Chapter 2: Some more examples
Example 2: Registering and controlling an L-var
In the UI, registering an L-var is the same as registering an A-Var. But behind the scenes, L-vars are using the WASM module (for more details, have a look at my previous post here).
The WASM module will take care of the registration, and if successful it will send back an acknowledge package that contains all the necessary information such as the offset where in the Client Data Area the variable is stored. In case you would launch the Cockpit Hardware HUB a second time and connect it with MSFS2020 (example from a different PC), and register for exactly the same variable, then the WASM module will send back the same information. This avoids that the same variables are being registered multiple times, which consumes Client Data Area space and which also makes the WASM module spend time to monitor the same variable multiple times, which is not effecient.
We know that the maximum Client Data Area size can only be 8192 bytes. The tool will automatically create additional Client Data Areas if it needs more space. A maximum of 10 Client Data Areas are supported, which means a total of 81920 bytes for the L-vars. There is currently no protection if you exceed that limit, except that you will get an Exception in the tool. I might improve this in the future.
Remark: At the time of writing of this post, I haven’t fully tested the multiple Client Data Area feature (I just forgot ![]() ). This means that exceeding 8192 bytes might not work yet. Once I have tested it, I will remove this remark.
). This means that exceeding 8192 bytes might not work yet. Once I have tested it, I will remove this remark.
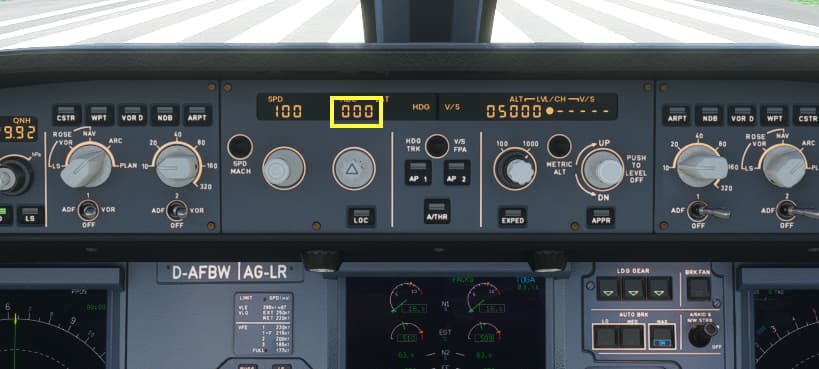
For this example, I want to register a variable that shows the HDG of the FlyByWire A32NX.
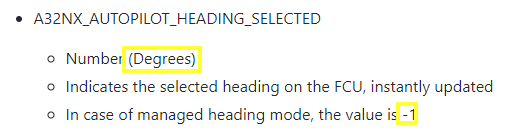
Let’s assume that we don’t have a clue what the name of the variable is. We can use several resource to find out. One obvious source is the FlyByWire website, which has a section that shows all the panels used in the cockpit. The HDG is on the FCU Panel that you can find here. There we see that the variable name we need is A32NX_AUTOPILOT_HEADING_SELECTED. This is an L-var, and it is Read Only.

If we want to know the unit, we can use a FlyByWire GitHub repository that contains more details about the variable. There we find out that the unit is “Degrees”, and in case the value is -1, we should show the managed mode which is “—”.
Before we register a variable, we can make use of the “execute_calculator_code” feature to check if the above is correct. Let’s tune the HDG to a certain value (example 100), and then check the value:

Looks like our variable is working. Now we can register for it. We can use an INT32, and the variable is Read Only.
After pressing “>MSFS”, the variable is registered, and we can now monitor it in real time.

Because it is a Read Only variable, we can’t change it with the command “001=[value]”. If you put the Log Level on “High”, you can see an error message if you try to send for example “001=250” to MSFS.
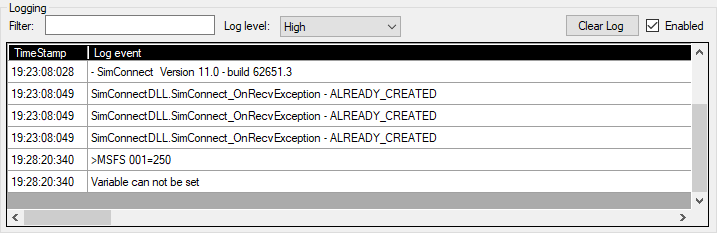
Remark: I might still tune the logging levels a bit. I think that errors like “Variable can not be set” should be visible if the Log Level is “Low”. So it might be that when you download the tool from GitHub, this has already been adapted.
Example 3: Registering and controlling a K-var without value
Let’s register a K-var this time. A K-var is an Event. In a lot of cases, an Event doesn’t need a value. That’s why we can register them as VOID which means we can also omit the Read and/or Write indications.
The knob to Increase or Decrease the HDG value on the FCU Panel can be controlled via a “Custom Event”. We see in the FlyByWire documentation that the event name is A32NX.FCU_HDG_INC and A32NX.FCU_HDG_DEC. The fact that the Event starts with the name of the addon followed by a dot makes it a Custom Event. Native Sim Events do not have a dot in the name (example: FUELSYSTEM_PUMP_TOGGLE).

We can also check Events with the “execute_calculator_code”. Although we don’t have a value, we can “set” the value of the K-var, which is done by adding the “>” in front of the variable.

We won’t receive any value, which means that the Float, Int and String values are all showing 0.
Now we know that the variables are working, we can register them.
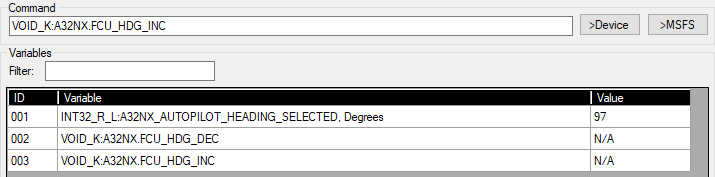
Because there is no value, the Variables screen will show “N/A”.
Now we can use the variables to Increase and Decrease the HDG value. We do that by using the command “002” and “003”. We can also use “002=” and “003=”, but strictly spoken we don’t need the “=” because there is no value to add.
Example 4: Registering and controlling a K-var with value
Some K-vars can take a value. The earlier mentioned K-var FUELSYSTEM_PUMP_TOGGLE is a native Sim-Event that takes the Fuel Pump number as parameter. We can also start with the FlyByWire documentation here to find more info.

Because this is an MSFS EVENT, the SimConnect SDK Documentation also contains some information.

An Event can only take a “DWORD” as parameter, which in our tool translates in an INT32. The tool is protecting against registering with wrong variable types, which means that for K-vars it will only accept VOID or INT32.
We can again use the “execute_calculator_code” to test the variable before we register it. As we could see in the documentation, the fuel pump value can be a value from 1 to 6. The below command toggles the first Fuel Pump. We can see the result in the OVHD panel, where Fuel Pump 1 is switched off.


We can now register the variable. Because this is an Event, which doesn’t return any values, we register it as Write Only, and we will see “N/A” as returned value.
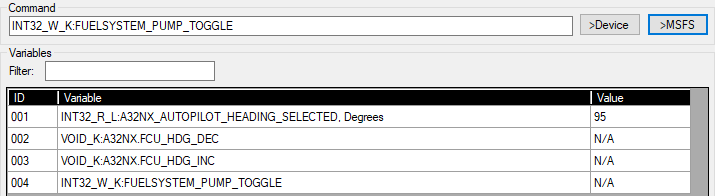
We can now toggle the 6 fuel pumps with the command “004=1”, “004=2”, …
Remark: Be careful not to switch off all Fuel Pumps if you have started the plane at the beginning of the runway with engines running. While I was testing, I did this as well. But once the last fuel pump is switched off, you cut off the power of the plane, with the effect that the cockpit goes dark. Took me a few minutes to realize that this was not a bug or a malfunction ![]()