Dynamic Bitrates with Link and Air Link – A Dynamic Duo!

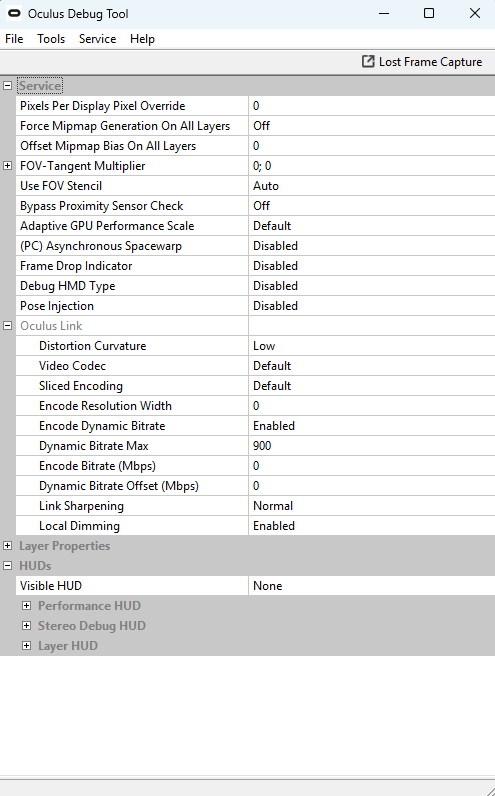
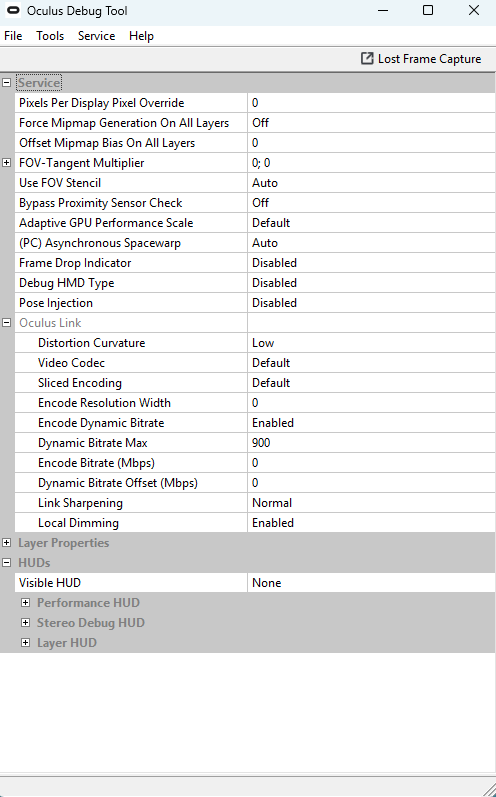
Since the latest (non-bricking) Meta V72 updates on my Quest Pro, Quest 3, and the Meta-Link PC app, I’ve seen some very nice improvements when using dynamic bitrate options with both Link and Air Link. What I’ve found is that if you enable Encode Dynamic Bitrate within the Oculus Debug Tool (ODT) this very nicely automatically sets a bitrate that adjusts itself for whatever your PC specs (probably within reason) and app you’re using. Since testing this out for the last few days I’ve never gotten better/smoother PCVR with msfs 2020. Once the dust settles on msfs 2024 I’ll reinstall it and give it a go as well.

You can input just about any Dynamic Bitrate Max value you like. This will then automatically adjust it up, as far as it can go, to this max value. Also, unlike encoding bitrate input, you don’t need to copy/paste values above 500mbps. You can enter any value you like. I have selected 900mbps to use because it’s about as high as my PC can handle using Link with my Meta official link cable and the normal encoding bitrate (non-dynamic).

Also, this automatically overrides whatever Air Link bitrate options you have selected from the meta-link home dashboard menu (far left icon). To be on the safe side I select 200mbps Dynamic beforehand. What I have noticed when looking at my win11 task manager network, using the 900mbps ODT dynamic setting increases the reported mbps by about 40mbps. This seems to result in a bit fewer artifacts, without any adverse effects with performance/latency.

You don’t need to specify which codec to use because Air Link will automatically use h.265 (hevc) and Link will use h.264. This is handy if you go back and forth from Link to Air Link. For PCVR I normally use my Quest Pro wired with Link on all my flight/racing sims and wireless with Air Link for everything else with my Quest 3.

The beauty of all this is that you can basically use the same ODT input for just about everything with both Link and Air Link. The only 2 inputs I ever need to change are Pixels per Display Pixel Override (= pixel density = super sampling, SS) and (PC) Asynchronous Spacewarp ( = asw mode). These 2 inputs can easily be edited before starting an app by entering and hitting return. No need to restart oculus services (although the first time you create one with the new dynamic bitrate settings you may want to do this).

In the case of SS you can change these values on the fly but you need to exit VR mode prior to doing this, then go back to VR mode for them to take. With msfs 2020 I normally use dlss/balance (using latest 3.8.10 nvngx_dlss.dll download from the Techpowerup website) and I’ve found that using 1.30 SS makes the cockpit clarity 99% as good as I can get with TAA. If you prefer to use TAA I’d probably just leave it at its default (= 0).

In the case of ASW mode you can also do these on the fly and this can even be easier! If your keyboard has a numeric keypad (most modern keyboards have this located on the right side of your main keyboard) then you don’t even need to edit the ODT value (leave it at whatever it already is, usually Auto) and you can then use keyboard commands to change between ASW modes any time you like, including while actually running the app in VR. You can do this as many times as you like so you can monitor which seems to work best for you. With Link and Air Link (sorry but this doesn’t work with Virtual Desktop or SteamLink btw) these are the keyboard commands;

Ctrl+num1 (numeric keyboard 1, not top row 1) = asw disabled
Ctrl+num2 = forced 45fps, asw disabled (actually ½ your refresh rate. So 80Hz = forced 40fps)
Ctrl+num3 = forced 45fps, asw enabled (again actually ½ your refresh rate)
Ctrl+num4 = asw auto (= default)

For me, with msfs 2020, I’ve found force 45fps with asw disabled (Ctrl+num2) works best and in my case (80Hz refresh rate) I get a very nice smooth 40fps. I mainly fly heli’s low down in cities like Tokyo, Osaka, and LA with lots of rooftop helipad hopping. I also like to select ‘few clouds’ and generally fly dusk/dawn. I use marketplace scenery upgrades, including enhanced night lighting and the cloud lighting effects and city lights all look fantastic on my Quest Pro with its local dimming enabled.

Of course you still need to use the appropriate meta-link pc app device settings. With my i913900k/rtx4090 I use 80Hz refresh rate with the res slider full right. If you have less than say a rtx4080 and/or want to use higher refresh rates, you may need to shift the res slider back a notch or two.

Anyway, I hope some may find this useful and best cheers for 2025. I’ll try to add a screen shot of the ODT panel. First time I’ve tried this so fingers crossed, lol!
3 Likes

Update; 7/02/2025

On this and other forums I’ve heard a few mention that h.265 (hevc) works very well with Link. So today I experimented a bit more with that. In the past I’ve found hevc with Link still has more artifacts than h.264, reduces distant object clarity, and sometimes it causes a few mystery horizontal lines in some apps.

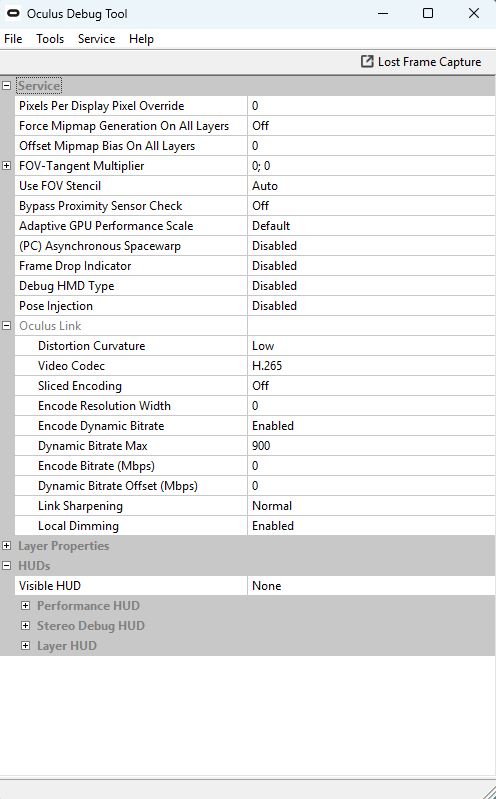
Today I found that the secret to using hevc with Link is to go to the ODT and change the Video Codec to h.265, plus turn Sliced Encoding = Off (probably best to restart oculus services after changing all this).

Sliced Encoding is Off by default with Air Link, but On with Link. This made a big difference and now h.265 (hevc) is working very well with everything.

Link with h.264 still has a bit fewer artifacts and slightly better distant object clarity, but h.265 has better colors/textures. Overall, I like h.265 with Link and I’ll probably stick with it for now.

Always something new to try eh, lol! Cheers.

3 Likes

This is exactly the type of information I was hoping to find today! I have been trying my hardest to get my Quest 3 to work smoothly on 2024, and while its working, its still been quite stuttery and and the colors seems very bright. Kinda a headache to play after a while. I am trying all these settings you just mentioned and I am hoping I’ll see some better results.

I’m running a amd 7800x3D paired with a 4070ti Super so while not as powerful as your, I would hope still strong enough to run well. Crossing my fingers.

Thank you for all this information! this is the stuff which gives me hope!

2 Likes

Oh, thanks so much for this. I got back into 2020 last night with my Q3 and was sure my performance and visuals were better than before but suspected it might be the placebo effect. Good to know a recent headset update might have something to do with it and I wasn’t imagining it. I appreciate your contributions to this topic. You are the ‘go to’ person re VR as far as I am concerned.

1 Like

Thanks mate, I hope these Dynamic Bitrates work well for you with Link or Air Link. Besides msfs 2020 I’ve also found that these work great with all my PCVR apps with both Link and Air Link. Without the need to use OpenXR Toolkit and as good as I can get with VD. With msfs 2020 I also select forced 45fps asw disabled (via ODT or by pressing ctrl+num2).

I’ve now found that using 1.40 pixel density (super sampling, top ODT item) makes dlss/balanced cockpit clarity as good as I can get with TAA. I’m still using the Oculus Tray Tool game profiles to set SS and asw modes, but it’s easy to edit ODT manually and use keyboard ctrl+num keys to do this.

This has been a big improvement, for me anyway. Cheers.

Thank you very much for your sharing your finding!

However, I don’t fully understand which apps this relates to.

As far as I understand this solution does not work with VD. I have seen many statements that VD will offer the best possible resolution for PCVR with the Quest 3. I don’t know if that is true.
Because if it means that what you found regarding settings for ODT will be “as good as using VD”, then that would lead to the question: then why not using VD directly?

So, do you think this approach is an improvement over using VD? If so, what are the advantages?

1 Like

This applies to all my PCVR apps/games/sims.

Nothing that I’ve mentioned earlier (ODT/ctrl+num) works with VD because it doesn’t have the official oculus/meta runtimes, just their version of it.

I’ve used VD for ~5yrs starting with a Q1 and it still works very well. I prefer Link/Air Link because these are fully compatible with all my apps, esp Viveport games. Also, a lot easier to go back and forth from wired to wireless. Up to you to decide what works best for you imho.

1 Like

Ok, hopefully last update on all this, lol!

After lots of experimenting with both my QPro and Q3 headsets I’ve come to conclude that overall I get better distance clarity using Link with its default h.264 codec. So I’ve revised my ODT base settings as follows (hopefully my cut/paste will work). For msfs 2020 I add 1.40 pixel density (really sharpens up cockpit instruments using dlss/balanced) and I’m using asw mode = 45fps forced, asw disabled (using 80Hz refresh rate this gives me a very smooth 40fps).

Again, by default, Air Link still uses h.265 and encoding slicing = off, Link uses h.264 with encoding slicing = on. This ODT works fine with both Air Link and Link. I’m also now finding that DX12 works a bit better now (HAGS still disabled).

I hope some find this useful. Cheers.

Have you experimented with the FOV tangent multiplier? I set mine to 0.83, 0.83 and I get an extra 15-20 percent better performance

1 Like

I have experimented with this in the past but I didn’t like the FOV reduction with black borders. Also, even going down to 0.70, 0.70 only got me a few percent performance improvement, maybe 3-5% with my i913900k/rtx4090 and QPro headset. Also, one of those settings that you need to re-enter all the time. So, bit of a pain.

Not sure how you’re getting 15-20%. Might depend a lot on your PC specs and other settings, who knows? If it does actually get you that much performance improvement then you probably should stick with it imho.

I have a 72 ipd so I can set it at those levels and not see black borders. I’m also using the quest pro with my eyes almost touching the lenses.
Basically my GPU is rendering 15-20 percent less pixels hence the equivalent fps boost

1 Like

I haven’t found that this to be a linear relationship. To test this out again I tried your 0.83:0.83 fov settings and tested this out in a busy city (Osaka), low and slow in a heli. I turned off ASW and found that I got 50 fps. Going back to 0:0 I got 47.5 fps. So, only a 5% performance improvement, for me anyway.

Since I target 40fps (forced 45fps asw disabled with 80Hz refresh rate) there isn’t any advantage, for me. Also with a QPro/rtx4090 and 69mm IPD with eyes as close as possible. I still find that full FOV (0:0) is much more pleasing to my eyes, esp. vertical because it lets me better see the full instrument panel.

Like everything VR, your results may vary, so just use whatever you find works best for you. This is a bit off topic so if you want to discuss this further I suggest you start a separate thread. Thanks, good luck mate, and cheers.