Flying the CRJ (or any other plane) in VR without touching the mouse (AAO, Behringer X-Touch Mini, Novation Launchpad Mini Mk II) ca. $150

fully agree

I know what you mean

But still I just had to laugh heartily. In music circles we always say that there shouldn’t be anyone who is forced to use anything from Behringer. :joy:
Old running gag, due to the earlier quality problems.

2 Likes

While Behringer X-Touch mini is already well known and discussed on this forum, as great autopitolot panel due to the 8 encoders, I would also like to bring your attention to the Novation Launchpad Mini which offers 64 square buttons (exactly the number on the CRJ FMS) plus 16 round buttons, 12 of which work very well as the FMS line select keys. No longer mouse needed to enter your flight plan or operate the FMS in flight. Easily available used for 40-50 bucks.
And it doesn’t come from Behringer :wink:
image

1 Like

Wasn’t aware of the Novation launchpad TBH but it seems a pretty decent solution. Obviously the “used” part doesn’t apply everywhere, as where I am I can only get a new one for about 95 euros or so. Still a bargain for what it offers.

Frankly I would have already ordered one already had I found an easy enough and adjustable solution to somehow label these keys (like it can be done with programmable USB keyboards such as ExpertKeys), because having 64 buttons without a straightforward way to know which does what is obviously a no-go.

Will search through different labeling proposals…

edit: Midiplus Midi Controller SmartPAD seems to be another option (although harder to find) and as a bonus it has knobs (no idea if they’re rotary or not) and separate buttons on either side which can be used as LSKs in MCDUs.

To be verified if these side keys actually send MIDI commands, or somehow only control the pad settings.
In Novation Launchpad the 16 round side keys actually send MIDI commands. I placed it on the extended drawer of my desk, to the right to my chair, more or less like in the actual plane. This way the top row of the round buttons, while placed horizontally, is actually facing me as kind on vertical column, still usable as left column of line select keys. The other row of round keys, truly vertical, acts as right column of line select keys.

To allow VR flying, I’m going to 3D print a set of 3mm-high frames dividing the button area into sections, like in CRJ unit - functions, digits, letters, LSKs, for tactile reference.

1 Like

Great idea. As an alternative you can even build your own controllers running on free MobiFlight software on an arduino, for just a few bucks of parts from Ali express. Only your fantsy and a number of available pins on Arduino Mega is the limit. Actually, the largest limit is what you can remember and find easily by touch.

I built my VR control box with 6 DIY dual encoders (3D printing + cheap single encoders) and 8 buttons and 3-position bank switch. This places all radio tuning, autopilot functions, and virtually all GNS530 functions at my fingertips, operating very close to real live. Most knobs have unique shapes and are easy to identify by touch.

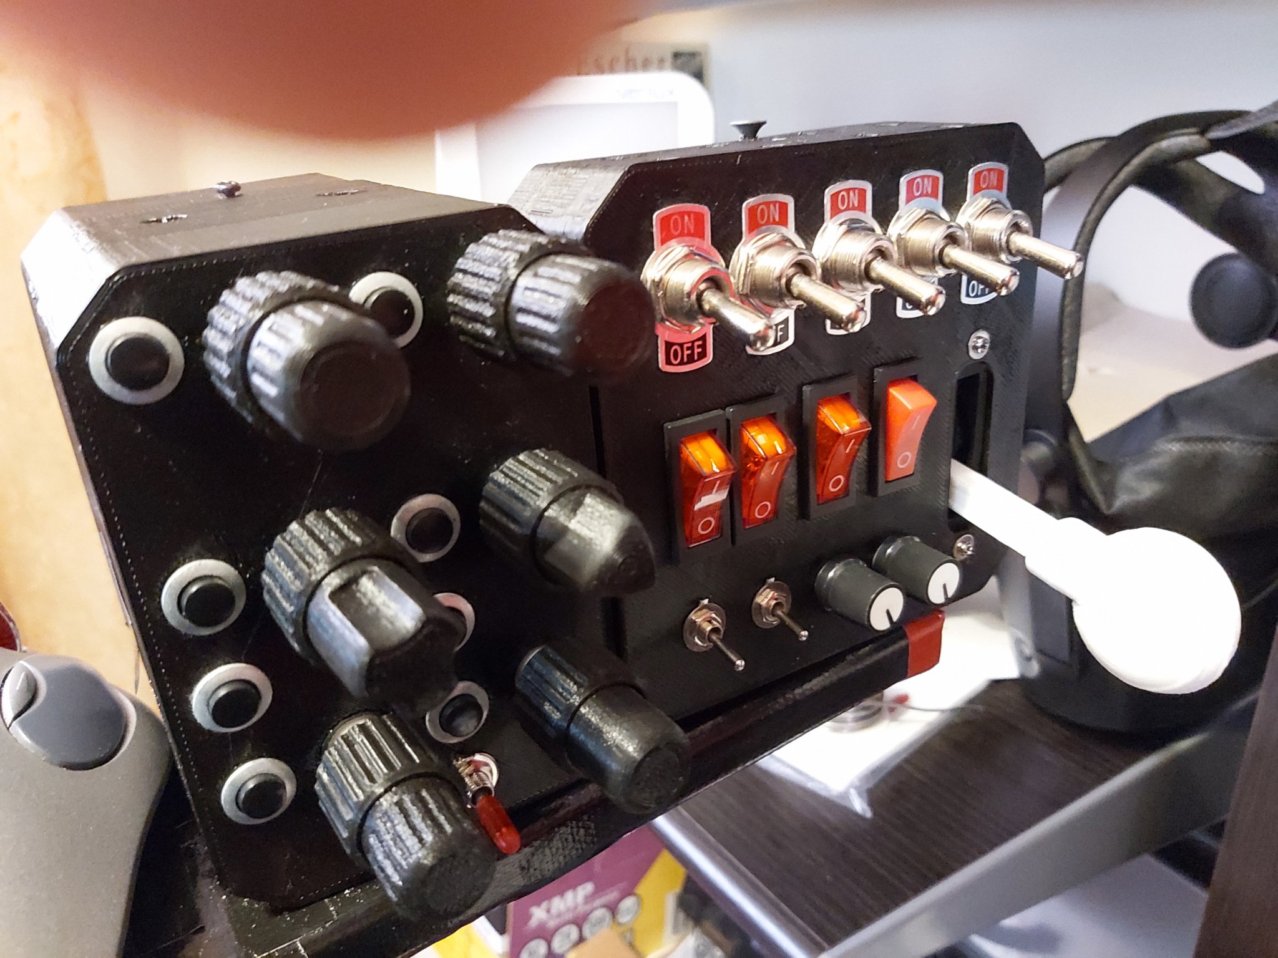
I then built an extension box just few days ago, with switches to control all lights, master battery etc., and a realistic gear lever (pull, slide, lock)

I will post my whole build soon (there’s much more: a whole home-built motion platform which I already My DIY 2DOF Motion Platform for MSFS - adding a whole new immersion level to VR, on a budget - VIDEO), custom-made 8-axis Boeing style throttle quadrant with analog reversers etc., custom pendular yoke and joystik rig built with hall sensors, and 5-axis left-hand HOTAS-style throttle that can transform to a helicopter collective control, with a panel of switches and pots.

Here’s the encoder box with an extention box. Dual encoders are way cooler than single encoders. And with Mobiflight you can mimic precisely how they are supposed to work and do quite complicated arrangements. For example, top let knob does COM1 radio frequency, kHz on the inner knob, Mhz on the outer knob (exacly like a real one), button next to the encoder is SWAP that uts the freq into use, and clicking the encoder center switches the state to control NAV1 radio in the same way, with SWAP button actin on that pair of frequencies. By flipping the bank switch I get to tune COM2/NAV2 radios in the same way. And that’s just one encoder!

Bottom left encoder: outer ring controls GPS zoom, iner ring control the transponder by using its click as a register change: locked/1st digit/2nd/3rd/4rth/lock. In short, I would run out of my memory trying to remember where everything is, then out of options with those boxes and panels… Total cost in parts and plastic is maybe around $70 at the most, for all described gizmos together…

I’m not keen to model FMC etc., because VR controller support is coming in SU7 and those would be much easier control with that in VR. But fine adjustments of AP/Radios and other encoders would probablyfeel better with real encoders still, and my goal is to keep hands free of VR controller on all critical parts of the flight.

I also have DIY panel based on Leo Bodnars 64-input card. However, the MIDI panels are easily available, cheap, and doesn’t require any DIY work.

Or you can just use VoiceAttack voice recognition software and order your copilot to twiddle the knobs.

Except somehow Cortana answered me on my last flight and didn’t know what lower flaps meant.

Hey guys,

Just jumping in here as I just ordered the Behringer device and I’m still considering something like the LaunchPad mini. Apart from the obvious issue with the orientation on that thing while not seeing anything, what about this device as an alternative?

It has buttons on both sides which would help with the orientation for the LSK, of course. Did anybody here have a look at this one, yet?

1 Like

Exactly what was discussed above:

Still searching for feedback on this. And in any case my main gripe is how to label those keys efficiently.

There is the manual at the vendor site, at first glance the left hand buttons handle the configuration of the rotary encoders, but maybe they are also sending MIDI commands.

Sure, I’m just mentiong the alternative. It takes time to build these, you you’d have to like doing that kind of thing. But it’s extremely cheap and you can build things that easier to use in a tactile way.

That’s actually a very good observation—I guess I’ll write a message to the manufacturer and ask if the vertical buttones on the left and the right do indeed send midi commands or not.

1 Like

I asked someone in YT who had reviewed Smartpad and he confirmed that the side buttons are only used to control the device itself, so unfortunately they don’t send MIDI commands. That’s a pity.

So back to Novation Launchpad Mini - while the round buttons are not placed left and right but top and right, they do send the MIDI commands. I keep my Launchpad on the open desk drawer, to the right to my chair, so the right-side column of round buttons works perfectly as the right line select keys. The top row of the round keys is not placed as conveniently, but still, from my perspective when sitting on the chair, they go from top (farthest) to bottom (closest to my sitting position) and can be used as the left column of line select keys.

So has anybody tried to label these Launchpad keys in an efficient way so that we can easily tell which button does what?

Ever since I found a way to set up a secondary PC keyboard as dedicated MCDU input, I’ve lost much of my interest in MIDI pads because I’ve solved my immediate problem (buying a Stream Deck XL to complement my 15-key version also helped). I’d rather buy a second Xtouch Mini and postpone Launchpad for a later date. But I’m still looking for ways to label these MIDI pads.

Labeling for non-VR use is relatively easy, one of the options are label printers for example Brother. The labels are very flexible and stick well to the Launchpad or X-Touch Mini buttons.
Labeling for VR is harder. I applied labels from Dymo embossing label maker however:

  • it is still not easy to recognize only by touch the embossed labels, so I applied the labels only to most important buttons, which act for me as touch reference points,
  • the labels are stiff and due to shape and material of the buttons of the Launchpad and X-Touch Mini, they not stick perfectly.

For the Launchpad I’m now considering 3D printing a set of frames to be put around the sections of buttons (digits, letters, function keys, line select keys) as a reference for touch. Such frames can be also created without 3D printing.

Despite these issues I find the physical panels much better in VR compared to mouse, which is immersion killer for me.
Let’s wait what kind of VR controller support SU7 will bring, it can be an alternative for hardware buttons, but the rotary encoders in the X-Touch will be probably still more realistic and convenient compared to usage of VR controllers.

1 Like

Good stuff. I’ve read about label printers. They don’t come cheap but can have a variety of uses so I’ll consider getting one when I eventually buy my Launchpad. As for the set of frames, please consider uploading your 3D design on Thingiverse if you ever get to create it.

The material of which the buttons on the X-touch Mini and Launchpad are made is not allowing good “stickiness” of the stiff labels from the embossing label makers. The buttons are also slighlty covex with is also not good for the labels “stickiness”.

After brief experience with the controller support introduced by SU7 I would say it is way inferior compared to X-plane, so I will rather stick with my H/W panels even for FMS which requires in VR “tactile blind” search with your fingers for the right button in 64 of them. This is still much more immersive compared to mouse, and the VR controller support seems unmature (I’m not optimistic about the date of a potential improvement of VR controller support).

Asobo released VR controller support, but it is rather dissapointing.
So I will rather pursue the way with physicial MIDI controllers.
To make locating the buttons in blind easier (when wearing the VR headset) on Novation Launchpad Mini Mk. II programmed as FMS CDU for the CRJ, I 3D printed the frame to be attached to the Launchpad to designate various sections of the CDU (commands, digits, letters).

The model (slightly updated vs. the version shown on the photo above) is available on TinkerCAD as:
Novation LaunchPad Mini CRJ FMS/CDU touch reference frame

1 Like