[GUIDE] Configure and fly via VOR

While today we are most likely to know how to use a GPS and fly simply “on the magenta line” being either on the airplane embedded system, or via external displays like your tablet or phone, VOR flying is still something I strongly encourage you to do.

You may discover more in details about VOR here:

or check out the explanation on Wikipedia.

Just as short explanation is a radio setup which allows airplanes to get a direction from or to the antennas set on the ground.

Why would it be still important today? Well some older aircraft do not have a GPS, and your tablet or phone may have issues while in flight (as well as the embedded GPS system). Therefore knowing how you could find where you are and how you can reach a given position may save you one day.

At first it may seems over complicated but if you follow it step by step you will see it’s actually not such a huge issue.

The first step is to discover which VOR are around you, and what are their frequency. I will for this purpose use Skyvector but you may use whatever other tool / map system you and. Any good fly map will contain the VOR and their frequency (even paper maps).

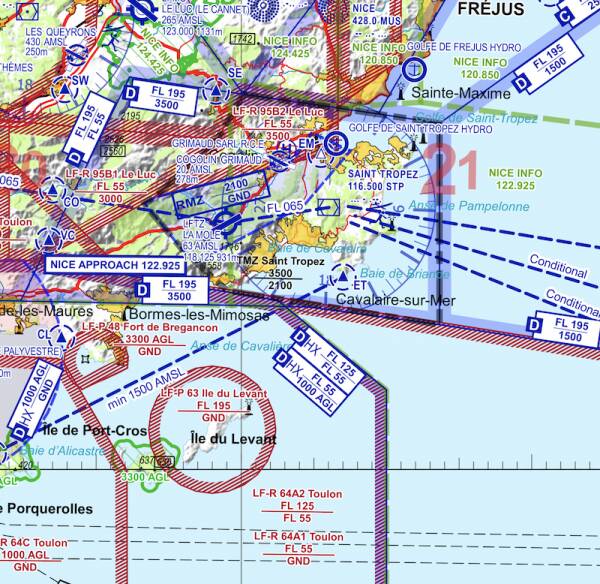
A VOR on a map look likes that:
image
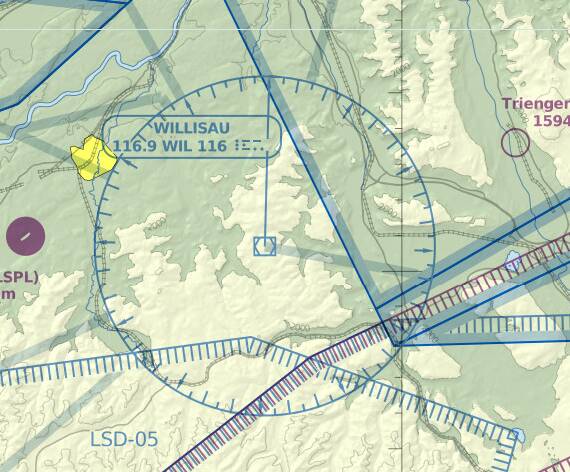
You see the name of the VOR (WILLISAU in this case), the frequency (116.9) and its MORSE code. (those dots and lines).

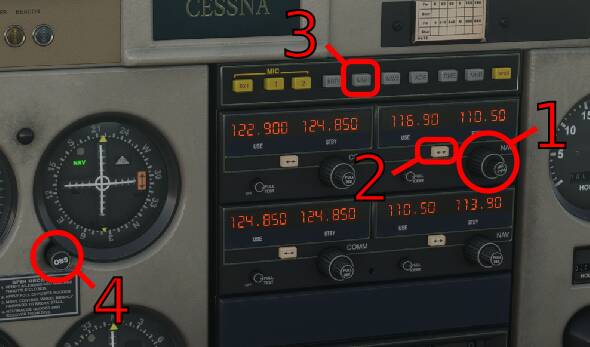
Now that we know our VOR information remains to set it up inside the plane system. I used first a glass cockpit on a GA plane, but the steps are basically the same on any airplane:

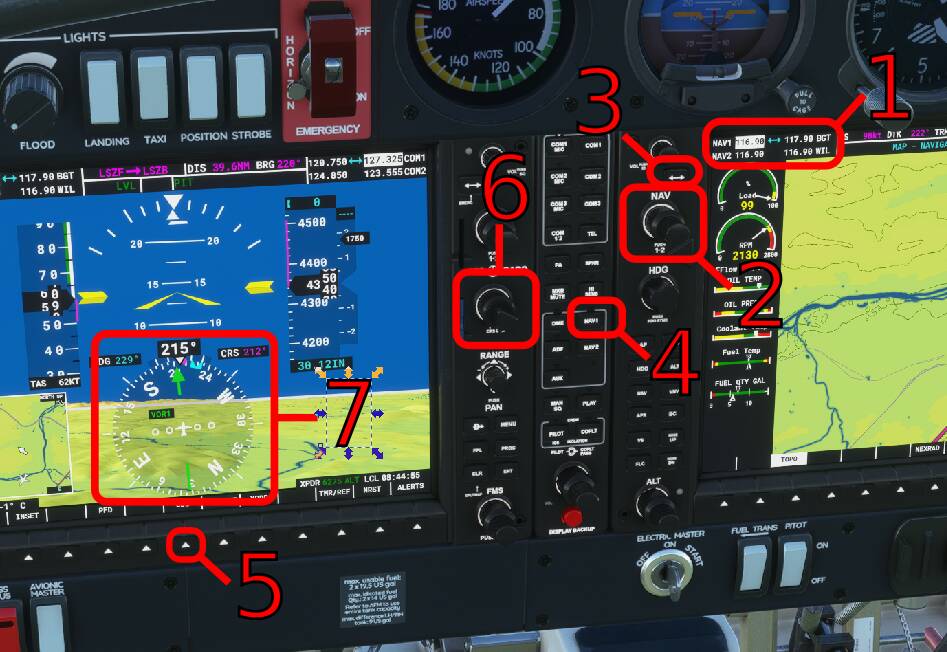
  1. You see here the frequency (on the right side) and the standby freqency of the 2 VOR NAV systems
  2. With this knob you may change the frequency (by turning the inner and the outer knob) as well as switch between NAV 1 and NAV 2.
  3. The frequency will not be active till you press that button! At that point your entered frequency goes on the right side and becomes active.
  4. If you are on the air and your airplane do get the radio signal (based on the distance and other factors), you can switch this button to hear the MORSE code on the radio. That will ensure that the correct VOR frequency is set, and you do get the signal.
  5. You may now switch the navigation mode to VOR1 by pushing the CDI button as many times as needed. The indicator (7) will be of a green color.
  6. You can now set your direction toward or from the VOR by rotating the inner knob CRS and by clicking it you set the direction directly toward it (homing).
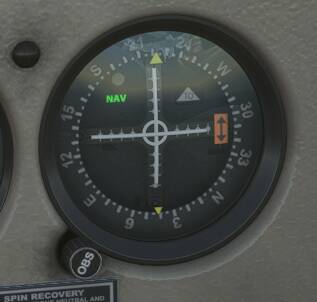
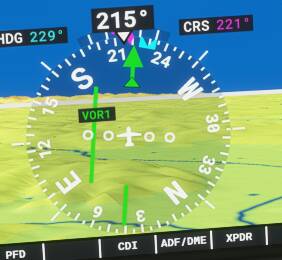
  7. You will see the indicated course toward or from the VOR there. The indicator is in 2 parts, the external parts tells which heading you should have, and the inner part shows you the deviation your airplane has:
    image
    In this case, to reach the VOR with an heading of 221 (CRS 221°) we would are right of the course. The dots represents a 5° deviation, so you know you are around 8° right of that course. To intercept the course you should then multiply by 10 the number of dots you passed (rounded up), so I would then in this case take a correction of 20° left to get my course back.

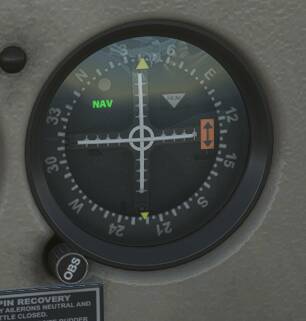
VOR can be used as said before in both direction: going forward or going from them. However the indicator will change a bit:
image
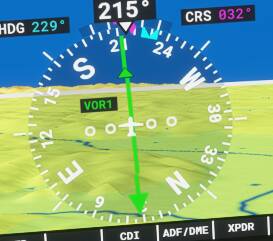
In this case I set the CRS as “From” and as you can see the small triangle points toward the VOR and the big one is the heading I should take.

In real life I strongly advice you to listen to the MORSE code to see if you are correctly setup to the right VOR otherwise your navigation is guaranteed to fail. It happened once to me while I was flying in German in an area which was completely new to me, I set the VOR to a wrong frequency and I was wondering why I was not able to get the VOR navigation to point me to something useful. Lucky me I was with someone else which helped me at that time.

As an exercise you may start from LSPN, set WIL (116.9) as NAV 1 and FRI (110.85) as NAV 2, you will cross Bern airspace (ideally you should fly above 6000 ft at that point) with an header toward FRI 228. I let you do the rest :wink:

Enjoy VOR flights !

27 Likes

For those which like (as I do) to fly with the analog / old instruments:
image

  1. You select the standby frequency
  2. Swap the standby to the active frequency to the active one
  3. Listen the MORSE code of the VOR (to ensure you have the correct frequency selected)
  4. Select your course with the OBS knob

You can see a “TO” course here:
image

And here is the “FROM” course:
image

As you see the To / From is displayed with the triangle on the right side of the instrument.
The course is displayed by the heading on the top which is pointed by the small yellow triangle. If you are not on the course the needle will shift left or right from the center. Again each dot or lines is a 5° difference.

BUGS:
I had issue with the simulator, I was able to switch in the listening of the MORSE code, but was unable to switch it out. Also there should be a volume knob which should allow to make the MORSE code more stronger or weaker, and while you can dial it, it actually doesn’t do any action.

20 Likes

If you don’t want to brush up your Morse-skills and are flying the G1000: just right of the active NAV1/2 frequencies, the G1000 shows the decoded VOR identifier (BGT and WIL in the screenshots).

2 Likes

@Niobos great info, and actually I never played with the G1000 to check what it can or cannot do. Personally I’m not a fan of glass cockpits in real life (old school pilot I’m :wink: )

For the morse code, I don’t expect people to know it, but in my knowledge and experience all the pilots maps do have the morse code displayed on it:
Swiss ICAO map - Fribourg VOR
If you open this link which is actually the real ICAO pilot map used in Switzerland (and free to all in digital form) you will see “FRIBOURG 110.85 FRI …-. / .-. / …” in the middle of the map. The dots and dash are the actual morse code you will hear on the 110.85 frequency which is also the frequency of the VOR.

By checking other countries, like France:


You see Saint Tropez which actually shows also the VOR with the morse code.

1 Like

My brain hurts :thinking::joy:

once you get your head around it the pain goes away and it’s a lot of fun :slight_smile:

2 Likes

TL:DR

  1. VOR is like plonking the axle of a bicycle wheel over the airport or whatever.
  2. Signals are sent out along the spokes and your aircraft can tell what spoke it is on (if near enough)
  3. NAV1 is used to tune to the VOR to pick the right VOR which it tells you via Morse code (!), not the spoke. All the spokes on one VOR have the same radio frequency.
  4. When you turn the VOR indicator’s knob (start with steam 172 or 152 its better visually) you are picking which spoke you want to use, and whether you want to fly towards the middle of the wheel or away from it.
  5. The indicator shows which way to turn the aircraft to get on the spoke.

The electronic versions do the same thing just they will fly it for you.

ADF/NDB is the same sort of idea except it only tells you the way to the beacon.
DME tells you how far away the thing is, useful for DR.

Shoreham in England (EGKA) is a good place to practice. It has four beacons MID MAY GWC and SFD in different directions, all about 10-15 miles away or so. Take up a C152 and just practice tuning into them and flying to them. Shoreham also has a NDB.

2 Likes

This is how my ground school was taught, back in 20-06 (twenty-ot-six is how I refer to back then)… Learned in those old non-gps 152s and I still prefer to fly this way in msfs, must be why the DC6 has been such a joy to fly!

A lot of rental aircraft for VFR or sport are not GPS equipped. Garmin has a pretty handy portable one that plugs into the iPad and makes it accessible to every aircraft. But nevertheless, VOR was the standard for PPL up until probably 10 years ago or so. It’s crazy to me that it seems so foreign now. It’s so basic. Tune radio, turn nob until the needle is centered, fly direct. Or turn it to your desired radial, boom. Even in vfr I’ll tune it for an ils approach if available, it’s the same concept with the addition of vertical guidance.

Old man rant over.

Great tutorial here. Sectionals make the VOR concept easier to understand, especially when flight planning. Skyvector is a good tool as well.

2 Likes