This guide is from the FSDeveloper Wiki:
Feel free to suggest changes and additions!
1. Overview
Creating a mission involves using different tools and skills. While it may be challenging to get your first mission up and running, once you understand the basic rules and files that make up a mission, the possibilities are endless. Essentially, a mission is a scripted set of events that tells a story, ranging from exciting scenarios like mountain rescues or engine problems to simpler flights with interesting points along the way.
To turn your mission idea into a playable experience, you need to plan the mission flow and then code it. Start by outlining the flow on paper, showing how the mission progresses from start to finish. Next, select and use triggers and actions to create the mission’s logic. Triggers check for conditions or events, while actions allow you to modify and control various aspects of the mission. You can also use objectives to give the player a clear sense of direction and purpose. Once you’ve scripted your mission, you can fine-tune and test it using the script editor, console for error checking, and tools for finding and fixing problems.
With patience and creativity, you can create rewarding and enjoyable missions that captivate players and keep them coming back for more!
2. Come up with a scenario and story
You need to decide what kind of mission you want to create, for example, a tutorial, an emergency scenario, or a treasure hunt.
You also need to think of how the mission will progress from start to finish.
- How will you introduce the player to the mission and explain their role and objective?
- What will you reveal to the player and what will they have to discover on their own?
- What are the possible ways that the player can complete the mission? Are there branching paths or different outcomes?
- How will you end the mission and give feedback or rewards to the player?
It can help to have a written structure that outlines your mission in detail. You can follow the same three-stage layout as a screenplay. This gives you a clear and coherent way of telling your story.
- The first section is your introduction, where you need to capture the player’s interest and set up the context and premise of the mission.
- The second section is where you trigger an event that challenges the player and makes them react (for example, an engine failure, a storm, or an enemy attack).
- The third section is where you conclude the mission and let the player reflect on their performance and enjoy their success (or failure).
- You can also add some twists or surprises along the way.
Give your players the freedom to choose their own path
You can also provide different threads or options for each section, depending on the player’s choices or actions. This will make your mission more dynamic and replayable, as the player can try different approaches or strategies. You can make your mission react to the player’s choices by changing the dialogue, the environment, or the difficulty. You can also use choke-points to connect your sections and keep your mission consistent. Choke-points are specific locations or conditions that mark the end of one section and the start of another. For example, in your introduction, the choke-point could be reaching the head of the valley. No matter which path the player took, they have to reach that point to trigger the next section. Choke-points help you keep track of your mission progression and avoid inconsistencies or errors. They also help you create different combinations of sections and options. For example, if you have three sections, each with three options, you can have nine different ways of flying a single mission.
3. Turn your story into a mission
Now for the most fun part you will make your idea into a real mission that you can play.
First, you need to plan the flow of the mission. This means how the mission goes from start to finish. You can use paper and a pencil to draw the flow. This will help you see the logic of the mission without worrying about coding.
For example, let’s say your mission has these steps:
- You take off from the airport.
- You hear some speech after 30 seconds.
- You have three ways to get to point B, where the next part of the mission starts.
You can draw three boxes on the paper and write the steps inside them: ‘Takeoff’, ‘Speech’, and ‘At point B’. The speech should happen 30 seconds after takeoff, so note that down next to the Speech box. Then you can draw three lines from the “Speech” box to the “At point B” box. These are the three paths the player can follow. On each line, you can write what you need to do: disable the other two paths and enable the next part of the mission.
Now that you have a good map of your mission flow, it will be easier to code it later.
Actions and triggers
Next, you need to choose the elements you will use to turn your mission map into code. The main elements of a mission are Actions and Triggers. These elements let you check things and do things in your mission. For example, you can check if the player is flying high or low, or if they are in a certain area. You can also do things like play speech, activate or deactivate objects, or change the difficulty.
To keep the example going, you might have a Property Trigger checking “Altitude AGL > 10” to test for takeoff. That would start a 30-second Timer Trigger using an Object Activation Action which, in turn, would call a Dialog Action for your “Speech” box. You would need one Trigger per potential path; they might be set to detect altitude, or heading, or more likely that the player has entered an area. Each of those would need another Dialog Action (just to keep the player informed), an Object Activation Action to enable the Trigger that checks “At Point B” and another Object Activation Action to disable the other two paths.
4. Create a mission project
You can use the SimpleMission sample project. Download it and complete step 1 and 2 of the guide.
5. Decide on flight conditions
Next, you will have to configure the flight conditions. To start, you can create a flight plan in the worldmap or with Little Navmap. This flight plan will be shown to the player when the mission starts, so it shouldn’t spoil the unexpected parts of the flight (e.g., an emergency).
Then you decide on the starting point of the mission (e.g., at the beginning of the flight or in the air somewhere along the route).
5.1 Create the flight file
For the detailed process, see this page.
- Load your flightplan and pick your starting location in the worldmap.
- Select your aircraft, livery, fuel, payload, and atc options.
- Choose your time, weather preset, and the multiplayer and traffic settings.
- Load your flight.
- Set up your aircraft as you want it (lights, switches, autopilot, etc.).
- You can customize the weather and save it as a preset.
- Position your plane exactly where you want it, with the correct speed and trim settings.
- Pause the game and save the flight as a
.FLTand as a.PLN. - Move your flight file and flightplan to the mission folder in PackageSources.
You will need to manually edit the .FLT to choose the assistance preset, mission category, traffic, briefing and loading screen. You can use the .FLT in the SimpleMission project as a reference.
Add pictures
Add pictures for your mission thumbnail, and the loading, briefing, and ending screens. The names for the loading an briefing pictures are defined in the .FLT file. The thumbnail will need to be named: Activity_Widget.jpg and the endscreen picture will need to be named: rewardscreen.jpg. You can use the pictures in the SimpleMission project as a reference.
5.2 Define custom weather
- Change the weather with the weather panel during flight.
- Save it as a new preset.
- Find the .WPR file in
\AppData\Roaming\Microsoft Flight Simulator\Weather\Presets\. - Move it mission folder (next to the .flt) and rename it to
Weather.WPR. - Tweak the preset by editing the .WPR file in Notepad++. See the documentation.
6. Set up a mission script
Continue with the SimpleMission sample project and complete step 3 of the guide.
7. Code your mission
You need to turn your mission diagram into a mission script with the script editor. For everything that happens in your mission, you need to choose and add the correct triggers and link them to actions.
7.1 Script Building Blocks
There are different types of nodes that you can use to make your mission.
Triggers and actions are fundamental components of a mission, working together to create an engaging experience. Triggers act as checkpoints, monitoring events or conditions, while actions determine what happens when those conditions are met. Triggers check for specific events or conditions, activating actions that perform tasks like activating objects, adjusting timers, displaying messages, playing sounds, and modifying goals. By combining triggers and actions, mission creators can script the flow and behavior of the mission, crafting interactive experiences for players.
Mission objects define a range of things like mission type, goals, world traffic, and a custom camera.
You can use calculators for more advanced logic in your mission. It can take in multiple variables and trigger different actions based on a logic. You can also use this to calculate a mission score and probably many more applications which you can explore.
Look here for a complete overview of objects.
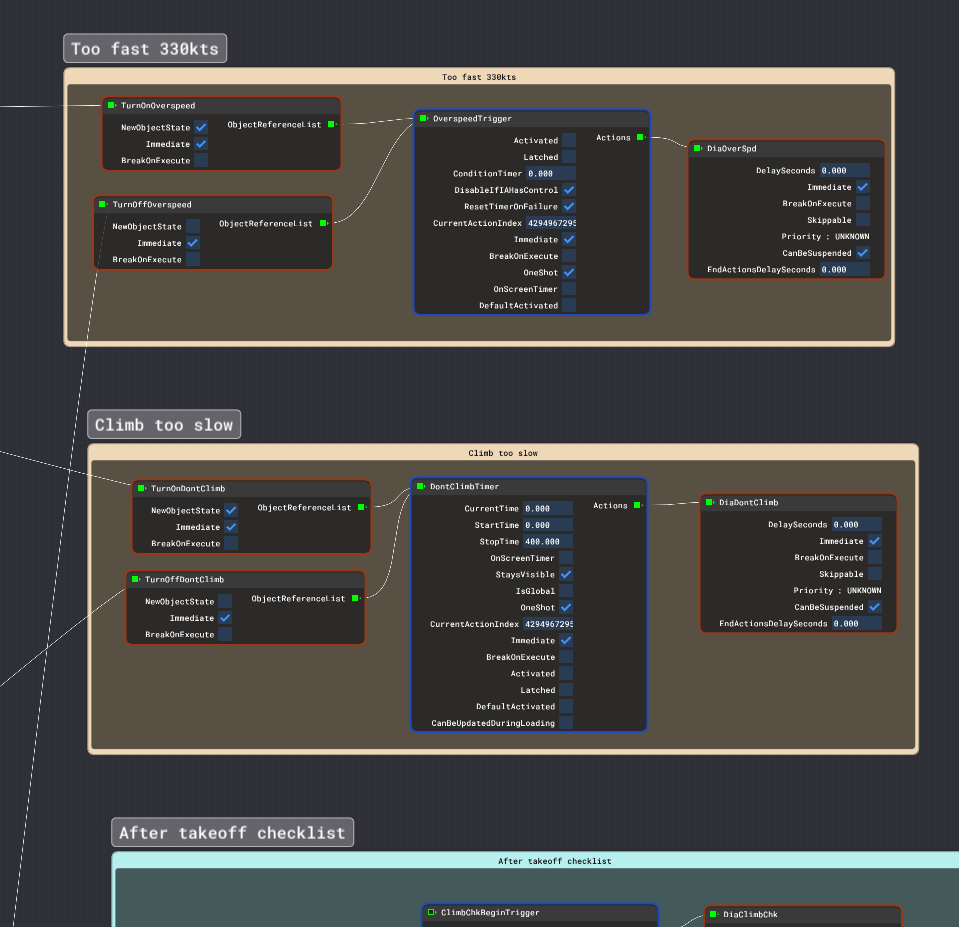
7.2 Script editor
To turn your mission map into a mission script, we will use the script editor. It allows you to create the mission with a visual representation of the script. All building blocks of the mission – such as triggers and actions – are represented by nodes (also called mission objects). Each node contains some settings specific to the building block and can be connected to other nodes. Nodes have ingoing and outgoing connections. Connections on the right size are references to other nodes and connections on the left size means the node is referenced by other nodes.

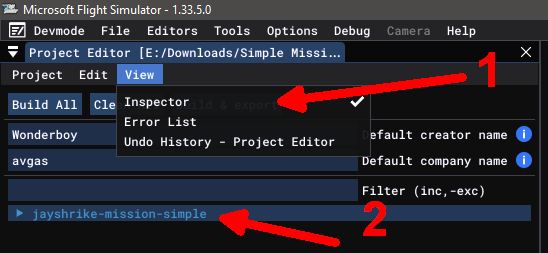
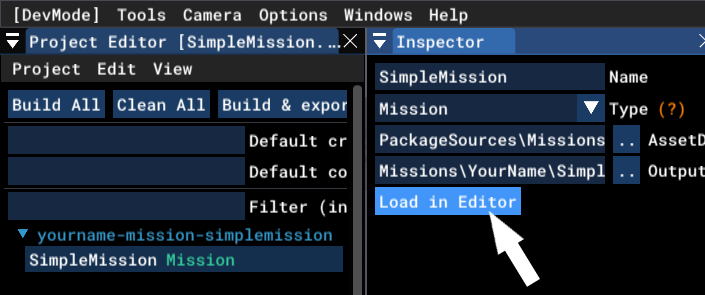
7.3 Loading a script
To start using the script editor, open the mission project, select your mission asset group, and click load in editor:
7.4 Adding objectives to your mission
Once you have loaded a script in the script editor, you can start adding objectives to your mission. Objectives are the goals that the player needs to achieve or avoid to complete the mission. They also provide feedback and guidance to the player during the mission.
Each objective has a state that shows how the player is doing:
- Completed: The player completed the objective.
- Failed: The player failed the objective.
- Aborted: The player aborted the objective.
If any mandatory objective is Failed or Aborted, the mission ends with a popup and a short message. If all mandatory objectives are Completed, the mission ends with a debriefing and a reward screen.
By default, all objectives are mandatory. If you don’t want this, set the objective to be Optional. The player can skip or fail optional objectives without ending the mission. But they still show up in the objectives panel, so the player can try them if they want.
To use objectives, you need to link each to a Goal or SubGoal node. The goal node determines the state of the objective it is linked to. You also set the initial state in the goal node. To change the state during the mission, you need to use a (Sub)GoalResolutionAction.
Steps
You can also add steps to your objectives. Steps are smaller tasks that help the player complete the objective. They show up in the objectives panel too:

7.5 Comments
As you create your mission script, you may want to add some comments in the script editor. Comments are nodes that you can add in the script editor to explain what each node or connection does. They can help you organize your script and make it easier to understand and edit later. Comments are not part of the mission script and do not affect how it works. They are only visible in the script editor.
7.6 Placing objects in the world
You can precisely place objects in the world using the script editor and the gizmo. First, compile and start your mission. When the world is loaded, you can add different kinds of objects:
- Areas, for use in proximity triggers.
- Static scenery objects with library objects.
- Simobjects, using containers or flocks.
- Markers and POI’s.
- Race points.
- A custom camera.
- A landing zone for landing challenges.
- A path for a calculator.
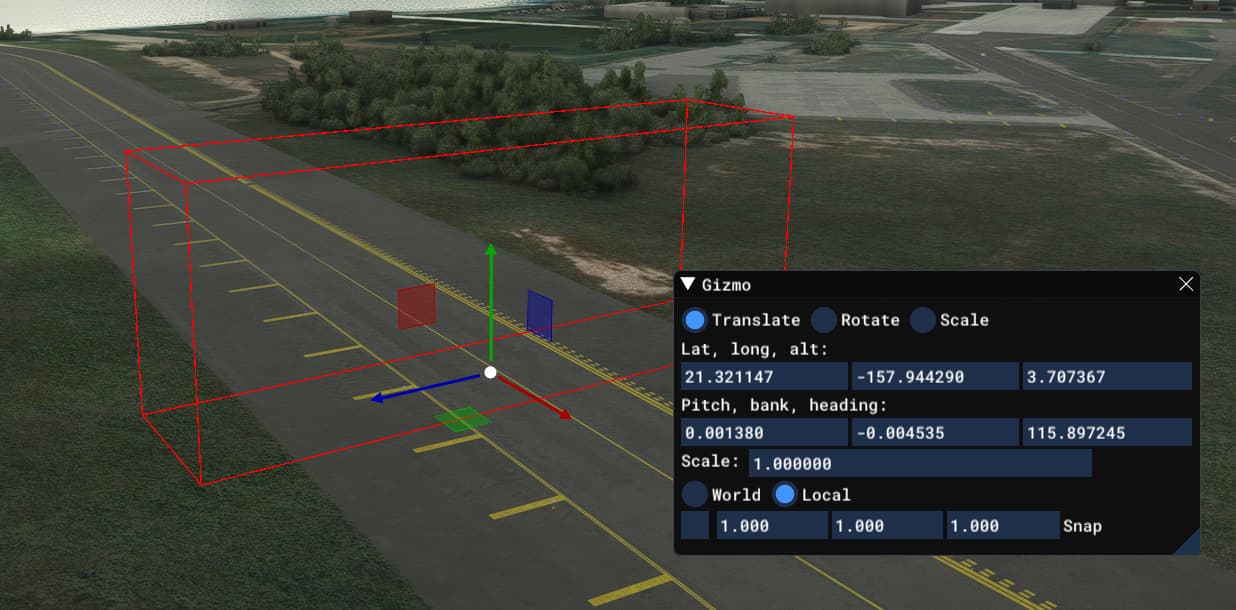
If the object has a world position, it will spawn in the middle of your view.
To change the location, you can move the object with the Gizmo. For gizmo options, in the script editor click View > Gizmo.
With the Developer Camera enabled you can double click on the objects in the script editor and the camera will go to their location.
8. Test, optimize, and debug your mission
In this section, you will learn how to test, optimize, and debug your mission. You will use the script editor and other tools to check for errors and fix problems in your mission script.
8.1 Testing the mission
The first step to test your mission script is to compile the mission. Compiling the mission means turning your script into a file that can be loaded and played by MSFS. When you build your project, the mission will get compiled and turned into an .SPB file.
Console
The console is where you can see the results of compiling the mission. It shows you any errors or warnings in your script. You need to fix any errors before you can play your mission. Warnings are not critical, but they may indicate potential problems or improvements in your script.
Start the mission
When your script has successfully compiled, you can start the mission. To do that, go to custom activities and select your mission.
8.2 Loading and updating your mission elements
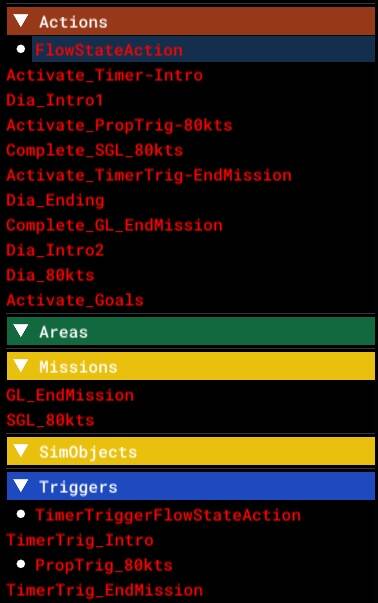
With the script editor open you can see if the elements are loaded in the mission. To add elements, click the plus in the overview window and select the element you want to add.
If the names are white, they are loaded, but if they are red, it means they are not loaded. While working on your mission, you can update the elements by clicking Script Editor > Game > Update.
8.3 World objects debug
When the mission is loaded in, make sure Debug > World Objects is enabled. Now you will see your areas and waypoints overlayed in the world.
8.4 Debugging calculators
You can debug calculators by enabling DisplayAllowed and using <code>Options > Flight Object Debug. Now you can see the parameters and actions of your calculator in real time.
8.5 Managing triggers
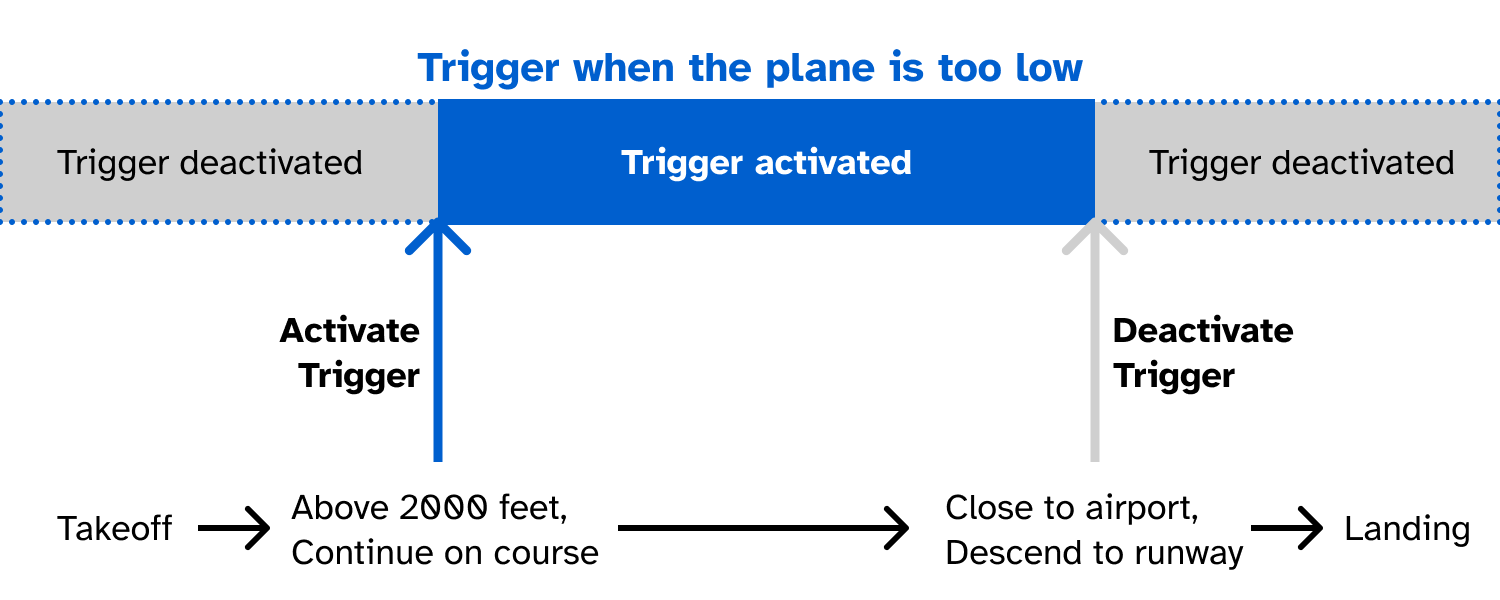
You will use many triggers in your mission, but you need to control when they are active. Otherwise, they may fire at the wrong time and cause problems or confusion.
For example, imagine you have a trigger that tells the player off if they fly too low during cruise. You don’t want this trigger to fire when the player is landing, because they have to go down to the runway. That would be confusing and annoying.
To avoid this, you need to activate and deactivate triggers at the right moments. Most triggers should start inactive and become active with an ObjectActivationAction when the previous trigger in the mission’s flow has fired. You should also use an ObjectActivationAction to deactivate them when they are not needed anymore.
Triggers have a property called OneShot. If you enable this property, the trigger will deactivate itself after it has fired. This can save you some time and nodes, but be careful not to use it for triggers that you want to fire more than once.
8.6 Unconnected nodes
You can use the script editor to look for breaks in your mission logic. All nodes that aren’t referenced by another node are marked with a white dot.
If nodes are ‘isolated’ like this, they may not function as expected.
- Actions that are never referenced won’t execute.
- Triggers that aren’t referenced by a ObjectActivationAction aren’t properly managed.
- For some nodes, such as the main mission object, this isn’t an issue.

9. Exporting the mission
To compile the mission for export, click Clean All, then Build All. Make sure there are no errors in the console from the building process. Then click Build & Export, ensure the mission package is checkmarked, choose Community Publishing, and select the Export Directory.
10. Conclusion
I hope you enjoyed this tutorial and found it useful. Creating a mission is a complex and creative task that requires a lot of skills and patience. But it is also very rewarding and fun. You can make any kind of mission you want, from tutorials to emergencies to adventures. You can give your players the freedom to choose their own path and make your mission dynamic and replayable.
Other reading
FSDeveloper Wiki - MSFS Mission Script
FSX Mission Building Tips by Paul Lange:
[PDF] Part 1 (On the process of mission creation)
[PDF] Part 2 (On the SDK, a bit outdated)