Help editing livery subtitles in My Hangar

I am trying to fix a few 3rd party developed livery addons, as far as how they appear in the livery listing under My Hangar in MSFS. Some have the UI-Variation listed under the pictures, but there are the occasional few that do not. Those are the ones I wish to edit, so they will be listed properly. Please see included screenshot. If someone can tell me what file and tools (if needed) to edit so I can get the text under the pic to show in the Livery selection of My Hangar, that would be greatly appreciated. Thank You for any help you can give.

Files that I have already edited in my attempt to try and resolve this issue.
Aircraft.cfg, Manifest.json, Layout.json, and every .json file in the associated liveries texture folder.

AFAIK itā€™s a combination. Aircraft.cfg for the text itself and then manifst.json needs to be updated with the proper file size of aircraft.cfg. Thereā€™s a tool for that.

Unfortunately, after updating to WU XIII this morning, my sim once again decided to delete itself, so Iā€™m not able to definitely confirm. However, the titles in my aircraft.cfg files when I do liveries are applied to the UI.

Do you happen to know the name of the tool used for updating the manifest.json file with the proper file size of the aircraft.cfg file?

Also do you know the exact line that needs to be edited in the aircraft.cfg file?

This is the line in the one I had in the screen capture
[ ui_variation=ā€œN88EGā€ ]

if thatā€™s the correct one then I just need to use the tool to update the manifest.json file.

Thanks for the help, by the way!

I stand corrected. It is not manifest but layout.json and the tool in question is Layout Generator which can be found on GitHub. For how it works, read the manual on GitHub.

Regarding the line in aircraft.cfg: You should be right with ui_variation. Make sure, though, that title (usually the very first item below [FLTSIM.x]) is set to an individual value as well. Otherwise it can mess with UI or the userā€˜s logbook. And I think itā€™s also used for model matching when flying online.

In case you need a working example, head over to flightsim.to and have a look at the various liveries there. For example, I did the D-AQUI livery for the Ju 52 operated by DLBS. Maybe one of these files gives you a clue. :slight_smile:

Iā€˜m happy to help :hugs:

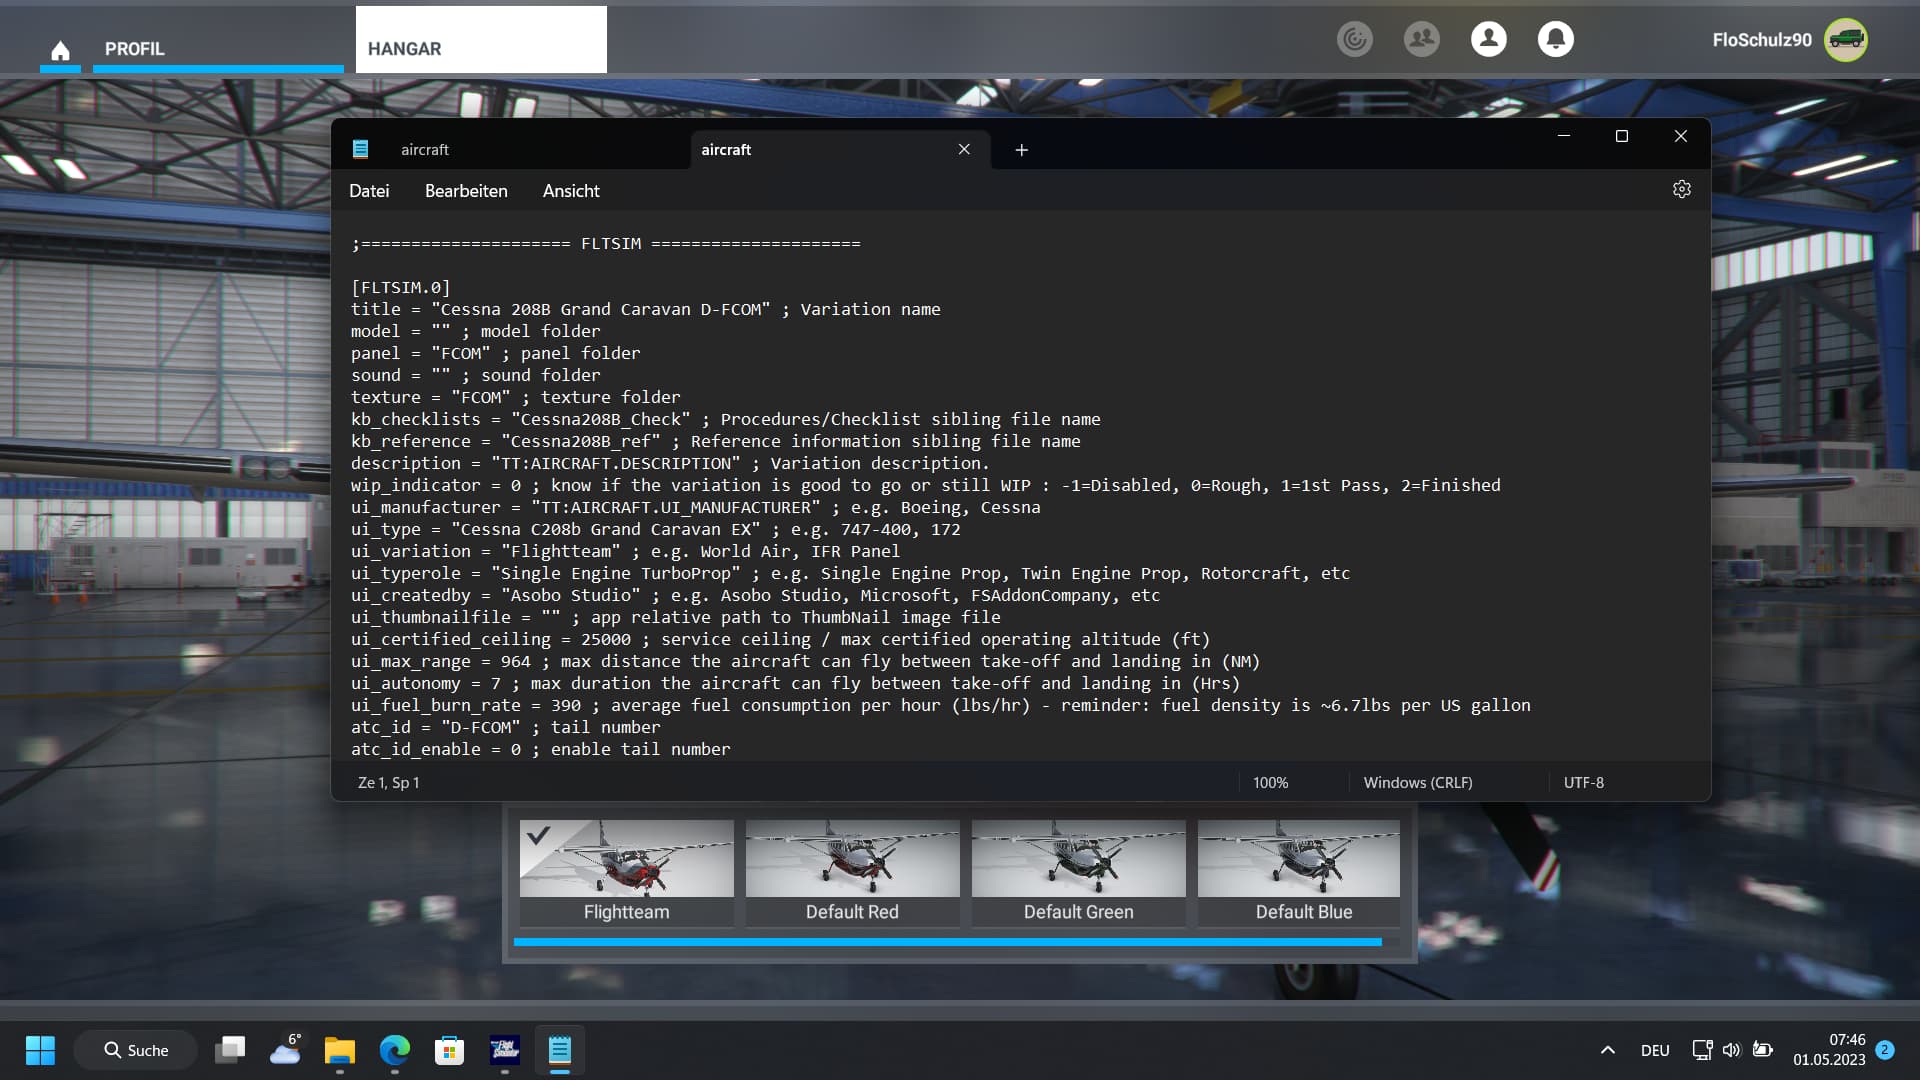
Here is the contents of the aircraft.cfg file for the one Iā€™m using as an example:

[FLTSIM.0]
Title="Bell 407 - N88EG"
Model=""
Panel=""
Sound=""
Texture="N88EG"
KB_Checklists=""
KB_Reference=""
description="TT:AIRCRAFT.UI.DESCRIPTION"
ui_manufacturer="Bell"
ui_type="Model 407"
ui_variation="N88EG"
ui_typerole="Rotorcraft"
ui_createdby="Kyle Matthews"
ui_thumbnailfile=""
ui_certified_ceiling=20000
ui_max_range=300
ui_autonomy=2.6
ui_fuel_burn_rate=42
atc_id="N88EG"
icao_airline=""
atc_id_enable=1
atc_airline=""
atc_flight_number=""
atc_heavy=0
atc_id_color="0x00000000"
atc_id_font=""
isAirTraffic=0
isUserSelectable=1
isFlyable=1
canBeUsedByAITraffic=0
Effects=""
atc_parking_types="RAMP"
atc_parking_codes=""

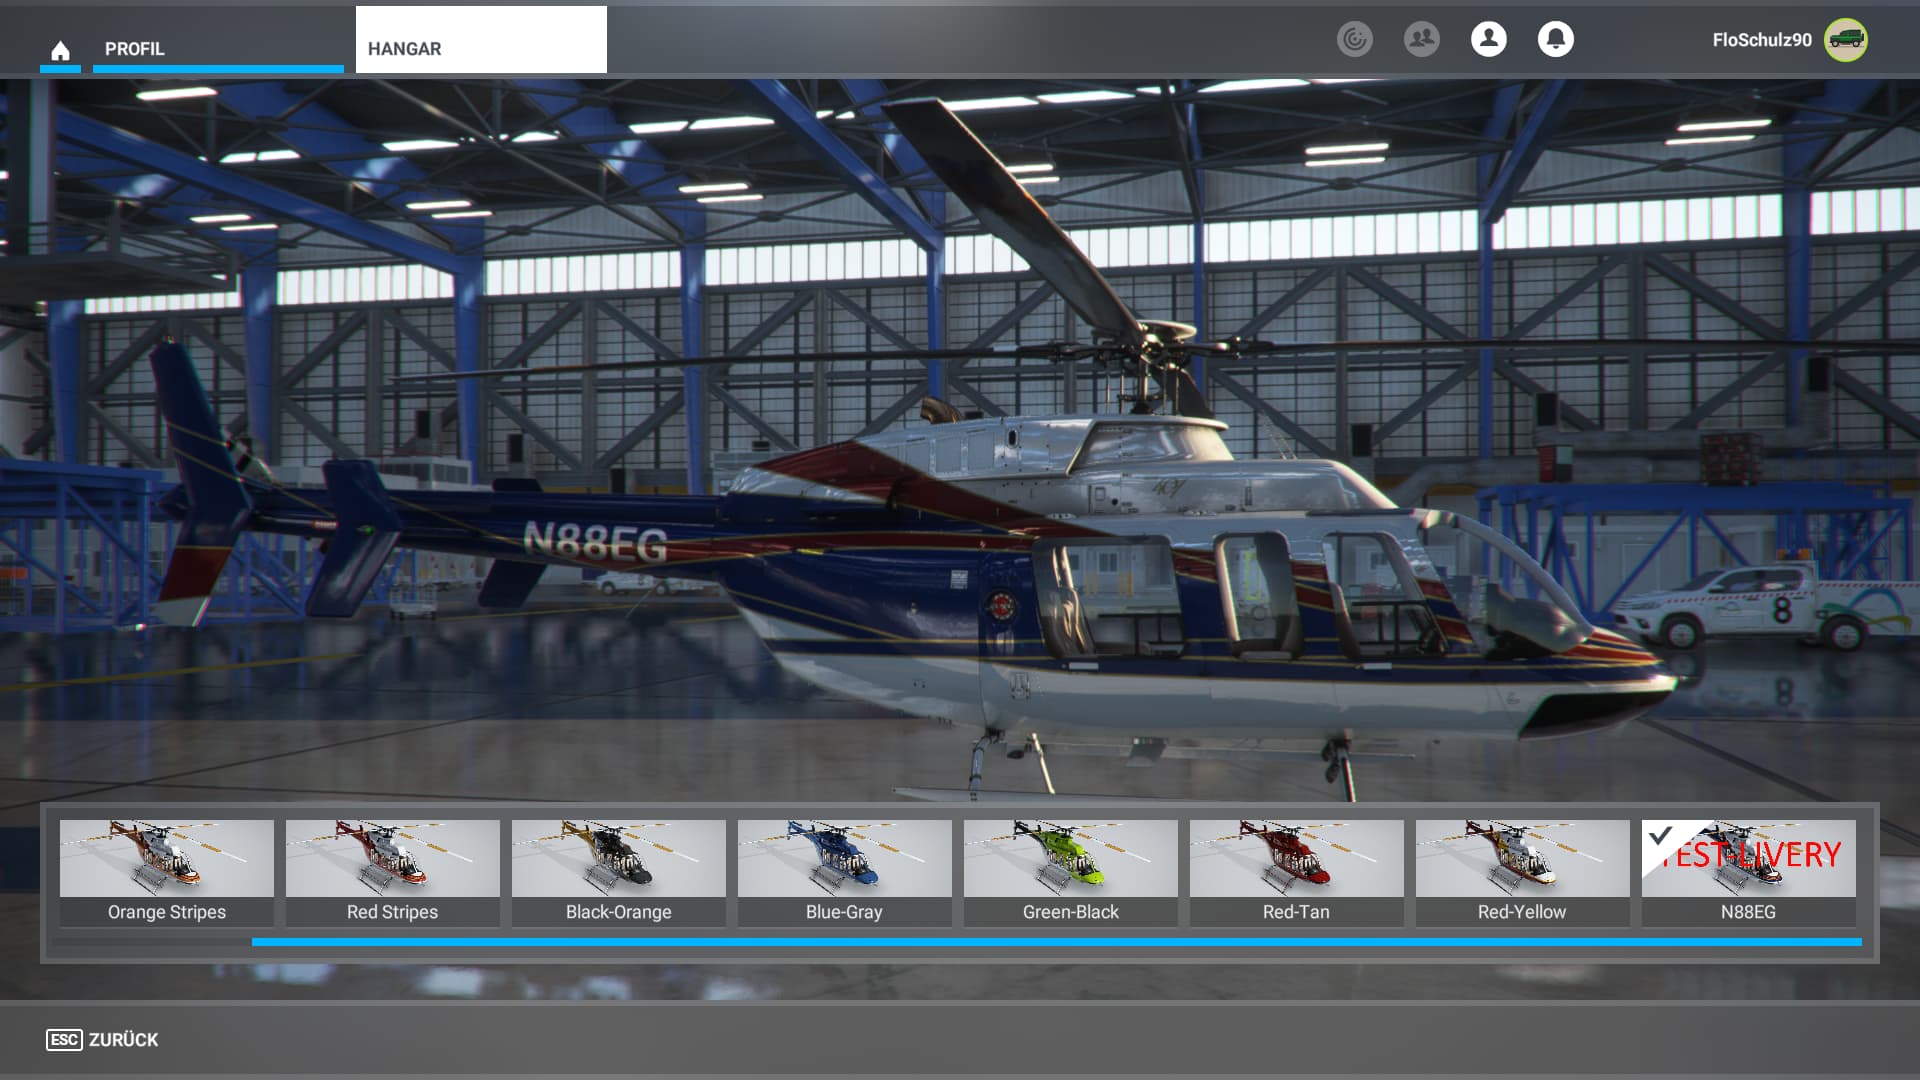
As to the best that I can tell, everything that is necessary to get the Livery Title to appear under the thumbnail image that shows the selection of liveries inside My Hangar, is all thereā€¦ Unless the text Title = line, is suppose to be the same as the UI_Variation = line. I wouldnā€™t think so, because none of the ones that I have, of other liveries, that show their text under the image, have matching text in the Title and Ui_variation lines. But I looked at the Layout.json file and noticed the size doesnā€™t match what the fileā€™s properties is showing.

Layout.json

"path": "Simobjects/Airplanes/Bell 407 - N88EG/aircraft.cfg",
      "size": 2389,
      "date": 133127288022357070

Aircraft.cfg properties
Size: 2.34 KB (2,397 bytes) <-- (I presume that's the size it refers to in layout.json
Size on Disk: 4.00 KB (4,096 bytes)

If this is correct then I am not sure how windows is doing the math, because 2389 bytes + 5 (number of characters in N88EG) = 2394 Not 2397 - Waitā€¦ duh, the layout.json is not updated with the new file size yet. Just wish I understood how itā€™s coming up with the long date stringā€¦

So if the Title line and the Ui_variation line are ok as they are, then I guess Iā€™ll go get the Layout.json generator tool. Unless the tool is the MSFSLayoutGenerator.exe? If so, then I have it and as far as I know, all I need to do is drag the layout.json file onto the MSFSLayoutGenerator.exe and it will open a command window, update the layout.json file automatically and then close on itā€™s own. Yeah, I just used it twice in the last week to update FSLTL with some new fallback liveries.

Let me know if Iā€™m on the right track here, or totally off the railsā€¦ LOL!

Thanks again. :+1:

Well, I just answered almost all my own questions. It is the MSFSLayoutGenerator.exe that I need to use. Just drag and drop as I did with updating the layout for FSLTL.
After reading all about File Time, I now know how and why the long Date integer.
So if you can confirm that the Title and Ui_variation in the Aircraft.cfg file are fine as they are, then I guess Iā€™m ready to give this a try. Whatā€™s the worst that could happen? I break everything! poof!

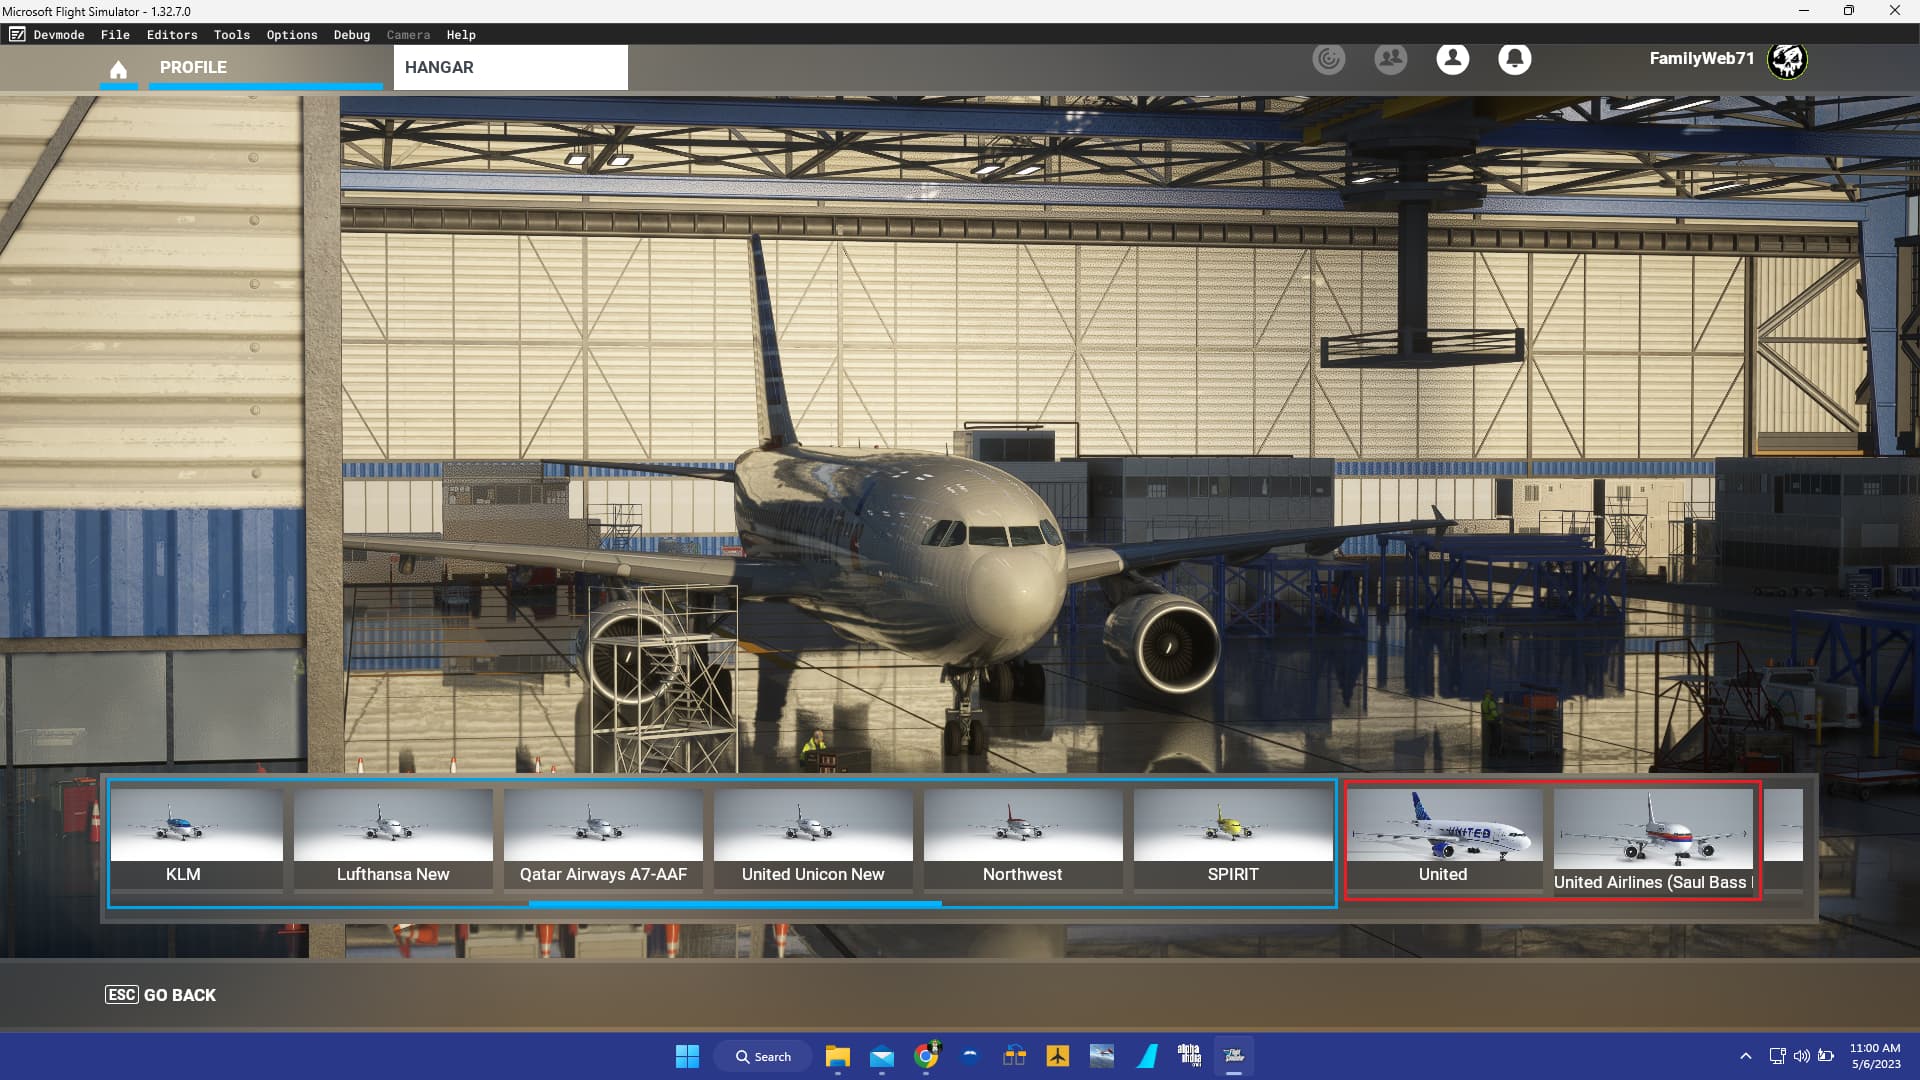
UPDATE - Well unfortunately that did not fix the issueā€¦ The MSFSLayoutGenerator.exe did itā€™s job, I guessā€¦ the file size in the json file matches that of the fileā€™s size as shown in the properties. But it still is not showing the text under the image in My Hangar when I select the aircraft and then Livery. All it shows is the thumbnail image. Not sure what Iā€™m doing wrong here.

I just went through a livery of mine, trying to decipher a few bits for you.


The aircraft is categorized according to the base modelā€™s information regarding manufacturer and type. In this instance, Iā€™m using a livery for the BSQ-Analog-Caravan. the String saved in ui_variation is what should pop up under the image in the selector.


title is what is used to show to other users / SimConnect-Applications which aircraft you are flying - in this instance, I quickly fired up Little Navmap.


ui_type finally seems to be used as part of the logbook entry together with ui_manufacturer - as I said earlier, Blacksquare in this example.


What Iā€™m going to try now is to create a livery example for the 407 using your snippet provided above and will report back later.


It should just work. I only copied your aircraft.cfg, added the basemodel and that was it.

I zipped the entire livery folder and put it in my OneDrive so you can access it. Download, drop into your community folder and thatā€™s it.

What thumbnail image does the ā€œMy Hangarā€ livery list use? The standard thumbnail.JPG or the thumbnail_small.JPG

I noticed the N88EG livery package that Kyle Mathews created for the 407 does not have a thumbnail_small.JPG file.

Could that be why his thumbnail appears but not the text under it? Maybe the specs for size of thumbnail donā€™t meet the requirements?

I guess the thumb is chosen based on context and screen resolution. In the livery overview (hangar), you only see small pictures while in the world screen, you have a larger picture of the aircraft as you have when youā€™re in the worldā€™s plane selector. Maybe you could give it a try by marking the thumbnail_small with some other overlay.

Well I donā€™t know if what I have stumbled on is the proper solution, but it is a solution nonetheless.
In the liveries that I have for the Bell 407, there seems to be quite a few that show a thumbnail image with no text under it, within the My Hangar line up. Except there is 2 that have numbers above where the thumbnail image would appear, but there is no thumbnail. Using MSFS Addons Linker I was able to confirm there was no thumbnail image. None in the texture folder or any listed in the layout.json file.

So, I created a screenshot of one of the missing ones and updated the layout.json file. I ended up with the same result I was getting from the N88EG, a picture but no text. So I loaded the thumbnail I created into Microsoft Paint and cropped the size down, this was based on the evidence from a few default liveries by Asobo. By reducing the pixel size down to something close to or less than the size of the defaults (1618 x 582 for thumbnail.JPG) or (600 x 216 for thumbnail_small.JPG), I was able to get the missing thumbnail to appear and with the text (ui_variation) underneath.

Itā€™s a very tedious way to fix this issueā€¦ especially when I have hundreds of aircraft liveries by 3rd party devs that have the same issue. So to the best that I can speculate, some livery / aircraft devs are either creating thumbnails that are to large in pixel size, or not creating a thumbnail at all.

Is there a way that you can confirm the thumbnail sizing specs? Not sure if the SDK says something or if it is written somewhere that thereā€™s a hard and fast rule on the specs for texture thumbnail files.

Thanks again for all your inputā€¦ itā€™s what has lead me to this ā€œsolutionā€, if you want to call it that. For me it seems like more of a work-around.

The display of the title under the thumbnail in the hanger is dependent on the width vs height size ratio of the thumbnail used. Taller thumbnails in relation to their width will obscure the titles below. MSFS has 3 different uses for a thumbnail. First is the thumbnail in the hanger, 2nd is for thumbnail used in the top left once an aircraft livery has been selected on the aircraft selection screen. And the 3rd is the thumbnails that appear in the list of liveries you see on the right when looking at all liveries for a particular aircraft. Unfortunately they all have different size ratios in each of the 3 positions, and use different methods to crop the thuimbnail to fit. Some display the full width of the thumbnail, and then crop the top and bottom to fit. While another displays the full height of the thumbnail and crop the sides to fit the available space. Getting a thumbnail that works for all 3 can be a challenge

After some trial and error I found I could get a consistent result for all my liveries by using a thumbnail size rate of 1 wide and 0.4 high. I found this gave the best result for the different methods of cropping the thumbnails in the various screen in MSFS, while always allowing the title to appear with the hanger thumbnail.

To get consistency and to show the livery to its best advantage, I take my screenshot for the thumnail in MSFS using the front 3/4 quarter view when parked using the default external screen zoom. I find that on the majority of aircraft you can crop this to 1000w x 400h and the thumbnail will work on all screens, with only a small compromise. But not all aircraft use a similar zoom, so on the Beaver for instance I crop thumbnails to 900 x 360, while on the A320/A310 I crop thumbnails to 1300 x 520, always keeping the 1 to 0.4 ratio.

I keep a spreadsheet of every aircraft type and the thumbnail crop size I used for my reference, so that all of my liveries have a consistent result both within aircraft types and across aircraft types in all 3 areas the thumbnails are displayed.

i can confirm you are now using the correct size
https://docs.flightsimulator.com/html/Samples_And_Tutorials/Tutorials/Creating_A_Livery_Package.htm

Thumbnails

You should also always include the two thumbnail images in the texture folder. These are authored as follows:

  • thumbnail.jpg : 1618x582 pixels
  • thumbnail_small.jpg: 600x216 pixels

and i did a tutorial on the Capture Tool here that may help

2 Likes

Thank you for your ratio tip. Iā€™ll keep that in my toolbox of knowledge going forward. I appreciate your input on this issue.

Thank you for the confirmation and the video tutorialā€¦ hopefully this will make this much easier in the process of fixing all these that have either no title appearing or no thumbnail appearing.

I greatly appreciate all the help everyone has given. Saves me so much frustration and headache.

Hey @EzRyder6869 , I watched the well made tutorial YouTube video that you made, first offā€¦ Very well done! Second, sorry to sound like a total noob here, but I am not a developer and for some reason I am lost when it comes to the use or enabling of the Drone Camera or any Camera setting in MSFS Dev Mode. For some reason, I am unable to select Camera from the Dev Mode menu. It is greyed out. As seen in the following screenshot -

Am I missing something here? Also, I do not have a gamepad to move the camera view. Just a mouse and Logitech Extreme 3D Pro joystick. So not sure how Iā€™d move this drone camera around. To do so in the Hangar, I have to use my mouse wheel (click) to free move the camera view around the external of the aircraft.

its not actually ā€˜using the drone camā€™ or even the dev cam
its the same system and keys but its only available in the hanger thru the Capture Tool

you have to load a profile or create a capture to ā€œUnlockā€ the camera as shown in the video at about 4:50 minutes

Edit: for the keybinds, like i said in the video they are the same as the drone camera
so you can look them up in your game settings or find them listed here
https://docs.flightsimulator.com/html/Developer_Mode/Menus/Tools/The_Aircraft_Capture_Tool.htm
they must have changed this page listing, my shortcut in the video no longer worked, so TY for the question, it brought that to my attention :slight_smile:

I guess Iā€™m not explaining it well enough. I have NO camera functionality of any kind when Dev Mode is enabled and Iā€™m in the Hangar, once I select Aircraft Capture Tool. I can no longer see the hangar or Aircraft at all in order to attempt to change the view, all I see is the Aircraft Capture Tool. No matter whether I have it set to Custom or Thumbnail, with or without the camera option under Custom Locked or Unlocked. And no matter what I do, the word Camera in the menu bar stays grayed out. So as I have read, if I cannot access the camera menu that contains Developer Camera, Top Down Camera, Slew Mode, and Developer Camera Settings, I cannot enable the Developer Camera, which allows me to see the aircraft and move the camera (drone, etc) around to position the camera for the shot I want. Because of this issue, all I get is a tiny far away capture that makes it impossible to tell what the livery looks like from the thumbnail, without opening it in an image editor. Here is a screenshot to help explain what I mean.

The thumbnail (captures) within the blue border are what I am limited to creating. The ones that are in the red border are from the livery developer, not created by me. How can I get access to the developer camera in order to do this? This would be way easier through a screen share, so you can see the issue live.

ok the Capture tool is a Wnidow, you can resize/move it anywhere you want
i tend to place it on my second screen

im guessing you have maximized it somehow to take up the entire screen?
your going to have to figure out how to resize it i guess
i hate the way they dock them, makes it so im scared to move anything :L

first grab the top to unlock its ā€˜dockedā€™ position by dragging it anywhere
once its undocked you can resize and move it out of the way so you can see to adjust the camera

I managed to get the Capture Tool undocked, but there still is no ability to adjust any camera. The position of the camera in relation to the aircraft is stuck in one stationary position.

this is not easy to explain in text, thats why i made the video

Make sure the Camera setting your looking at is Selected Active (left side)
then you must select Custom camera type (4:37 in vid)
then you must Unlock the camera in the tool (4:53 in vid)
after that you should be able to move the camera, if not then ā€¦
i dont know something is wrong, i just tested in game and it works here on my end

i also have a premade xml to load in the capture tool linked in the description, all made up with the correct export settings for livery thumbnails

Yeah I did all that, but in your video youā€™re able to freely move the camera view around, I cannot. My guess as to the reason why is, if you notice in your Dev Mode menu, the word Camera is available (white), where mine is not (itā€™s grayed out). This tells me that you probably have Developer Camera check marked under the Camera menu. But, I downloaded your quicksave.xml from the description off your video. I looked at it, and I can reproduce it manually by selecting Edit Camera under Custom with a Type set to Unlocked. Just wish I could move the Camera with either the Hat switch on my joystick or the mouseā€™s wheel button, in the same way you do with your gamepad. I think you may be correct in your assumption that something might be wrong with either my MSFS installation or whatever controls the Developer functions of MSFS. I have a support ticket in with zendesk to see if they have a solution to getting the Camera menu in the Developer Mode to activate and allow me to click on it so I can activate the Dev Camera. Thanks for all your help :grinning: