Not sure if this is complementary to the problem (As I just got the Bravo the other day myself),
the default associations that Honeycomb is using for the trigger states may or may not exist for an planes planes profile (or may be incorrectly triggered, ie the anti ice is by default, illumined on a Cessna 172, although IRL a decent number of the planes are not rated for icing conditions)
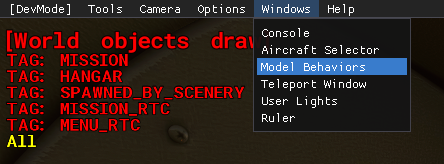
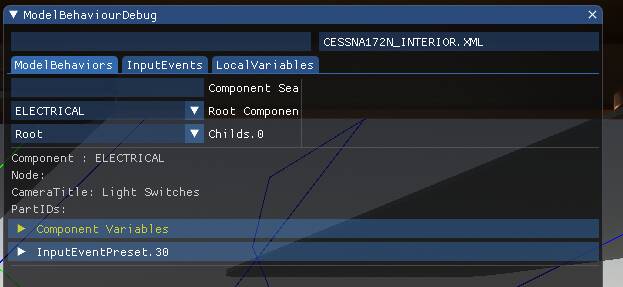
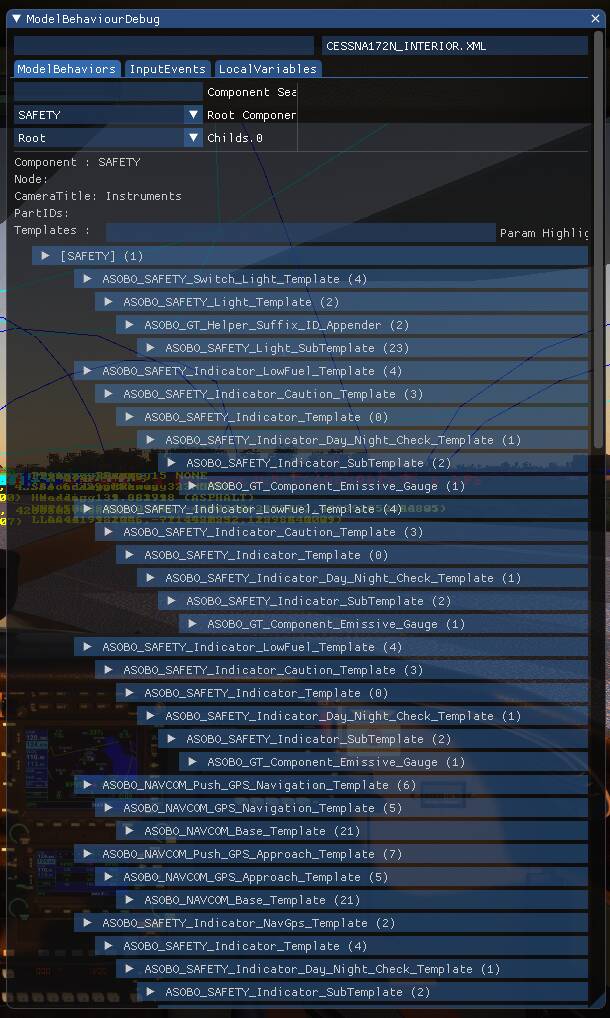
By going into developer mode, loading into a session, then opening up the aircraft profile, and looking under the various xml profiles, we can determine what variables are being monitored to trigger the events. For the 172 model, the best place to look is the C172N_Interior.xml (not sure why the N model is being used instead of the S or R, but whateves) and under Safety Root
By looking for the Emissive code, we can then have the bravo quadrant monitor this state
By looking at other xml files and emissive states, you can code map these states to the annunciator panel at your discretion (for me, even though the c172 does have a starter engaged lights or an anti-ice, I’ve mapped them the magneto-start and pitot-heat on states, respectfully)
On the Bravo side of things (with the coding) is mapped to the following lights
Byte Index 2, Bit Index 6; Master Warning (Not currently coded by default)
Byte Index 2, Bit Index 7; Engine Fire
Byte Index 3, Bit Index 0; Low Oil Pressure
Byte Index 3, Bit Index 1; Low Fuel Pressure
Byte Index 3, Bit Index 2; Anti-Ice
Byte Index 3, Bit Index 3; Starter Engaged
Byte Index 3, Bit Index 4; Auxiliary Power Unit
Byte Index 3, Bit Index 5; Master Caution (Not currently coded by default)
Byte Index 3, Bit Index 6; Vacuum Pressure
Byte Index 3, Bit Index 7; Hydraulic Pressure
Byte Index 4, Bit Index 0; Auxiliary Fuel Pump (Not currently by default)
Byte Index 4, Bit Index 1; Parking Brake
Byte Index 4, Bit Index 2; Voltage
Byte Index 4, Bit Index 3; Door
By going to the (installation location)\ Flight Sim Downloads\Community\AFC_Bridge\bin folder directory and opening the BFC_Throttle _Config as a notepad, you can map the lights to essentially anything you want
For me, I modded a couple of monitored variables for the C172
{
“Language”: “EN”,
“SaveName”: “Throttle_SEP_Sample”,
“LEDs”: [
{
“ByteIndex”: 0,
“BitIndex”: 0,
“Condition”: “A:ELECTRICAL MAIN BUS AMPS, Amperes”,
“ConditionValue”: “!=0”
},
{
“ByteIndex”: 1,
“BitIndex”: 0,
“Condition”: “A:AUTOPILOT HEADING LOCK, bool”,
“ConditionValue”: “=1”
},
{
“ByteIndex”: 1,
“BitIndex”: 1,
“Condition”: “A:AUTOPILOT NAV1 LOCK, bool”,
“ConditionValue”: “=1”
},
{
“ByteIndex”: 1,
“BitIndex”: 2,
“Condition”: “A:AUTOPILOT APPROACH HOLD, bool”,
“ConditionValue”: “=1”
},
{
“ByteIndex”: 1,
“BitIndex”: 3,
“Condition”: “A:AUTOPILOT BACKCOURSE HOLD, bool”,
“ConditionValue”: “=1”
},
{
“ByteIndex”: 1,
“BitIndex”: 4,
“Condition”: “A:AUTOPILOT ALTITUDE LOCK, bool”,
“ConditionValue”: “=1”
},
{
“ByteIndex”: 1,
“BitIndex”: 5,
“Condition”: “A:AUTOPILOT VERTICAL HOLD, bool”,
“ConditionValue”: “=1”
},
{
“ByteIndex”: 1,
“BitIndex”: 6,
“Condition”: “A:AUTOPILOT FLIGHT LEVEL CHANGE, bool”,
“ConditionValue”: “=1”
},
{
“ByteIndex”: 1,
“BitIndex”: 7,
“Condition”: “A:AUTOPILOT MASTER, bool”,
“ConditionValue”: “=1”
},
{
“ByteIndex”: 2,
“BitIndex”: 0,
“Condition”: “A:GEAR LEFT POSITION, percent over 100”,
“ConditionValue”: “=1”
},
{
“ByteIndex”: 2,
“BitIndex”: 1,
“ConditionLogic”: “&&”,
“Conditions”: [
{
“Condition”: “A:GEAR LEFT POSITION, percent over 100”,
“ConditionValue”: “<1”
},
{
“Condition”: “A:GEAR LEFT POSITION, percent over 100”,
“ConditionValue”: “>0”
}
]
},
{
“ByteIndex”: 2,
“BitIndex”: 2,
“Condition”: “A:GEAR CENTER POSITION, percent over 100”,
“ConditionValue”: “=1”
},
{
“ByteIndex”: 2,
“BitIndex”: 3,
“ConditionLogic”: “&&”,
“Conditions”: [
{
“Condition”: “A:GEAR CENTER POSITION, percent over 100”,
“ConditionValue”: “<1”
},
{
“Condition”: “A:GEAR CENTER POSITION, percent over 100”,
“ConditionValue”: “>0”
}
]
},
{
“ByteIndex”: 2,
“BitIndex”: 4,
“Condition”: “A:GEAR RIGHT POSITION, percent over 100”,
“ConditionValue”: “=1”
},
{
“ByteIndex”: 2,
“BitIndex”: 5,
“ConditionLogic”: “&&”,
“Conditions”: [
{
“Condition”: “A:GEAR RIGHT POSITION, percent over 100”,
“ConditionValue”: “<1”
},
{
“Condition”: “A:GEAR RIGHT POSITION, percent over 100”,
“ConditionValue”: “>0”
}
]
},
{
“ByteIndex”: 2,
“BitIndex”: 7,
“Condition”: “A:ENG ON FIRE:1, bool”,
“ConditionValue”: “=1”
},
{
“ByteIndex”: 3,
“BitIndex”: 0,
“Condition”: “A:GENERAL ENG OIL PRESSURE:1, psf”,
“ConditionValue”: “<2000”
},
{
“ByteIndex”: 3,
“BitIndex”: 1,
“Condition”: “A:GENERAL ENG FUEL PRESSURE:1, psi”,
“ConditionValue”: “<1”
},
{
“ByteIndex”: 3,
“BitIndex”: 2,
“Condition”: “A:PITOT HEAT, bool”,
“ConditionValue”: “=1”
},
{
“ByteIndex”: 3,
“BitIndex”: 3,
“Condition”: “A:GENERAL ENG STARTER:1, bool”,
“ConditionValue”: “=1”
},
{
“ByteIndex”: 3,
“BitIndex”: 6,
“Condition”: “A:SUCTION PRESSURE, inhg”,
“ConditionValue”: “<3”
},
{
“ByteIndex”: 4,
“BitIndex”: 1,
“Condition”: “A:BRAKE PARKING POSITION, bool”,
“ConditionValue”: “=1”
},
{
“ByteIndex”: 4,
“BitIndex”: 2,
“Condition”: “A:ELECTRICAL MAIN BUS VOLTAGE:1, volts”,
“ConditionValue”: “<25.5”
},
{
“ByteIndex”: 4,
“BitIndex”: 3,
“Condition”: “A:CANOPY OPEN, percent”,
“ConditionValue”: “>0”
}
]
}
I’m hoping that the annunciator toggle state could be added to the what-if state to emulate testing the panel
Edit: I was just able to add to the code to allow for the annunciator test by adding the following to the respective states
Old
{
“ByteIndex”: #,
“BitIndex”: #,
“Condition”: “(Original Condition Monitoring, variable type)”,
“ConditionValue”: “(Original Condition value)”
},
New
{
“ByteIndex”: #,
“BitIndex”: #,
“ConditionLogic”: “||”,
“Conditions”:[
{
“Condition”: “(Original Condition Monitoring, variable type)”,
“ConditionValue”: “(Original Condition value)”
},
{
“Condition”: “A:ANNUNCIATOR SWITCH, bool”,
“ConditionValue”: “=1”
}
]
},