The purpose of this guide is to show how to use the Nvidia software to tailor your MSFS graphics settings for your PC’s hardware. All without having to understand terms like Ambient Occlusion or fiddle with each and every MSFS graphics setting.
Unlike the MSFS standard presets that have all settings set at low, medium, high or ultra, Nvidia uses combinations of low, medium, high & ultra settings in each of its presets. Currently this results in 9 Nvidia presets available vs the 4 presets delivered with MSFS. This guide shows how to access these 9 Nvidia presets.
The aim is to have MSFS give the best results for most aircraft, in most parts of the MSFS world, for people with low or mid-range PCs.
NOTE - You need to have a Nvidia graphics card to use this guide.
First some things you might need to know how to do to use this guide:-
Click here to find out how to do a clean install of the Nvidia software
-
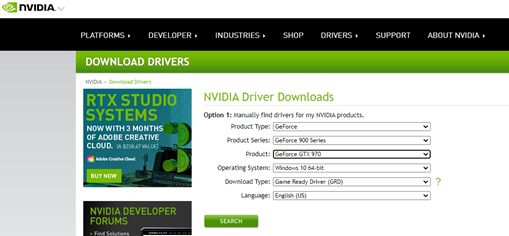
Download the latest software for your PC’s graphics card from Download The Latest Official NVIDIA Drivers
-
Once downloaded, double click on file which should have a name like “452.06-desktop-win10-64bit-international-dch-whql”
-
Click OK to the popup window listing the extraction path. Let Nvidia use whatever it wants here as it usually deletes this stuff when finished. After it extracts the files it will start the installation.
-
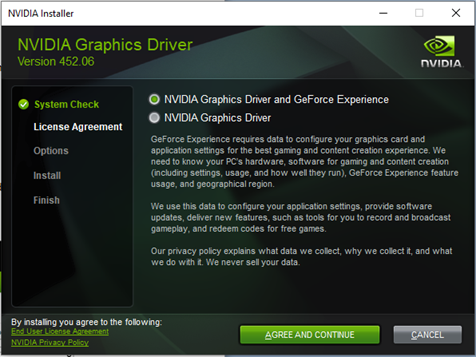
Make sure “Nvidia Graphics Driver and Geforce Experience” is selected as you will need both components.
-
Click “Agree and continue”.
-
Select “Custom (Advanced)”
-
Then click “Next”
-
Leave all components ticked and also tick “Perform a clean installation”
-
Then click “Next”


The installer will remove any existing drivers and install the latest version you have downloaded. Let it do its thing and after a while the installer will advise “Nvidia Installer has finished”.
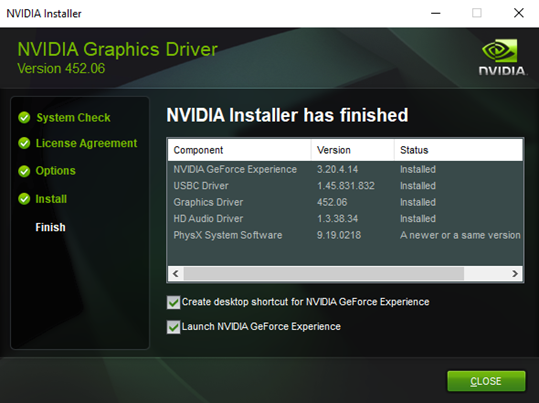
- Click “Close”
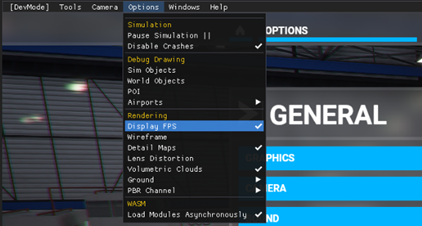
Click here for instructions how to enable the MSFS frame rate counter
- From the main MSFS Welcome screen click on “Options”, then click “General”, then click “Developers”
- Change the setting from OFF to ON.
- Click “Apply & Save”
You should see an extra menu line appear at the top of the screen now.

- From the new menu line at the top of the screen click “Options”, then click “Display FPS”

On the right side of you screen, you should see the MSFS frame rate counter
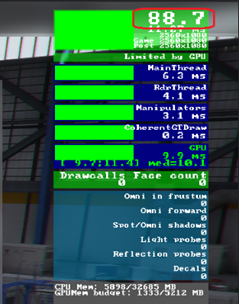
It has lots of information but we are only interested in the value on the top line.
Click here for instructions how to disable the MSFS frame rate counter
- From the developer’s menu line at the top of the screen click “Options”, then click “Display FPS”
The frame rate counter should disappear from the right side of the screen.
- From the main MSFS Welcome screen click on “Options”, then click “General”, then click “Developers”
- Change the setting from ON to OFF.
- Click “Apply & Save”
After you click “Apply & Save” the developers menu should disappear from the top of your screen.
Tip - You may notice that the frame rate counter has reappeared on the right of your screen. Don’t be concerned, just shut down MSFS and the frame rate counter will be gone the next time you start up MSFS.
NVIDIA EXPERIENCE - QUICK TUNING GUIDE
No explanations, no tips, no pictures, just simple steps (assumes you understand how to use Nvidia software).
[details=“Click here for the “Quick Guide””]
- Open Nvidia Geforce Experience
- Move mouse over Microsoft Flight Simulator 2020, then click “Details”
- Click on spanner
- Move slider to the middle as a starting point
- Click Apply
- Click “Play” to fire up MSFS, pick your preferred aircraft and location, and see how it performs.
- If graphics are OK but performance is too low in MSFS
- Exit MSFS and move slider in Nvidia Geforce Experience one notch the left
- Click “Play” and retest in MSFS and repeat process until you have the graphics/performance you are happy with.
- If performance is OK but graphics are too low in MSFS,
- Exit MSFS and move slider in Nvidia Geforce Experience one notch the right
- Click “Play” and retest in MSFS and repeat process until you have the graphics/performance you are happy with.
[/details]
NVIDIA EXPERIENCE - STEP BY STEP TUNING GUIDE
This has basically the same information as contained in the quick guide but includes detailed step by step instructions, with tips and screen shots.
[details=“Click here for “Detailed Guide””]
- Open the Nvidia Geforce Experience. When this software first runs it will prompt you to log in. Either log in with your existing Nvidia account if you have one, or click the “create account” to create one and then log in.
- If you see a popup window titled “Keep your games optimized” Click “Skip” towards the bottom of the screen.
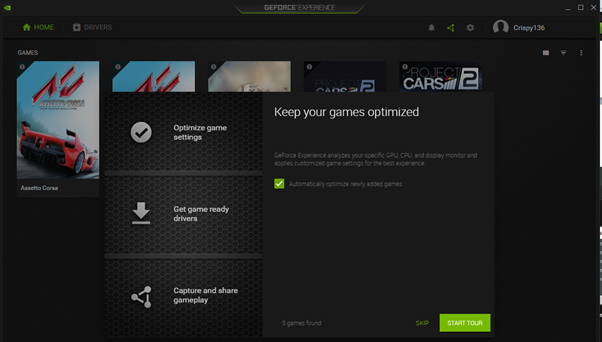
The program then displays a list of your games.
- If Flight Simulator is not shown, click on the 3 dots towards the top right and then click “Scan for games”. Flight Simulator should then appear.
- Move your mouse pointer over Microsoft Flight Simulator and you will see “Play” and “Details” buttons appear.

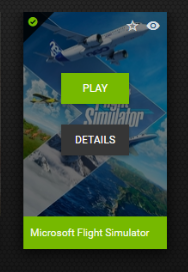
- Click “Details”.
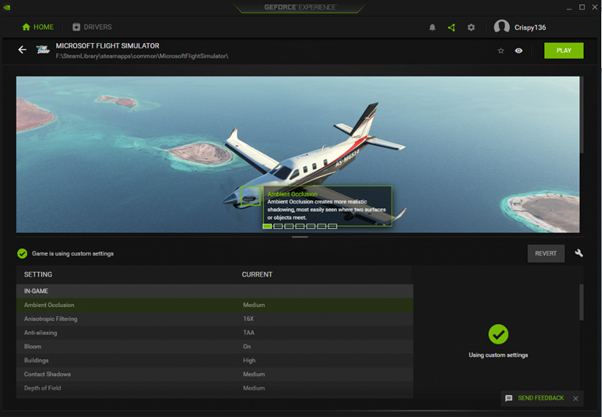
You should then see the following screen where Nvidia recommends MSFS graphic settings for your PC.
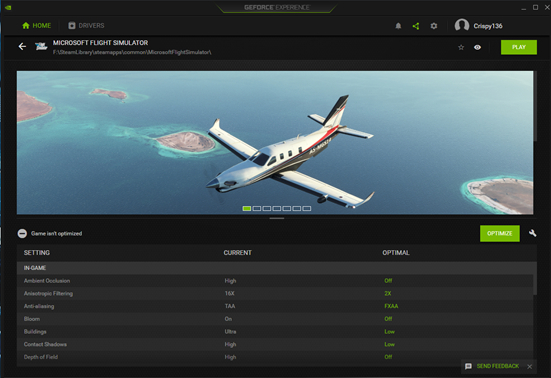
The values in the “Current” column are your existing settings in MSFS, and the values in the “Optimal” column are what Nvidia think they should be. I have found that Nvidia’s “Optimal” setting can be a hit or miss on how good the recommendation is, depending on your PC’s age, specs and monitor display resolution.
Tip - If you want to know what each graphic setting does, move your mouse over any of the lines in the bottom section of the screen and Nvidia Experience will tell you want each setting does, shown in the picture in the top section of the screen.
- Click on the little spanner on the middle/right side of the screen, and you should see the popup window shown below.
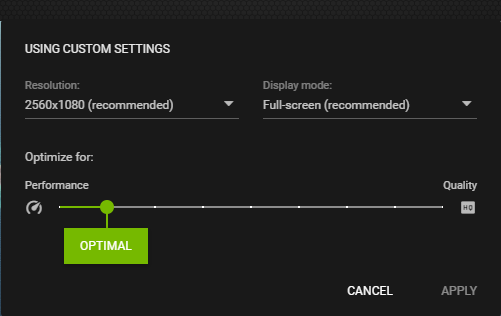
The green dot just above “Optimal” is a slider you can move left or right to change all the graphic setting in MSFS in one hit. As Nvidia has 9 presets, it can fine tune a little better than just using the 4 presets within MSFS.
For this test we’ll just stick it right in the middle. Later we’ll adjust it to the left or right depending on what we find in MSFS.
Tip – If your PC is as good as, or better than, Microsoft’s mid-range “Recommended spec” shown on the 1st page of this guide, then start with the slider 2 notches to the right of centre.
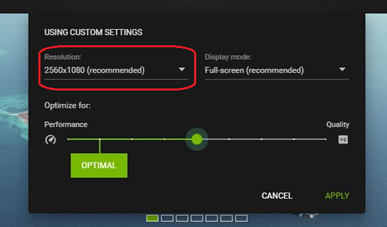
Tip - always make sure that your PCs maximum screen resolution is set in the top left of the Nvidia custom settings screen. I have noticed Nvidia occasionally changes this to a lower value, which we do not want.
-
Click “Apply” and Nvidia Experience will transfer those settings across to MSFS.
-
Then Click “Play” and Nvidia Experience will start MSFS up for you to test the changes.
You can then either test the changes in MSFS based on your own methods or use my guided testing process to optimize your MSFS settings.
If you would like to try my guided benchmark testing in MSFS, just follow the 3 part process listed in the “Benchmarking your Nvidia changes” section below. I found this gave an optimized and consistent result across my two PCs, one low and the other mid-range.
- If you prefer to use your own judgement, then just test in MSFS by flying around in different aircraft and different areas until you get an idea if you need better performance or better graphics.
- Then exit MSFS and open the Nvidia Experience and adjust slider 1 notch left (if you need better performance) or 1 notch right (if you need better graphics) and retest in MSFS. Repeat this until you’re are happy with your overall MSFS performance.
Tip – If you want to fly jets like the A320 it would be best to lean towards better performance rather than better graphics.
[/details]
BENCHMARKING YOUR NVIDIA CHANGES (OPTIONAL)
After making the initial changes in the Nvidia Experience, this section shows you how to test the changes by using a 3 part process using just one aircraft, the Cessna C182 G1000.
Tip - Don’t be concerned if the scenery in MSFS isn’t as clear or as sharp as you would like when running the tests. We’ll fix this later as this is something Nvidia doesn’t optimize correctly yet for MSFS on all PCs.
Click here for 1st Step - Benchmark Regional Airport/Town
Aircraft – Cessna 172 G1000,
Airport – Bundaberg (YBUD), Runway 32,
Weather/time – Few Clouds, mid day.
- Fire up the flight using the settings above and then compare your frame rates in MSFS with those listed below for the various scenarios.
Tip – After MSFS loads and you are in in the cockpit, it takes a short while for the frame rates to settle as MSFS is still loading various bits and pieces. It takes anywhere from 5 to 20 seconds.
- If you want Best Performance
- Cockpit view - frame rates of 50 to 55
- Outside view - frame rates of 50 to 55
- If you want Best Graphics
- Cockpit view - frame rates of 40 to 45
- Outside view - frame rates of 40 to 45
- If your frame rates are generally higher in MSFS than those listed above, then exit MSFS, open Nvidia Experience and move the slider to the right 1 notch, Then click “Apply”, then Click “Play” then go back to step 1 above.
- If your frame rates are generally lower in MSFS than those listed above, then exit MSFS, open Nvidia Experience and move the slider to the left 1 notch, Then click “Apply”, then Click “Play” then go back to step 1 above
- If your frame rates in MSFS are roughly similar to the values above, then proceed to the next section “Benchmark Hand Crafted Airport/City”, so we can fine tune your MSFS graphic values further.
Tip – If you want to fly the A320 in larger cities then adjust the Nvidia slider to match the frame rates listed under “Best Performance”. If you are more interested in light aircraft or regional areas, then adjust the Nvidia slider to match the frame rates listed under “Best Graphics”.
Click here for 2nd Step - Benchmark Hand Crafted Airport/City
Aircraft – Cessna 172 G1000,
Airport – Sydney (YSSY), Runway 34L,
Weather/time – Few Clouds, mid day
- Fire up the flight using the settings above and then compare your frame rates in MSFS with those listed below for the various scenarios.
Tip – After MSFS loads and you are in in the cockpit, it takes a short while for the frame rates to settle as MSFS is still loading various bits and pieces. It takes anywhere from 5 to 20 seconds.
- If you want Best Performance
- Cockpit view - frame rates of about 45
- Outside view - frame rates of about 45
- If you want Best Graphics
- Cockpit view - frame rates of 35 to 40
- Outside view - frame rates of 35 to 40
- If your frame rates are generally higher in MSFS than those listed above, then exit MSFS, open Nvidia Experience and move the slider to the right 1 notch, Then click “Apply”, then Click “Play” then go back to step 1 above.
- If your frame rates are generally lower in MSFS than those listed above, then exit MSFS, open Nvidia Experience and move the slider to the left 1 notch, Then click “Apply”, then Click “Play” then go back to step 1 above
- If your frame rates in MSFS are roughly similar to the values above, then proceed to the next section “Final Manual Tweaks”.
Tip – If you want to fly the A320 in larger cities then adjust the Nvidia slider to match the frame rates listed under “Best Performance”. If you are more interested in light aircraft or regional areas, then adjust the Nvidia slider to match the frame rates listed under “Best Graphics”.
Click here for 3rd Step - Final Manual Tweaks
-
End your flight if you haven’t done so already and return to the main MSFS menu.
-
Then click “Options”, then click “General”, then click “Graphics”, and change the following values:-
- Anti-aliasing - change the value to TAA if it isn’t already set at that. This will sharpen up the image and remove any blurring you might have noticed during testing.
- Terrain level of detail
- If the value is 100 or less – then reduce this value by 20. Eg if it says 75, change it to 55.
- If the value is greater than 100 – then reduce it to 100.
- Objects level of detail
- If the value is 100 or less, then reduce this value by 20. Eg if it says 50, change it to 30.
- If the value is greater than 100, then reduce it to 100.
-
Click “Apply and Save” at the bottom of the screen to save your changes. These final manual tweaks should give you a few extra frames per second.
Congratulations! If everything has gone to plan in the 3 steps above, then your PC should now be optimized for MSFS for most aircraft, across most areas.
Lower performance PCs will have less detailed scenery, and lower frame rates in the A320 than mid-range PCs, but this is simply a limitation of your hardware. Hopefully mid range PCs should now perform well enough to avoid a costly upgrade.
When you get more confident, experiment with changing individual graphics settings within MSFS.
Click here if you are interested in the logic behind this guide
The Cessna was chosen for the mid-range level of complexity of its digital cockpit. The frame rate targets used in this process with the Cessna C172 have sufficient headroom to cater for lower frame rates experienced with more detailed aircraft like the TMB or A320, without specifically testing them as well.
Similarly the 2 locations were chosen because the default views give a good coverage of scenery, buildings, trees etc, without having to test lots of differing scenery areas.
I found that using the Nvidia presets to target the frame rates, gave an overall good result across different PC specs, but allowed the same testing method on both.
The process was tested across 2 PC platforms
Computer 1 - i7 3820 processor, 16gb ram, GTX970 video card, 1920x1080 monitor.
This PC is only slightly better than the “Minimum spec” computer listed by Microsoft as it has a better video card and more memory. The computer runs Windows 10 on an SSD, but MSFS is installed on a regular HDD. The CPU is slightly overclocked, but the video card is not overclocked.
Computer 2 -i5 9400f processor, 32gb ram, RTX2060 video card, 2560x1080 monitor.
This computer is better than the “Recommended” computer listed by Microsoft as it has a much better video card and more memory. This computer runs both Windows 10 and MSFS on SSDs. The CPU is overclocked, but the video card is not overclocked.
Neither computer is anywhere near the “Ideal spec” listed by Microsoft, so both are good candidates for system tuning to get best results in MSFS.
Quality Control
This guide was scrupulously checked by my assistant. ![]() So use it at your own risk.
So use it at your own risk.