Like pretty much everyone, I’ve found the VelocityOne Flightstick’s stiffness to be way too high. It kinda ruins an otherwise nifty piece of hardware.
Here’s how to adjust it in a non-destructive way. EDIT: And a very much destructive method is posted below.
No pictures this time but it’s pretty straight forward:
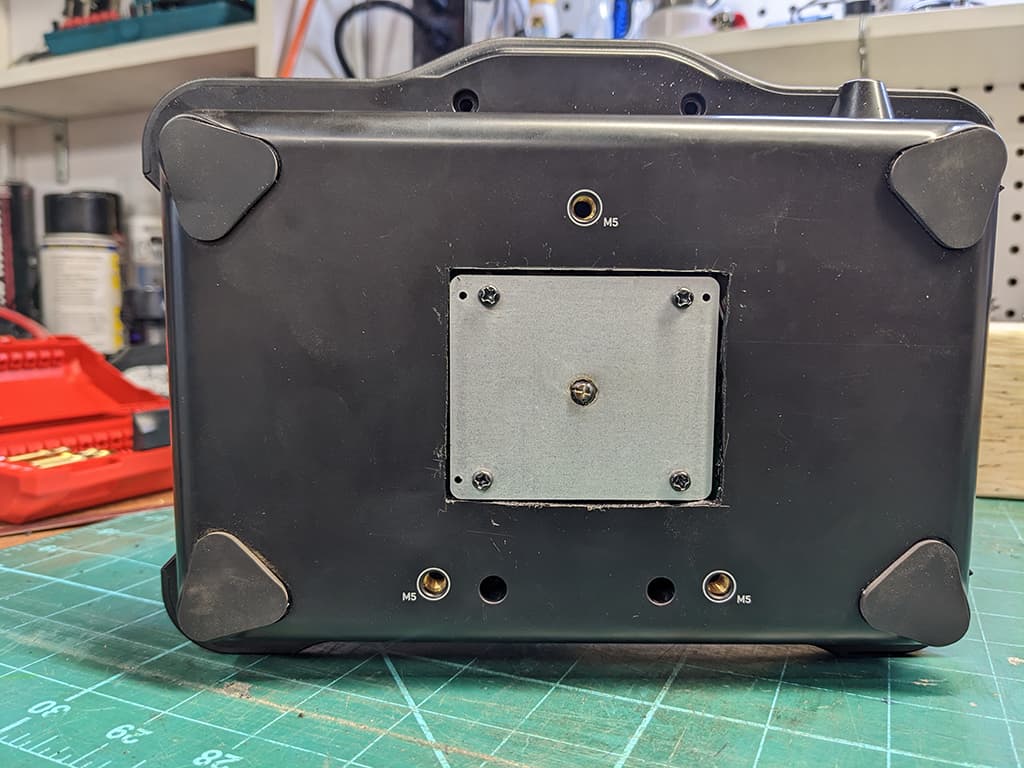
Remove the base - there’s 8 screws, four obvious ones and four more under the rubber pads.
Inside you’ll find a metal plate, held by four screws. Remove these screws. Make sure you hold the plate down since there’s a spring under there. This plate compresses the spring, which determines how stiff the stick feels.
The next steps will take some experimentation:
Put some washers or spacers under the plate, refasten the screws, and try the stick. You should find that it’s a little looser. I’ve found that 3mm of spacers is good enough. 5mm or 6mm felt perfect but I got stopped at the next step.
Attempt to put the base back on. If your spacer stack is too high you will fail and have to try again with a smaller spacer stack. Like I said above, I’ve found 3mm to work pretty good in terms of less stiffness at the stick but still be able to reassemble everything.
Enjoy your upgraded flightstick!
I really did like how the stick felt with 5-6mm of spacers, so maybe sometime in the future I’ll modify the base for clearance of the compression plate. Maybe just drilling holes for the screw heads will be enough or maybe I’ll have to go further. Having the whole plate accessible would be nice so I could vary the compression on the spring without having to fuss around with taking the base off.
You sir, are a genius . Going to try this right now. Thanks for sharing!!
Edit:
Ok I finished, took 20min tops with most of the time testing and adjusting. I ended up with almost 2mm of spacing.
A few small things to add to maybe make things a little easier!
the screw holes under the 4 bottom pads are on the outward side of the rubber pads. So if you peel them back slightly from the outside-in, you should be able to remove the 4 screws without having to remove the pads completely.
definitely test test test. All range of motion and the rudder. I thought I was happy with my setting but ended up having a “click” at a weird point so I had to open everything up again.
if you’re like me and don’t have a drawer full of smaller washers, I was able to gain a little bit more looseness by leaving the 4 screws in the plate ever so slightly looser than snug. I tried to go even looser but that’s what started my “clicking”.
Good luck!
PS - there seems to be some kind of vibration wheel and weight in the joystick. I’m on PC, anyway to enable that???
Hah yeah I was going to mention the (unused??) vibration motor but then I thought I’d leave it as a surprise
Re: the screws for the plate - I’d definitely have those snugged up. As you’re moving the stick around that plate is going to try to move (as you discovered with the clicking sound). I could imagine that over time it might damage the plastic threads that the screws go into.
(please excuse the rough cut, this was just a test fit and I cleaned the hole up considerably before reassembly)
Now I have 6mm of spacers installed and the stick feels great! I wouldn’t want to go more than 6mm with the stock screws - there isn’t a whole tonne of thread left. Might have to go find some longer screws.
Anyways…if you have the nerve to go cutting away at your toy airplane parts, I highly recommend this mod!
I don’t know why you’re making things so complicated.
I simply ordered new, different springs from eBay, installed them and tested them.
So that you can try it out yourself, here are the data for the compression springs:
(wire diameter/spring width/spring length, dimensions in mm)
1.5/18.0/17.5 (original spring)
1.0/18.0/15.0 (unsuitable, as the neutral position is barely present)
1.0/18.0/20.0 (stiffness significantly lower than the original, neutral position clearly noticeable)
1.2/18.0/20.0 (stiffness slightly higher than with 1.0 mm, not tested)
The springs should be made of spring steel and not of another material. I think the spring I’m using now (1.0 mm) is ideal, but it might be a bit too easy for some people. So it’s best to order both wire thicknesses at once (it doesn’t cost much) and test for yourself which one suits you better.
Perhaps more test results with other spring data from other users will be added.
1/10 RC springs from like a Traxxas work great, I must have a dozen different stiffness leftovers. Cut it to the exact length of original. I think I ended up with a Lossi Green. Bend the cut end slightly in to keep it from hitching on the plastic. Those springs can take an unfathomable beating. I can move it with a fingertip on top and it will still make a fully positive return to center.
The process to replace the spring nearly identical to adding spacers so I’m not sure what’s complicated?
However - I’ll be the first to admit that I took things too far with cutting a hole in the bottom! Definitely not advocating people take that route!
Thanks for the spring numbers though! I might give that a try at some point too and note the difference.
To be honest I’m pretty happy with how things are at the moment, except there’s some ugly stiction in the roll axis that I can’t seem to solve. The fittings for the bearing surfaces (just plastic on plastic) are pretty tight so it’s tough to get some proper grease in there.
It might be if the end of the spring isn’t tapered it’s hitching into the plastic ball surface, or camming. Say if you cut a spring and leave an unfinished edge, if you stood it on a table it would lean. Most springs have a final wind to seat uniformly or as it compresses it can cam and have a little thunk, or in the case of the excessively thick stock spring they machine it flat. Or just a little sharp end on a cut wire can dig into the plastic too.
I haven’t had it apart in a long time, but if you cut a spring, you carefully bend the last angled coil so it’s flat, then put the machine finished ‘smooth’ unaltered edge up against the plastic.
I just cut the spring in half personally. Don’t know why TB didn’t make it possible to adjust the tension without any need for DIY. The stock tension is obviously way too stiff.
I’ve since gotten a VKB Gladiator and let me tell you, it’s unbelievable how much better it is in all regards. Not an option if you’re on Xbox like I was when I got the TB V1 stick, but if you’re on PC, do yourself a favour and forget the V1. I never understood how big of a difference it could make, but it’s night and day.
Shortening the spring is of course one way to improve the stick’s rigidity. However, as has been rightly pointed out here, either the cut end has to be worked on to avoid damage to the plastic holder, or at least the installation has to be done so that the cut end rests on the aluminum plate. Nevertheless, it remains a DIY solution.
The idea with the spacers would be a nice solution (I tested it straight away), but unfortunately the base plate no longer fits with 3 mm spacers. And then comes the cutout of the base plate, which makes this solution complicated.
So just use a spring with the right data and we have a professional solution that Turtle Beach could also implement, thus eliminating a major disadvantage of the otherwise very good stick.
The problem with modifying a stock spring is there is a progressive wind to it to give slightly more tension at the max compression than at neutral. TB just made it 300% too stiff overall for some unknown reason it’s like the valve spring on an old 350 V8.
The irony is it’s a carefully designed spring and not some cheap thing, it’s like nobody ever tried the stick first.
A quality RC truck spring looks simple but they are well engineered and durable. You could even use half of a progressive wound one to give you more of a tightening at full deflection or a linear one, just like you would tune a 70mph stadium truck capable of jumping 15’ in the air.l(or over your garage should you be inclined).
And the twist seems miserable too if you use that, at least that works out if you don’t. if I didn’t use such a decent spring I would have replaced the stick when I went PC. I use the V1 quad with it and not the levers. I like the quick left hand rest switch for when I use it for the cirrus with throttle quad on the right. And the colors match-but another big whiff not having white as an option.
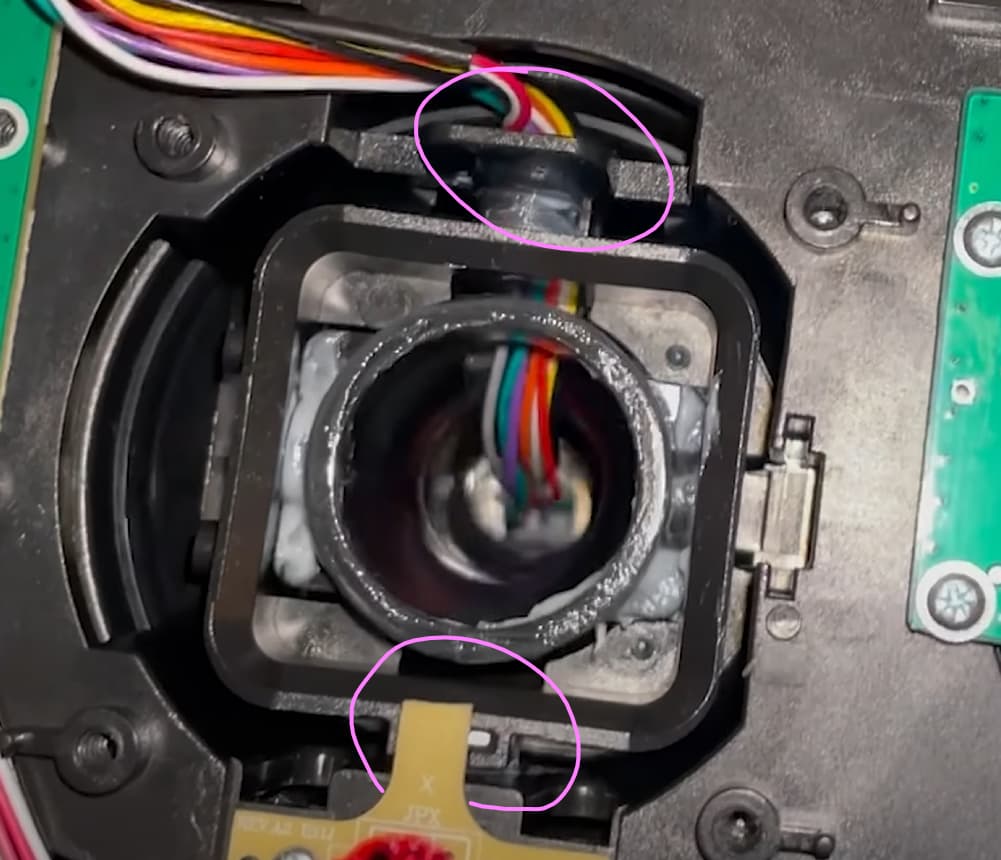
Nah the stiction is there even with the spring completely removed. It’s a very subtle sticking occurring when it’s first moved. Once in motion it feels fine. Fore and aft feels fine with basically no sticky feeling, it’s just left and right.
When everything is returned to stock (ie - no spacers, original spring, etc) the effort to overcome the high spring force masks the stiction issue.
I really think it’s just the cheap plastic “bearings” (circled in pink) are the issue. Possibly fit too tight, which also makes it difficult to get any decent grease in there.
Just an Off topic question: does anyone have also issues with the trim wheel on the stick? Even after recalibration and air cleaning the trim wheel act randomly up and down when turning it. https://youtube.com/shorts/uE2aTgph-NU?si=GrCK86HkcHG5KoYQ
LOL very true! That’s ok - I like modifying my stuff and accept the consequences of breaking warranty or degrading resale value.
To be honest the stiction is not a deal breaker in the slightest. It’s something I’d like to fix but in no way ruins my enjoyment of an otherwise fine (for the price) flight stick.
I took the V1 yoke apart when it was brand new on the market and tinkered and tweaked long before the yoke support mod came out. Still want to get in there and put a metal bushing/bearing in there on the spring shaft.
For the above post I’ve never had good luck with the trim wheel or the ‘mouse’ pad and disabled them. I think I have the click inputs for them bound but use the yoke’s trim and levers with the stick instead. I couldn’t get the ‘trim wheel’ bound for zoom view so just have it on the trigger but you have to tap fast When I use that as left stick I use the electric trim on the hat(for say the SR22T that doesn’t have a trim wheel). The 22T is one of the better modeled e-trim.
Yes, I did and ended up buying a new stick because of it (VKB Gladiator, highly recommended not only because it’s a great stick, but also because it’s designed to be taken apart and put back together non-destructively by the end user. All needed tools are included and how-to’s are on YouTube. Next level right to repair right there!).
I think the issue of the stick’s stiffness has been dealt with.
The slightly increased friction in the aileron axis is there, but I think that can be ignored. OK, a plastic plain bearing is not a metal ball bearing. And the stick should also remain affordable.
Anyone can install a spring that suits them themselves, thus eliminating a primary disadvantage. In any case, my favorite is the 1.0 spring (see above). Perhaps Turtle Beach will figure it out at some point and change this.
But now to the second problem: the rudder axis is still far too stiff. But I still don’t understand where the ‘spring’ is that is responsible for this. Perhaps someone here knows more. And when we’re done here, we can then get a job in the product improvement and quality department at Turtle Beach.
I’ve read a lot online, and I think I’ve found a way to fix my spring that’s too stiff.
1 Remove the spring like you showed me.
2 Heat the spring in a stove until it turns red.
3 Use two pliers to bend the spring to the shape I want.
4 Quickly cool the spring in water to make the new shape permanent, just like how you harden metal.