Hello all. I would like some help and I have a bunch of questions about the workflow of exporting an object from blender with a material and getting that material to be visible if MSFS. I have not found a tutorial yet that fully explains how to do this.
Here is what I have tried:
Open Blender with a default cube.
Unwrap the cube.
Apply an image texture to the cube using Materials>Surface>Base Color
Bake it.
Go to the MSFS Material Params and Change the Material Mode from Disabled to MSFS Standard.
Under Texture Maps go to Albedo and Open the Image Texture.
Save the project and export using Extended gltf 2.0
Not sure 5 and 6 are correct or not. It seems like I have to at least do something with MSFS Material Params. Not sure what to do after I Bake, or if Baking is even necessary.
I can get the block to import into MSFS, but it never has the material on it. Also, when I export, I specify ../textures/, but it always puts the png in the same folder as the gltf, bin, and xml file. Therefore, in my MSFS Projects folder under PackageSources>ModelLib folder, I place the png file in that folder instead of in the textures folder. I have tried it both ways.
Also, I try opening the gltf with Windows 3d viewer, and I have seen the texture on the block in that viewer, but sometimes it doesn’t work and I see the bee and it says it can’t open the 3d object. But even when it works in that viewer, it doesn’t work in MSFS.
As you can tell, I am really not sure what I am doing, and any help would be appreciated.
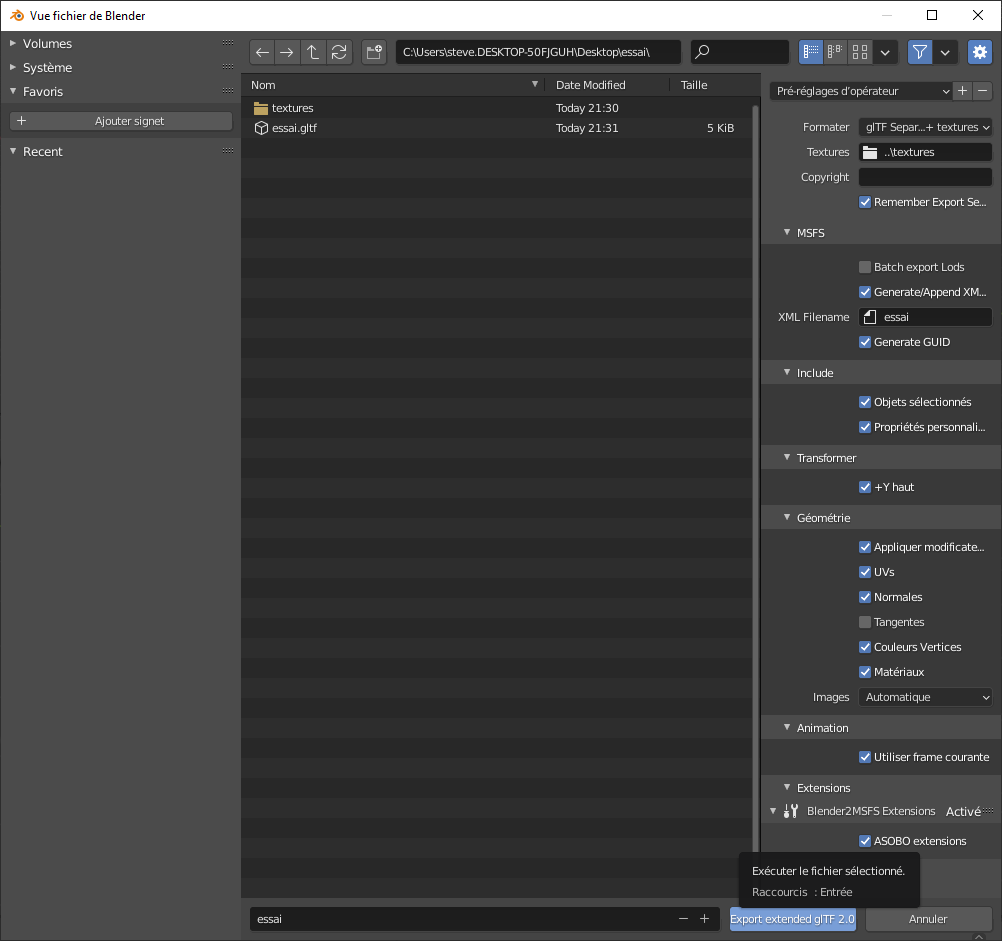
Si vous voulez voir votre objet avec sa texture en ayant fait l’export avec le BLENDER2MSFS toolkit sous le viewer de windows 10 il faut :
soit avoir renseigné le champ intitulé “Textures” en écrivant dedans “.\textures” (ceci placera un sous dossier nommé textures au pluriel dans votre dossier qui contient les 3 autres fichiers ayant pour extension *.bin, *.gltf et *.xml)
soit avoir renseigné le champ intitulé “Textures” en écrivant dedans “..\textures” (ceci aura alors pour conséquence de créer le dossier textures en dehors du dossier qui contient vos trois fichiers précédemment cités au même niveau que votre dossier projet.
!!! IMPORTANT !!! si c’est un objet simple sans plusieurs calques sous blender, ne pas cocher la case intitulée “batch export lods”. (c’est à cause de cela qu’il ne vous créé pas le dossier “textures”).
Ensuite récupérer votre dossier projet contenant ses 3 fichiers + dossier texture inclus ou votre dossier projet contenant seulement ses 3 fichiers + le dossier parallèle nommé textures. Puis il faut coller l’ensemble dans le dossier de package de votre SDK de MSFS 2020 en suivant les tutoriels visibles sur internet en vidéo.
Je mets une capture d’écran de ma fenêtre d’export blender avec le toolkit blender2msfs en espérant qu’elle soit visible directement sur le site sinon je la mets en pièce jointe. Dans mon cas le dossier “textures” se trouve à l’intérieur de mon dossier projet “essai 1”. Par contre pour l’intégrer dans le simulateur MSFS 2020 il est préférable d’avoir le dossier projet et le dossier textures en parallèle cela permettra d’avoir toutes vos textures (si plusieurs objets à créer) au même endroit dans votre package perso.
If you want to see your object with its texture by having made the export with the BLENDER2MSFS toolkit under the viewer of windows 10 you must:
either have filled in the field entitled “Textures” by writing in “. \ textures” (this will place a subfolder named textures in the plural in your folder which contains the 3 other files with the extension * .bin, * .gltf and *. xml)
either have filled in the field entitled “Textures” by writing “.. \ textures” inside (this will then have the effect of creating the textures folder outside the folder which contains your three previously mentioned files at the same level as your project folder.
!!! IMPORTANT !!! if it is a simple object without several layers under blender, do not check the box titled “batch export lods”. (that’s why it doesn’t create the “textures” folder for you).
Then recover your project folder containing its 3 files + texture folder included or your project folder containing only its 3 files + the parallel folder named texture. Then you have to paste the whole thing in the package folder of your MSFS 2020 SDK by following the video tutorials on the internet.
I put a screenshot of my blender export window with the blender2msfs toolkit, hoping that it will be visible directly on the site otherwise I put it as an attachment. In my case the “textures” folder is inside my “test 1” project folder. On the other hand, to integrate it into the MSFS 2020 simulator, it is preferable to have the project folder and the textures folder in parallel, this will allow you to have all your textures (if several objects to be created) in the same place in your personal package.
Merci pour ce tutorial en français, ça fait plaisir.
Surtout après plusieurs jours à essayer d’exporter correctement les fichiers de Blender.
Néanmoins, je serais tenté de demander la suite.
Parce qu’une fois créé mon projet dans le SDK, et même en essayant de suivre l’exemple montré par le DA62, créer un simple avion, me semble bien compliqué…
Tous les tutos sur Youtube se concentrant sur la création de scène, et pas sur celui d’un avion.
Vu que FS2020 prend une plombe pour se lancer, le moindre plantage pour ouvrir un projet, me fait m’arracher les cheveux..
Voilà mon souci, j’ai beau regarder les tutos…et le SDK du DA62.
Pas moyen de faire “upload” à ce stade.
Si quelqu’un pouvez mettre le doigt sur mon erreur …
Ils sont en train de travailler sur un plugin d’export officiel pour Blender, ça va peut être faciliter des trucs (ou pas…). Et ils bossent aussi sur un gros tuto sur la création d’un avion de A à Z qu’ils mettront dans le sdk.
source : Le dev update d’hier