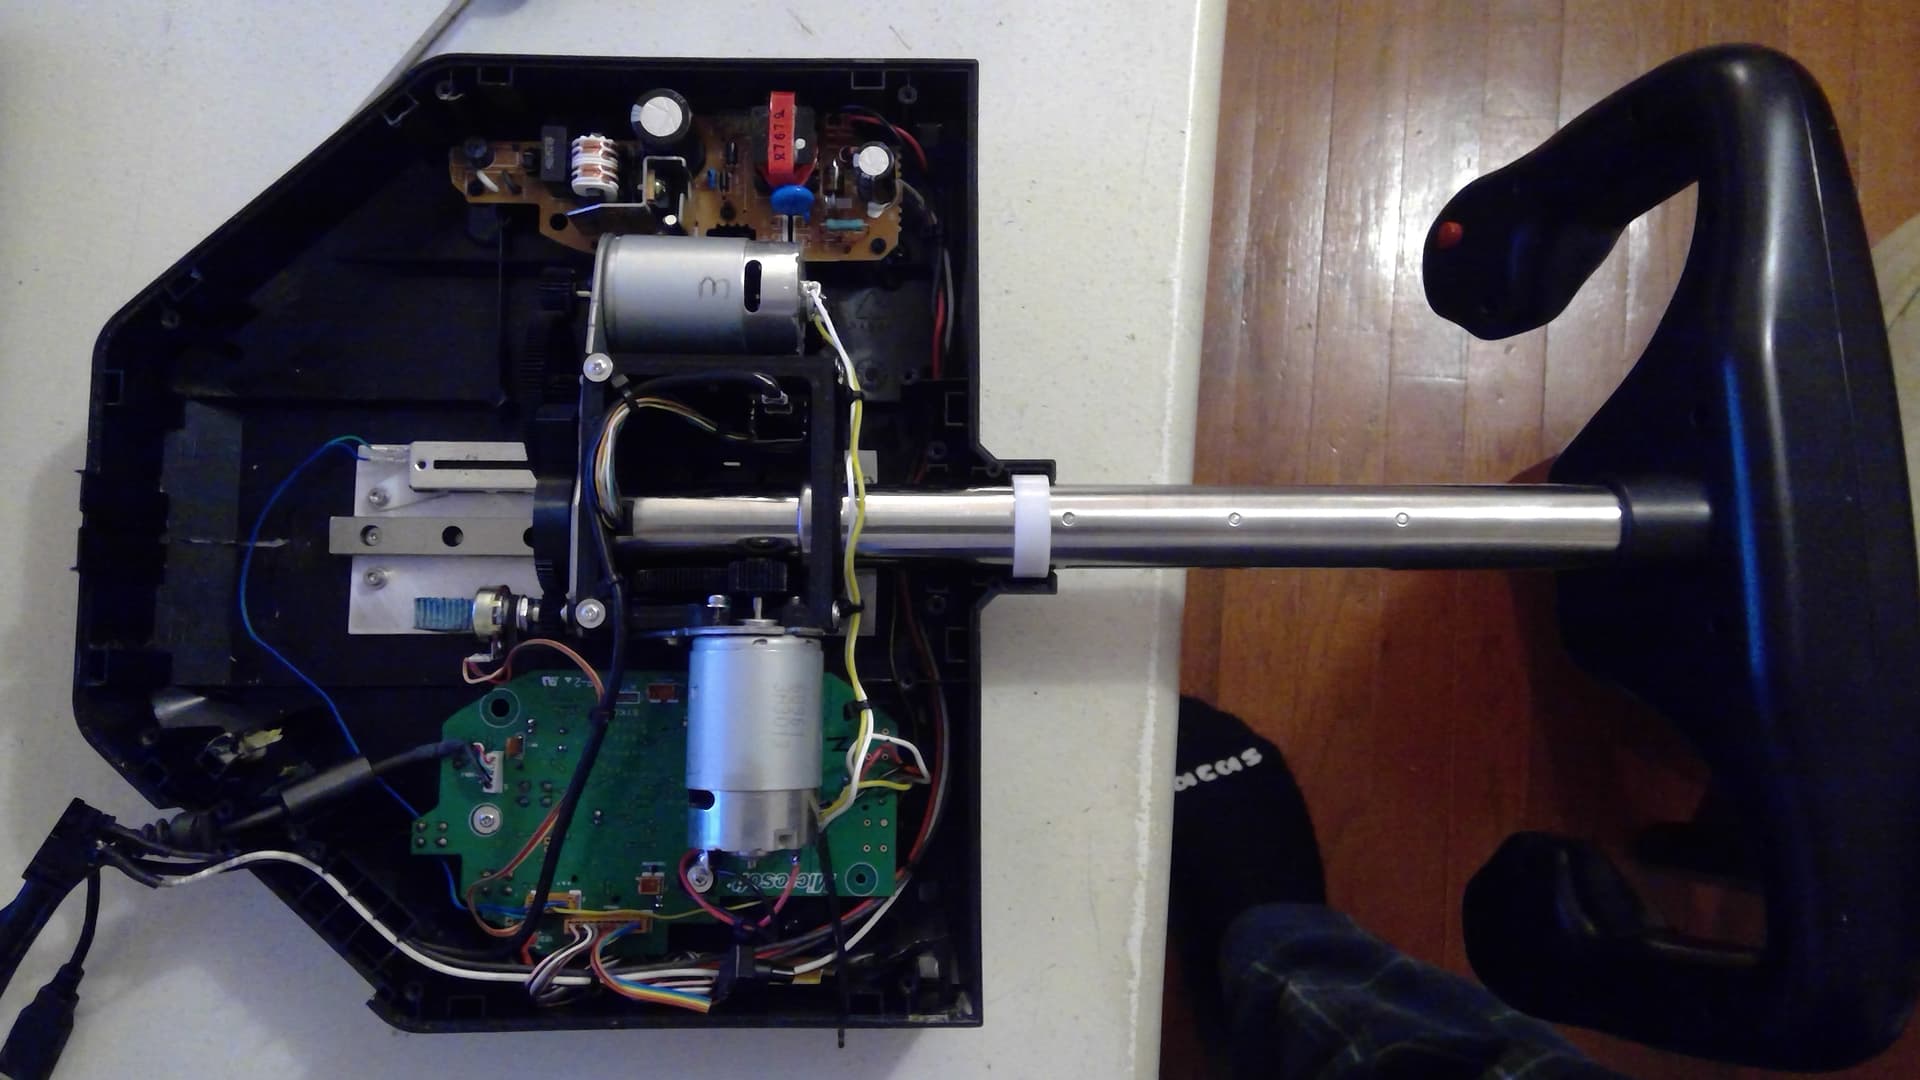
FFB does work (mostly?) in MSFS. I’m currently turning a Saitek yoke into a FFB part using MSSFFB2 guts; just because I wanted to see if I could.
The main goals for me at this point are self-centering, control surface deflection, and autopilot following. Those functions work correctly in MSFS. Maybe XPForce will mature some more as the sim matures.
I built the motion unit so it would fit in the space allowed. It took a couple design changes and a few reprints. It came together well, and the hard part is done. The only external indication that it’s been modded will be the 2 support plate nuts on the rear, top of the housing.
Still have to finish stuffing the electronic in the box and wire the yoke handle. Maybe I’ll get to fly it some this weekend.
Yep, I used the electronics and motors from the MSFFB2. The yoke, tube, and housing from the Saitek yoke.
The bought things were a 1" needle bearing, 2 small thrust bearings, a 100mm/10k ohm slide potentiometer, a rotary 10k ohm potentiometer, a 60mm x 180mm x 3mm piece of aluminum plate, and a Teensy 2.0 board.
There are 5 printed pieces.
As the yoke and stick used different methods of wiring for the switches, I figured it would be easier to us a Teensy 2.0 board to run the switches.
I still have to print out 3 parts that cover where the plug and wires exit the housing, and to cover where the square mounting holes are.
I had thought of doing the simple resistor mod to it, to make it more powerful, but I don’t think it will need it.
Not yet other than verifying that it all worked. there were a few little things I had/have to finish before I close it up to mount. Almost there…
The Teensy was an afterthought. I originally had a 10-turn pot located in that spot for the pitch but it caused too much drag.
It flies… And better than I expected. There’s ground and flap vibration. It gets sloppy in stalls. Elevator and rudder pressure changes with trim and air speed. It follows the yoke with the AP engaged. I still need to fly it in some stormy weather to see if there is buffeting. I’ve read that is something that FFB currently lacks. This has been a fun project. I may have to add FFB to my Saitek pedals as well.
When you cut and modified the switches on the yoke were they wired parallel with a common ground. Been thinking of eliminated the Logitech board on mine for an input to a Leo Bondar board.
Yes they were. It’s 3 harnesses soldered directly to the PCB. One for the left handle, one for the right handle, and one for the center display. I wrote down the diagram for the handles, but not the display. I’ll post it later when I get home.
The printed main body is set up for both the 10-turn and the slide potentiometer for the pitch axis. I’m using the slide as it creates less parasitic drag.
I still have to figuring out how to share the F360 files so that you can see the final assembly.
The only fasteners that are bought are 11 m3x16 hex head bolts., 2 nuts, and 20 washers.
The pitch motor bracket will need to be cut. keep in mind the brackets are mirror images of each other. So don’t cut the wrong one.
Correct about the 10-turn pot. You won’t need it.
The pots need to be 10k ohm.
2 thrust bearings, not 2 packs of 4.
The linear rail looks right. There is an international standard. You will have to cut it.
The aluminum plate is for the support plate. If you open the f3d file you will see it. I used 1/8" but the design calls for 3mm thick. The plan was to use the white nylon bushing to add support to the yoke shaft where it comes through the housing. I forgot to shave the plate down to 3mm. So it doesn’t perfectly center in the hole. So I removed the bushing. As it turns out, it wasn’t needed. I still may sand down the
the plate when I disassemble it.
I have a Snapmaker 2.0 printer/CNC/laser machine. So I was able to CNC the holes in the plate. Tolerances are pretty tight so it might be a good idea to have it made somewhere if you don’t have a CNC machine.
Wow! An incredible design. Thanks much for sharing such great work with us. I don’t see me doing this soon with all I have going on. But, I look forward to seeing other make this.
I think it has to be imported. Someone better versed in F360 would have to answer that.
I missed it earlier. The Teensy is for the switches on the yoke. MS used a matrix; Saitek used a common ground. So it was just easier to use the Teensy. I mounted in the support but would mount it in the yoke if I were to do it again.
I’m currently buying all the needed parts. The Mouser slide-pot costs around 4€ per piece but 25€ shipping to Germany.
However, if I would buy around 13 pieces, the shipping is free. Are there other Germans (or Europeans) interested so we can save shipping when ordering together? I would offer to manage the process.
I was able to open the step file and view the construction. Even more impressed with it’s simplicity. I think I’ll give this ago. The most expensive part is the Sidewinder and they are under $100. I have the Saitek yoke and the slide pot and 500K pot. I’ll add this to my C172/PA-28 VR cockpit. Thanks!!