I’ve noticed that from time to time, questions about BIOS settings, BIOS updates, or chipset drivers appear on the forum. In many threads, you can find questions and valuable tips - unfortunately, these useful tips often get lost among other posts, which is why I decided to create this thread.
In this thread, I also encourage everyone to share their BIOS settings that could improve performance in our favorite simulators, MSFS 2020 and MSFS 2024. For example, I know that @GimbalAxis is rigorously testing various settings to get the most out of his hardware while keeping CPU temperatures at safe levels. I think he has a lot of valuable tips regarding, for instance, PBO and per-core curves.
He has an MSI motherboard, the same as mine and many other users, so his tips will definitely be useful for us as well. There are also users with ASUS, ASRock and Gigabyte motherboards - I invite you too, because our BIOSes are different and your tips will be valuable as well ![]()
@BegottenPoet228 @WingWarper1 @RogueNaught1 I tagged three users from memory because I’ve seen their tips in various threads - I also invite everyone else I didn’t mention. Unfortunately, my memory isn’t good enough to remember all the helpful contributors ![]()
![]() First, a warning: AMD and Intel are not responsible if anything happens to our CPUs during overclocking or undervolting, so everything should be done carefully and at our own risk. Similarly, users sharing tips are not responsible if anything happens to your CPU, motherboard, or other components. Everything is done at our own risk and with caution.
First, a warning: AMD and Intel are not responsible if anything happens to our CPUs during overclocking or undervolting, so everything should be done carefully and at our own risk. Similarly, users sharing tips are not responsible if anything happens to your CPU, motherboard, or other components. Everything is done at our own risk and with caution.
What’s worth knowing - it’s always a good idea to keep your Chipset drivers and BIOS up to date, as updates often include fixes, AGESA or CPU microcode updates (for example, for Intel), which not only improve performance but also help ensure our hardware runs safely and reliably. Motherboard manufacturers also add new BIOS settings and compatibility support for newly released RAM and CPUs.
BUT … BIOS update is not mandatory. In general, you don’t need to update the BIOS unless you encounter issues that could potentially be fixed by a BIOS update - for example, past issues with Intel CPU microcode, changes in vcore, or power limits.
The BIOS should ideally be downloaded from the motherboard manufacturer’s official website.
After installing the BIOS, we set the curves for CPU cooling and other fans. Another important setting is the Fan Fail Warning. On MSI motherboards, you can find it in the Hardware Monitor - the same place where you set the fan curves.

We should enable the Fan Fail Warning for all fan channels, including CPU, CPU Pump and SYS fans, or any other connected fans.
Save the changes, and restart PC. Next, we activate the CPU Over Temperature Alert - on MSI motherboards it has this name, on other brands it might be called differently.

We also enable System Power Fault Protection

After the restart, we can disable the iGPU if it’s not needed and also the integrated audio card if it’s unnecessary. Save the changes and restart.
At this point, we have our baseline settings - our default configuration. It’s a good idea to save a profile of these settings, so if we ever need to reset the BIOS, we can quickly restore them.
Now, we can disable virtualization if it’s not needed. On AMD platforms, this means SVM and IOMMU. Disabling SVM and IOMMU can improve overall PC performance, but one Windows feature will no longer be available: Core Isolation – Memory Integrity.
https://learn.microsoft.com/en-us/windows-hardware/drivers/bringup/device-guard-and-credential-guard
Next, we should enable RAM EXPO profile (for AMD) or XMP (for Intel) for our RAM.

Save and restart.
After the restart, it is recommended to check whether the system and MSFS are running stably with EXPO/XMP enabled. If everything is stable, you can proceed with further BIOS changes, such as adjusting PBO settings.
At this point, you can save these settings as a second BIOS profile - essentially your baseline configuration before overclocking or undervolting.
- CPU Loadline Calibration Control
This is an important setting, usually used with overclocking to prevent VCore from dropping too much to stabilize the CPU. I have mine set to Mode 3.

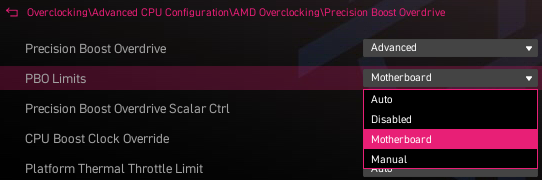
- PBO
For PBO, the typical sweet spot for Ryzen 7 7800X3D, 9800X3D, 9850X3D CPUs is a negative offset of 15 on all cores.


- Auto: Same as option [Motherboard].
- Disabled: Loads AMD default socket power (PPT), electrically-limited VRM current (EDC), and thermally-limited VRM current (TDC) limits.
- Motherboard: Allows the processor to run according to increased PPT, EDC, and TDC limits defined by your motherboard.
- Manual: Allows the processor to ignore AMD default limits for PPT, EDC, and TDC and instead use manual values (up to the maximum capabilities of the of the motherboard).
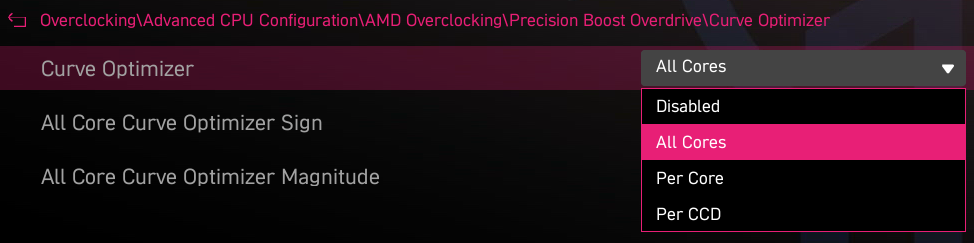
If you chose All Core Curve Optimizer and applied negative offsets

All Core Curve Optimizer Magnitude also lower the CPU VCore - the higher the number, the lower the VCore. Too low a VCore can make the CPU and system unstable, so keep this in mind when adjusting.
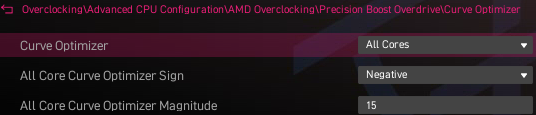
The above settings are shown here as an example on the MSI X870E Carbon WIFI motherboard.
Save the changes and test PC as well as MSFS with these settings.
There are, of course, many other BIOS settings. I haven’t described all of them - I’ve listed what I consider the most important ones, but some may have been missed. These settings are given as an example for the MSI motherboard and for AMD platforms, so ASRock, ASUS, or Gigabyte boards, as well as Intel platforms, may have different options.
Any additional important settings are welcome to be shared.