What position does the fuel switch need to be in to make it automatic ? so i don’t need to try and figure out where the fuel needs to be.
Gonna reply you to this two questions, hold on
Thank you, Jack!!! So I do have a THIRD question… Believe it or not! ![]()
OK, so my understanding of the fuel transfer system - the AUTO switch (under the cover) where you can set it to either forward or aft… that eliminates the need to switch all the other stuff manually, correct? It seemed to work in the earlier part of my climb, but now at over FL500 I seem to be at 52 or so CG and the range I should be at is WAY down below. I have had it on auto-aft and it doesn’t seem to be doing much at this point. I am thinking I am having climb/balance issues because of it.
Thank you for this!
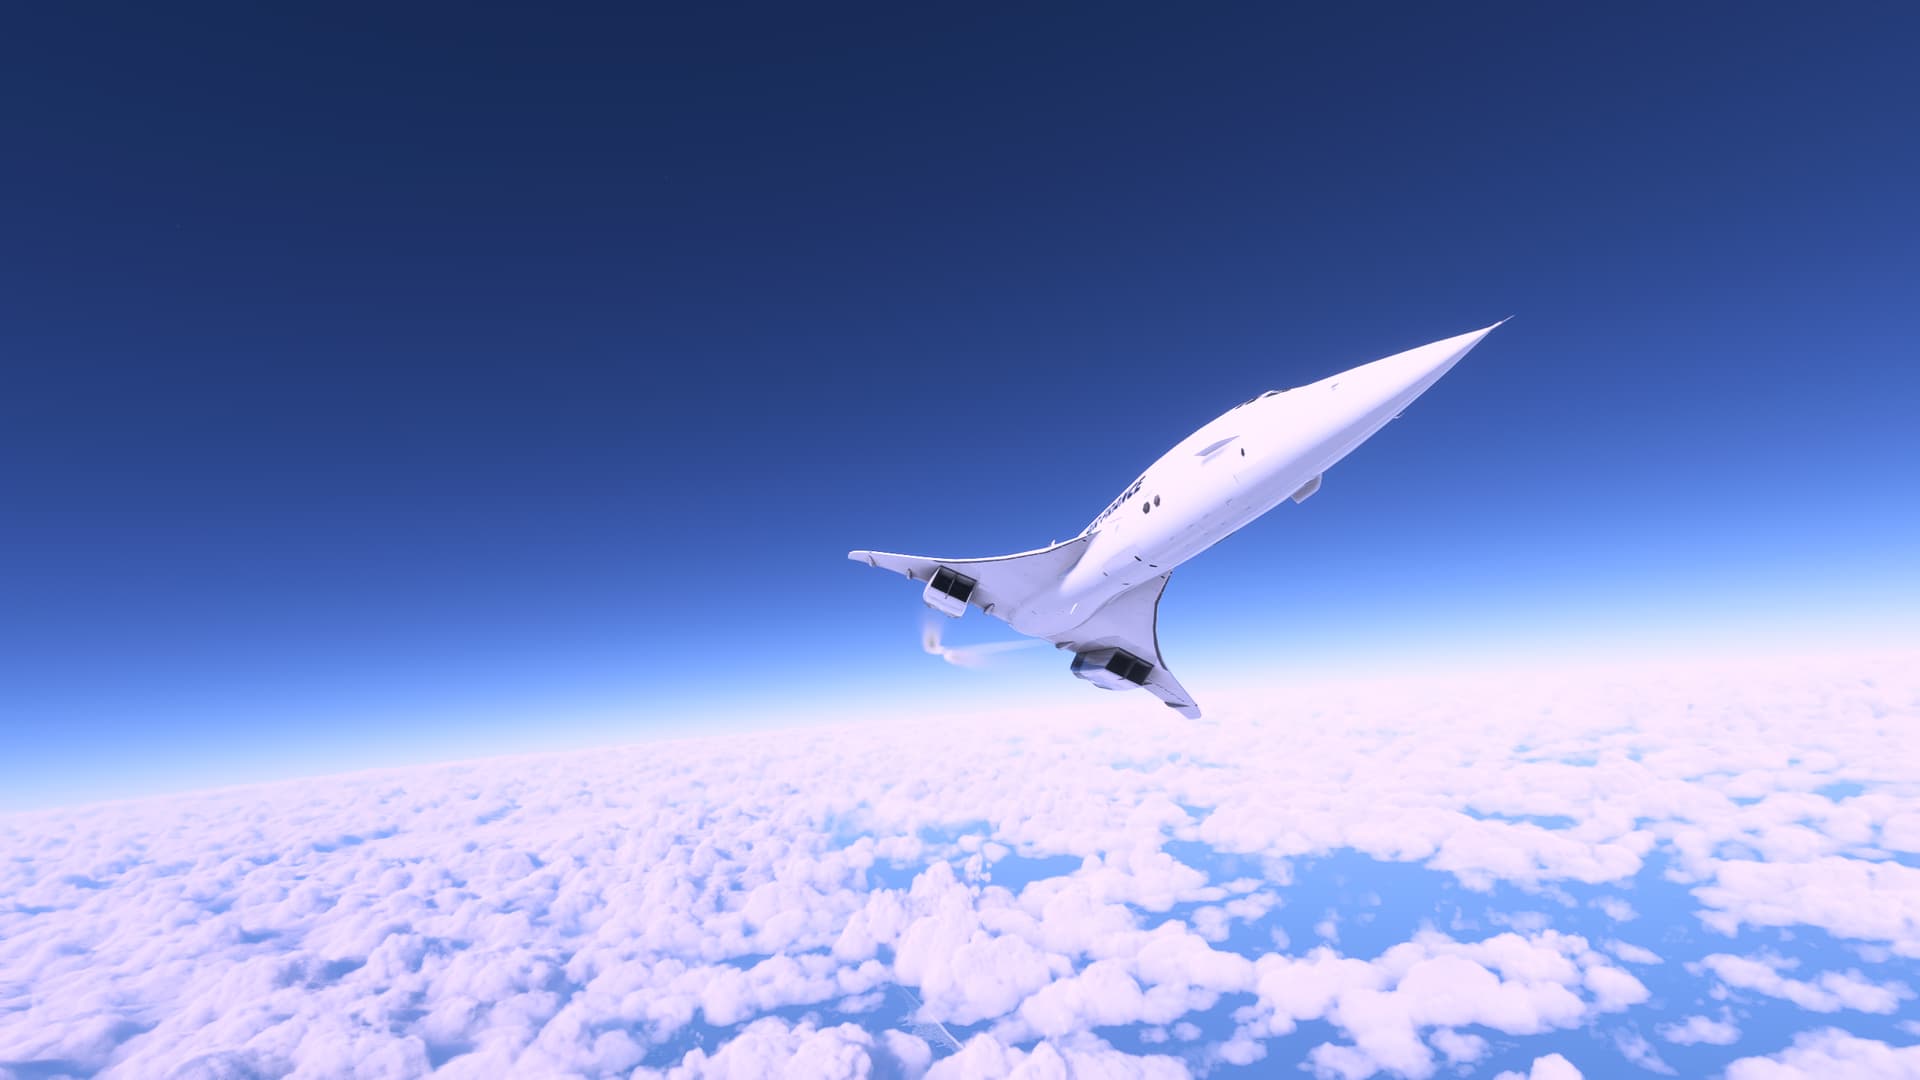
Saying hello at FL340 and Mach 2 …


Tried to do a C&D startup at the gate and had no real trouble until it came to starting Engines 1 and 4. The interactive checklist said to turn the EGU OFF after engine 2 is running, which I did, but the next two engines would not start until I turned the EGU back on.
Perhaps related, some of the “eyeball” items in the checklist do not seem to work or else I simply couldn’t tell what I was being asked to do - this was especially true of a number of the valve, inlet and nozzle controls on the FE’s panel.
Anyway, I’m sure it will all eventually get sorted out and/or some folks with the time will put out some detailed tutorials. As for me, I managed to start all four engines, taxi to the runway, and takeoff. Had a hard time wrapping my head around the AP controls but eventually got pointed the right way. I planned a route from KJFK to Miami, a route that had historically been considered for the Concorde before Cabotage (look it up - very relevant to international airlines operating to/from the US) put a stop to it, along with no American operators taking on the plane themselves.
I made no real effort to manage the climb properly - had a hard time figuring out the checklists for fuel transfer and how to monitor CG, but I made LITERALLY no effort here aside from looking at tooltips and trying to follow the checklist. I have not read the manual or anything, just stopped working and booted up the sim for a test.
Glad you brought up this doubts.
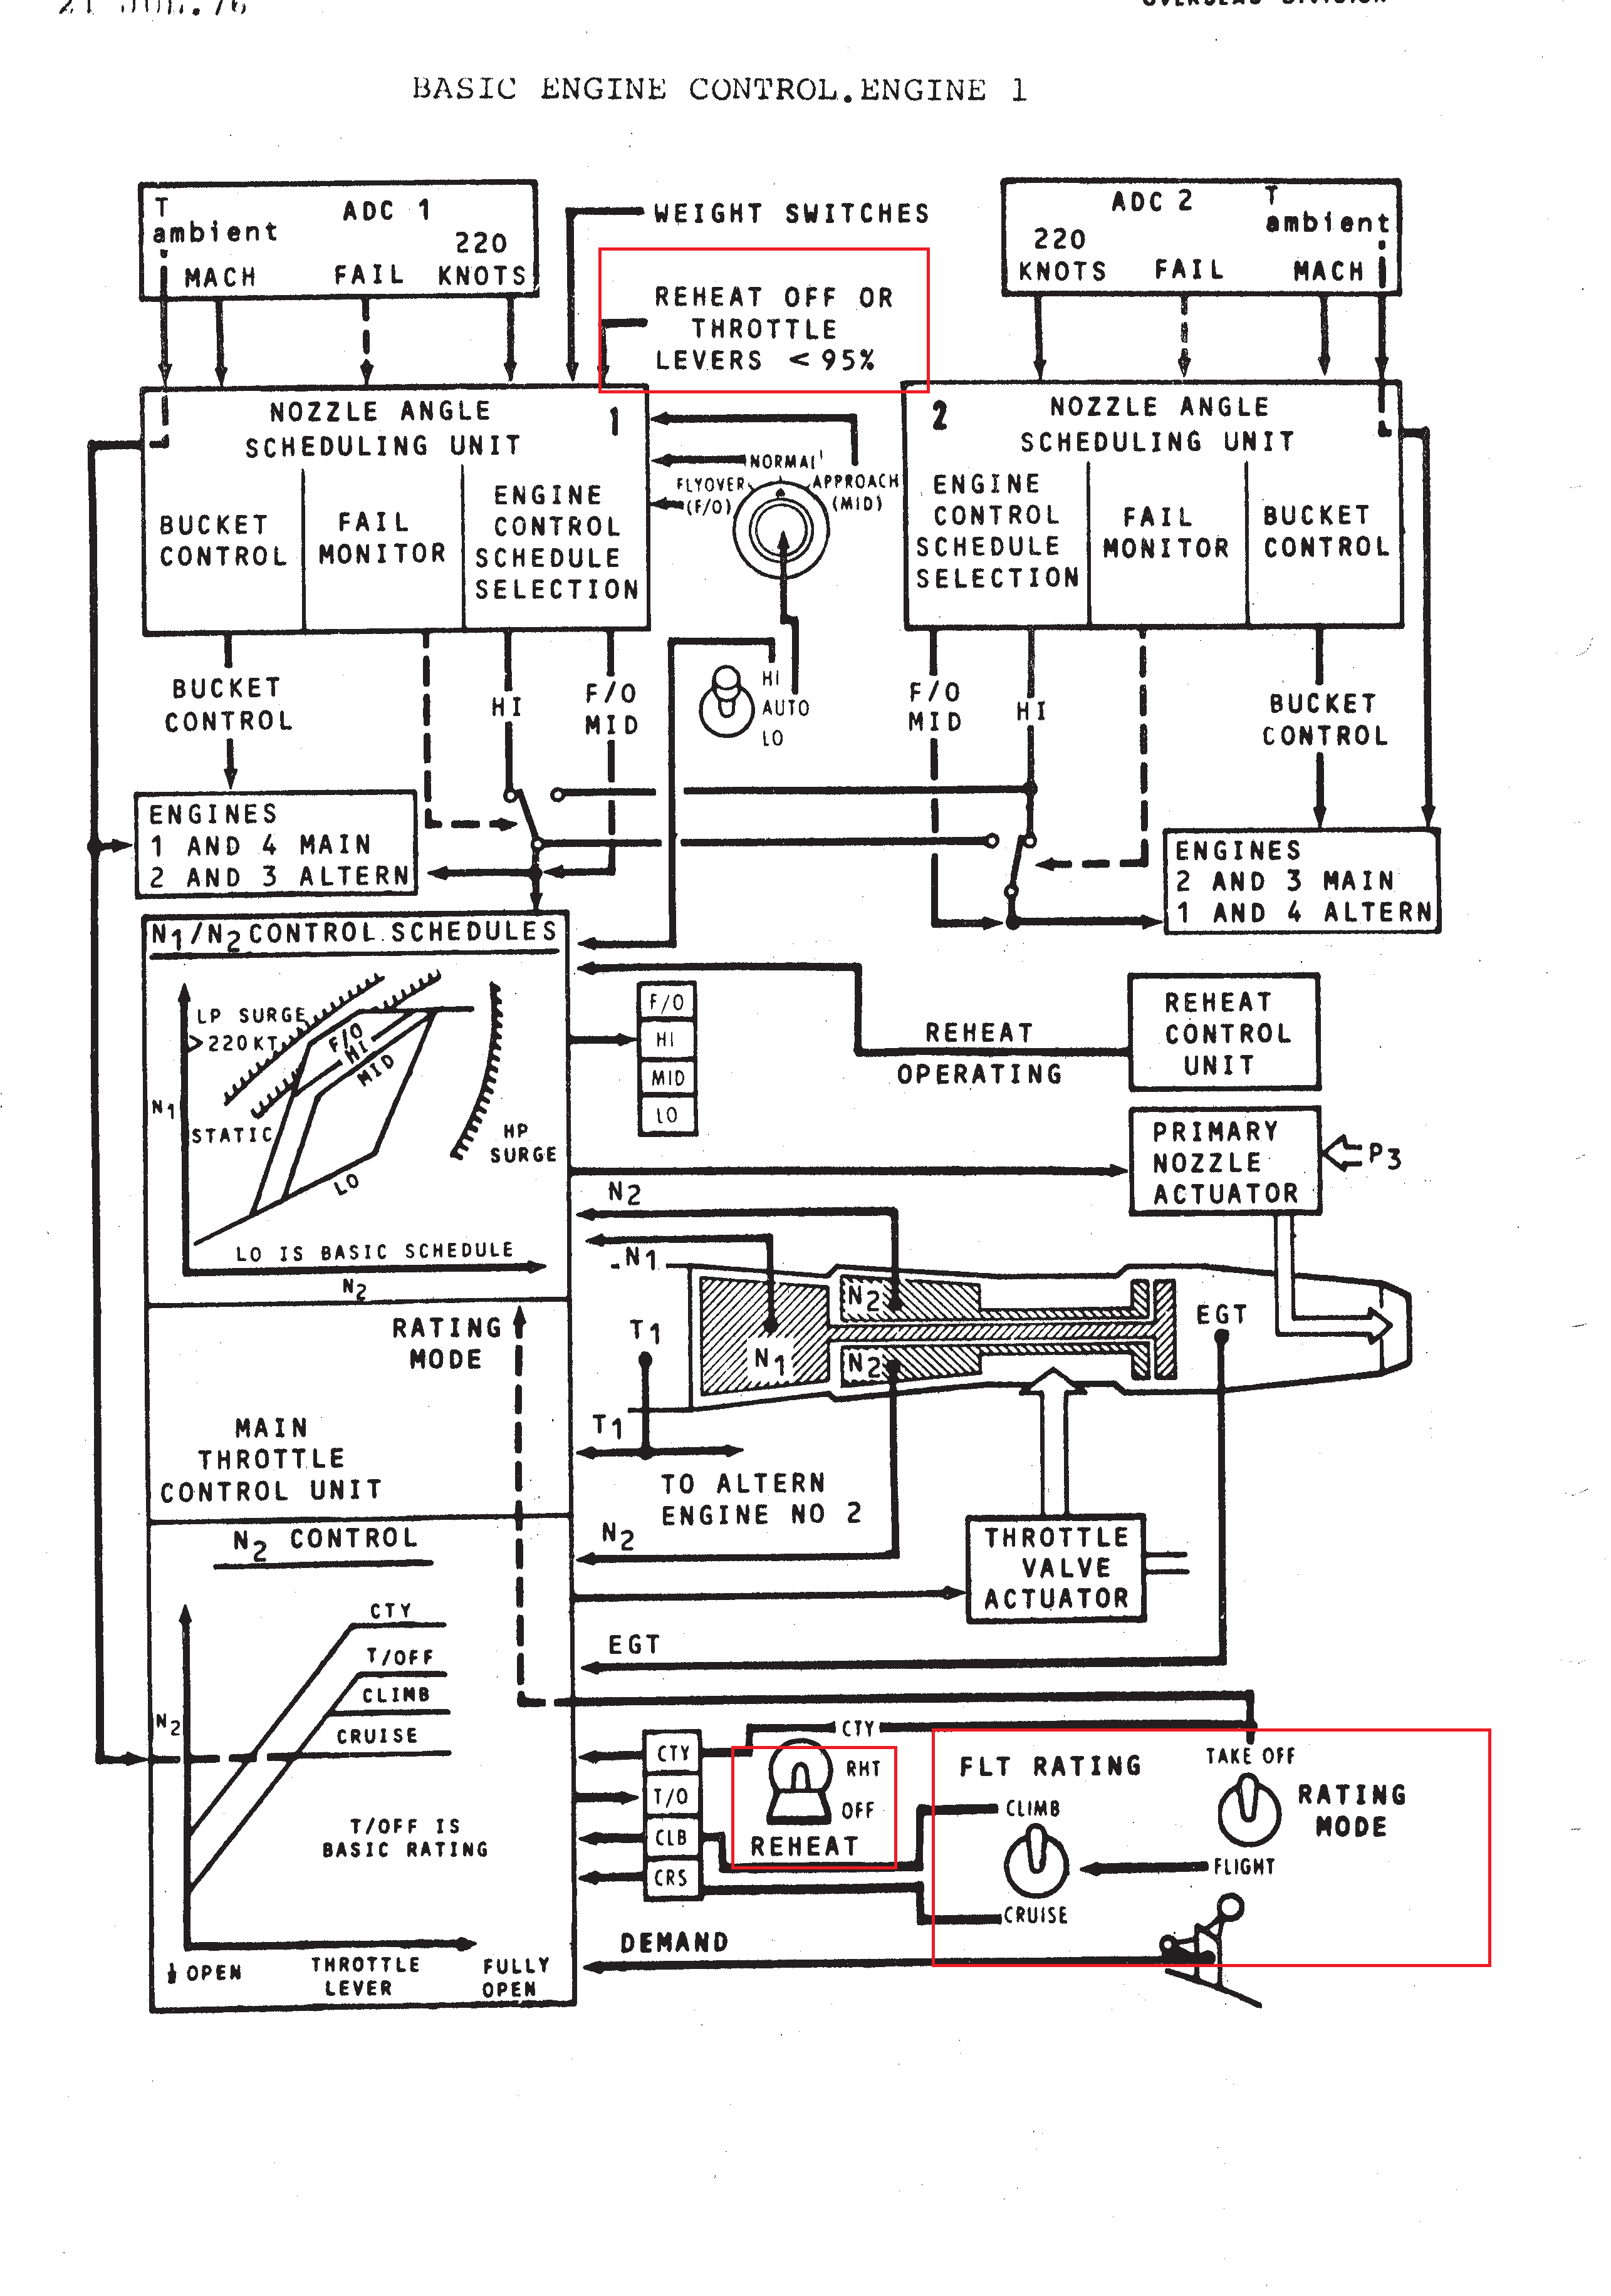
maximum range without no AB is specifically 89.95% (in the real concorde this is 95%) but I would have had to redo the entire power curve of the ECU to move the maximum thrust no AB to that point. I probably will in the future.
Indeed, with respect to the British airways manual, the positions off is down and on is up.
the events of each button would be respectively these. regarding your general mapping:

That is, if you have two engines activated with reheat and you press your general mapping you will activate all 4 at once
I put the official scheme
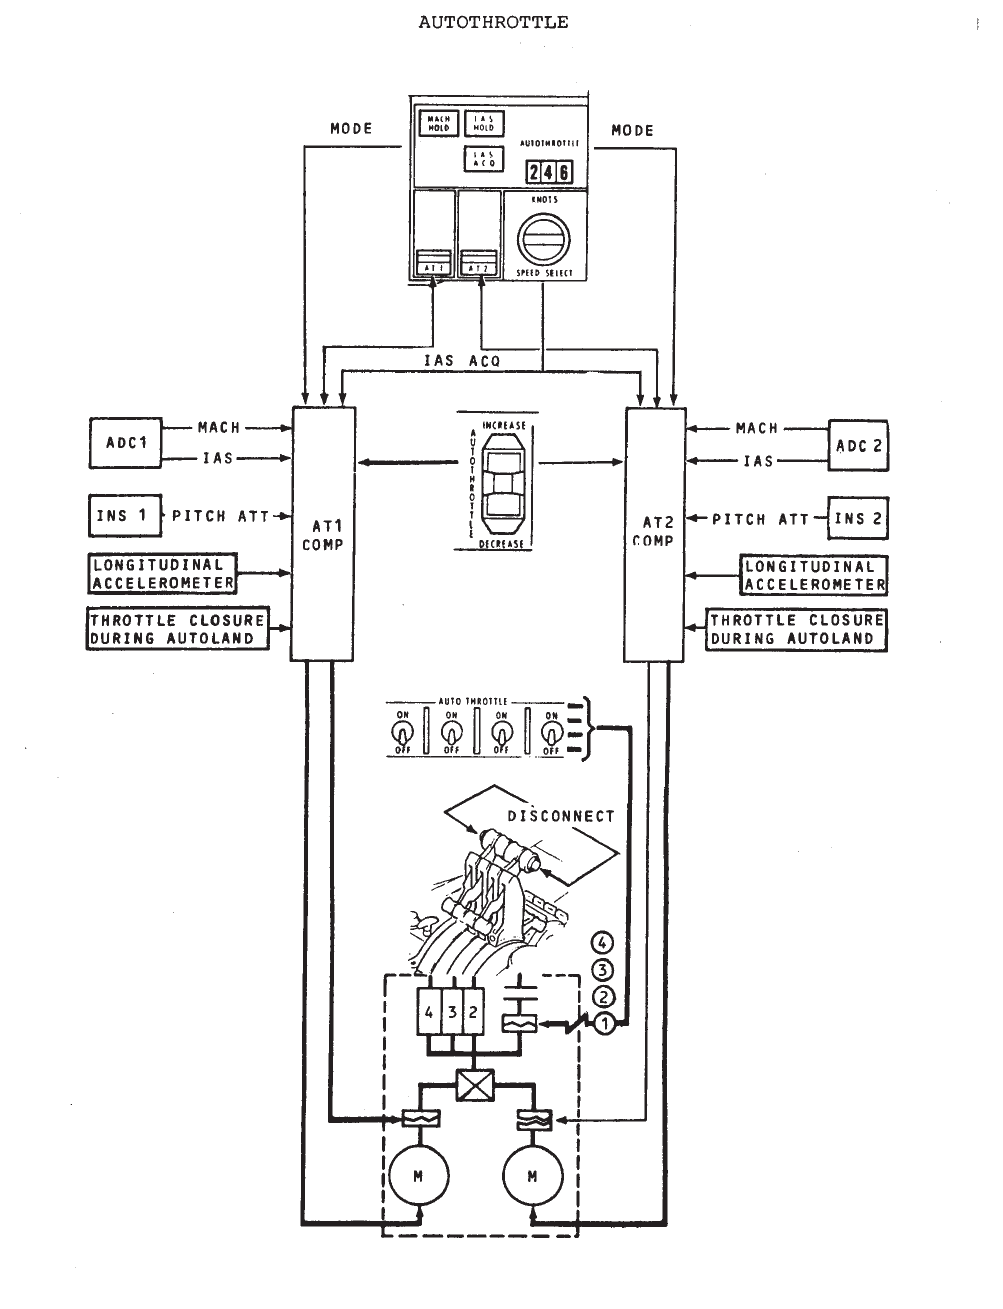
The first thing to understand is that AT1-AT2, AP1-AP2, FD1-FD2, do not work at the same time, but 2 is a backup of 1 if 1 goes into failure.
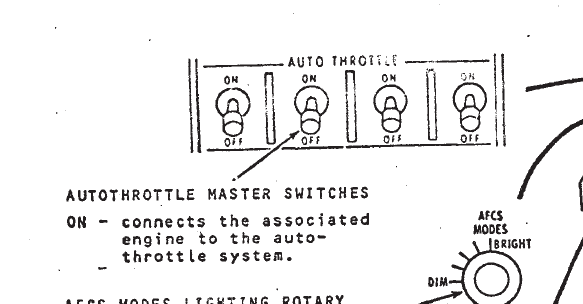
- The controversy that exists in flight simulator is that while the real concorde would allow you to include or not each engine in the autothrottle system, MSFS does not, if you activate autothrottle it affects all the engines not just one, so you will see that in ovhd active autothrottle are all activated for this reason.
I put the descriptions of each button of the autopilot regarding autothrottle.
- As i have said, due to MSFS limitations is All or nothing.
-
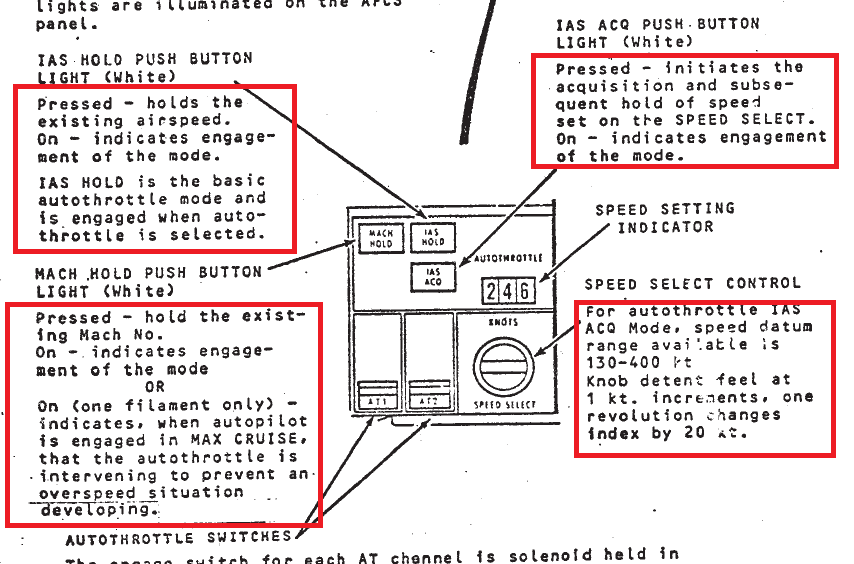
IAS HOLD: will hold the current the current airspeed, if and only if it is within VMO which is a maximum of 540 knots (mach 2.04 at 60000ft)
-
MACH HOLD: does exactly the same, with a max of 2.04.
-
IAS ACQ: Will try capture the IAS selected in the rotary within 130-400 knots. The rotary selector speed is ignored in IAS HOLD and MACH HOLD but not ignored when IAS ACQ is on.
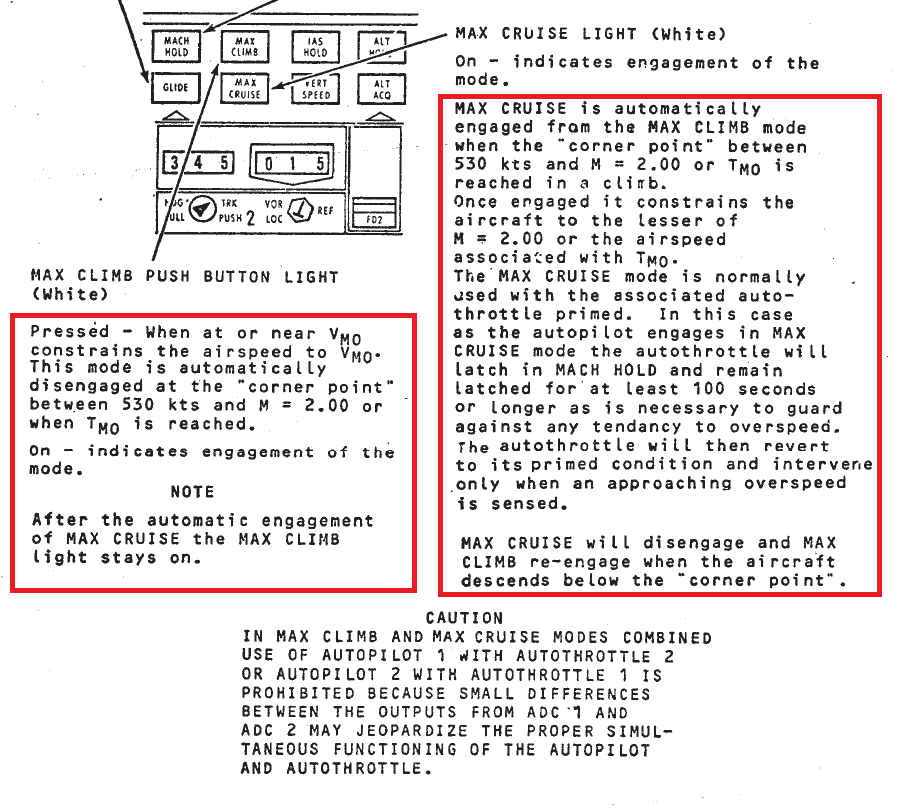
- MAX CLIMB From my understanding, max climb is based on FLC, in which it will maintain maximum climbing airspeed within VMO. If you did a direct max climb at 55000ft, you will see that it will climb to 36000ft at a maximum of 400 ias, and there it will make a stop, it is because from there it will prepare to reach 540knots up to mach 2.04. Since your goal is always airspeed over vertical speed, you will see how the vertical speed decreases to maintain 400 or 540 knots.
I answer the question you ask me about the autothrottle activating the Afterburners even though you have them lowered: this is clearly a limitation on the part of Asobo, in which it has not taken into account that the autothrottle should distinguish between if it should reach the selected speed with or without Afterburner. While in real life autotrottle doesn’t activate afterburners in real life, in MSFS it will do so if it deems it necessary and ignore your commands. That is to say that it will use all the available power. At the moment in the SDK there is no option to change this behavior
- MAX CRUISE: Max cruise has no secret, it’s mach hold at 2.04. Will or will not use all available power to maintain mach 2.04 and avoid overspeed at all costs.
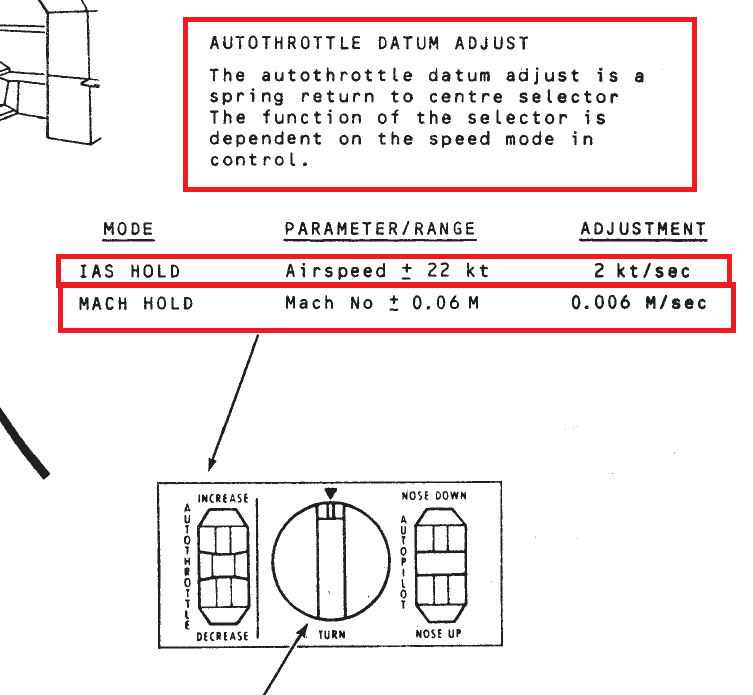
About this, never confuse it with the rotary selector of IAS-ACQ. They are independent. The autothrottle datum adjust only works with IAS HOLD and MACH HOLD, not IAS ACQ, not MAX CLIMB and not MAX CRUISE
Autothrottle at take OFF:
You must understand one thing, autothrottle piano keys arm the system, but it will not work unless one of the buttons IAS HOLD, MACH HOLD or IAS ACQ is enabled. That is to say that only with the piano keys enabled, you still have manual control of the throttle, so you can perfectly leave the piano keys armed on the ground, take off and once in the air, press the IAS HOLD to retain your current speed (it does not have to be 250 knots), or IAS ACQ (to reach the speed of the rotary selector, within 130 IAS or 400IAS, 250 knots is a reference speed for take off to give you time to retract the visor and the Landing gear, nothing more). My recommendation, leave MACH HOLD out this equation until you reach supersonic altitude area.
Jack, this is SO helpful! Thank you for the insight. THIS actually explains a bunch of stuff I was wondering - for instance, when you arm AT on the overhead panel, the AT1 switch on the panel gets activated automatically but not AT2. Knowing that those don’t operate together is key understanding.
My other big question deals with how to balance the CG into the proper range - I think I am misunderstanding how that Auto Transfer switch under the cover works in regards to balancing forward/aft.


That livery … “the taste of a new generation,” indeed. ![]()
- Correct, channel 2 is for backup in case channel 1 fails
(this is unlikely to happen in MSFS, but I wanted to bring that realism so
The objective of the fuel system is to optimize fuel consumption, attitude and trimming based on CG, but it is not something mandatory, but to optimize those 3 aspects in the flight envelope, because in real life, it could fail and it turns out that you have to do a emergency landing with a very aft CG, it can be done perfectly, but obviously the landing speed varies.
Having said that, let’s analyze the diagrams:
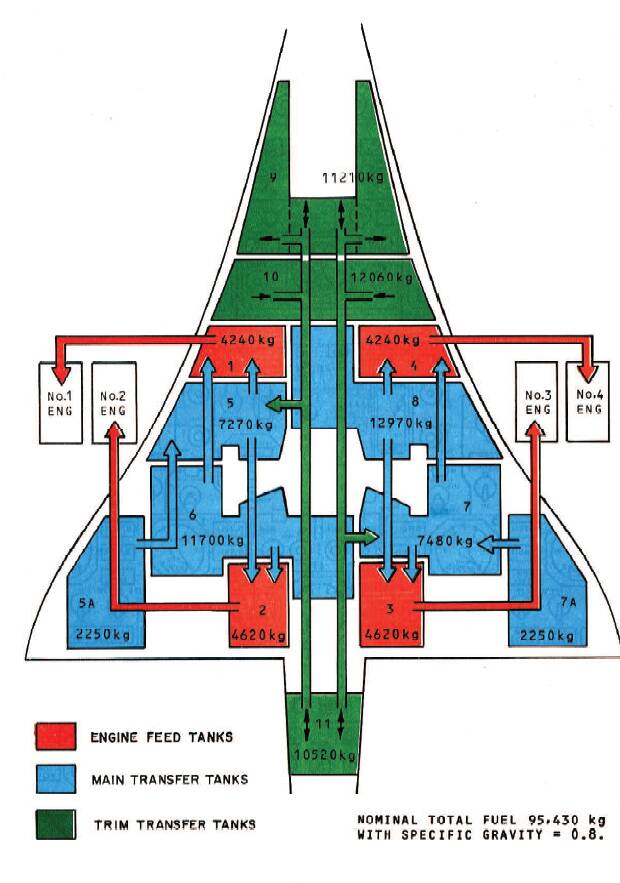
The fuel system carried out complies with the real one, each pump, each valve, each flow line, each tank and its weight. If you look closely, tanks 5,6,7 and 8 do not have the same capacities, so do not be afraid of falling into imbalances because it is not like that, they are interconnected between tanks 5 with 8 and 6 with 7 interconnect valves. No pump between them, it is gravity that balances. and the center of gravity is not altered since the discharge of the tanks is crosswise 5-7 and 6-8.
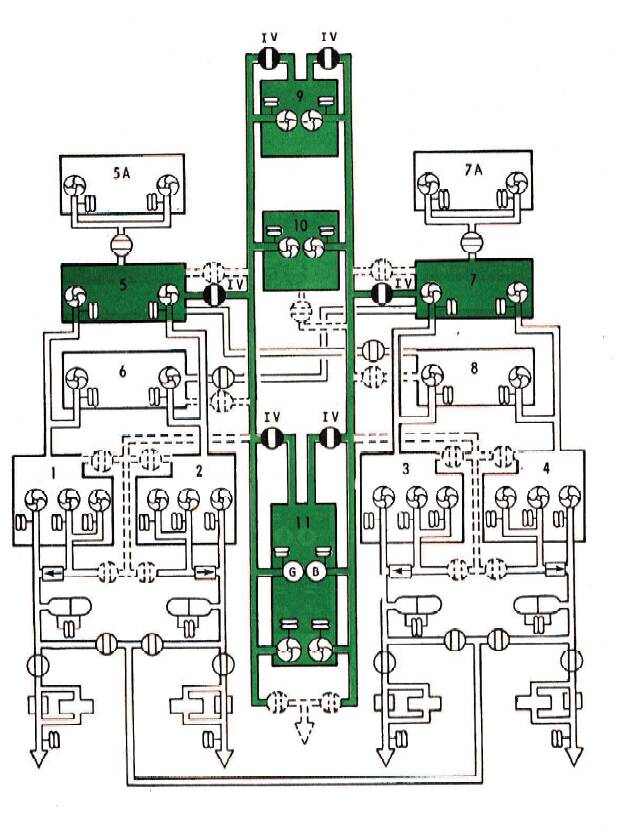
this is really the transfer system to consider, “the trim transfer system”. Its function is to balance the load and at the same time feed the rest of the tanks that do not make up the system.
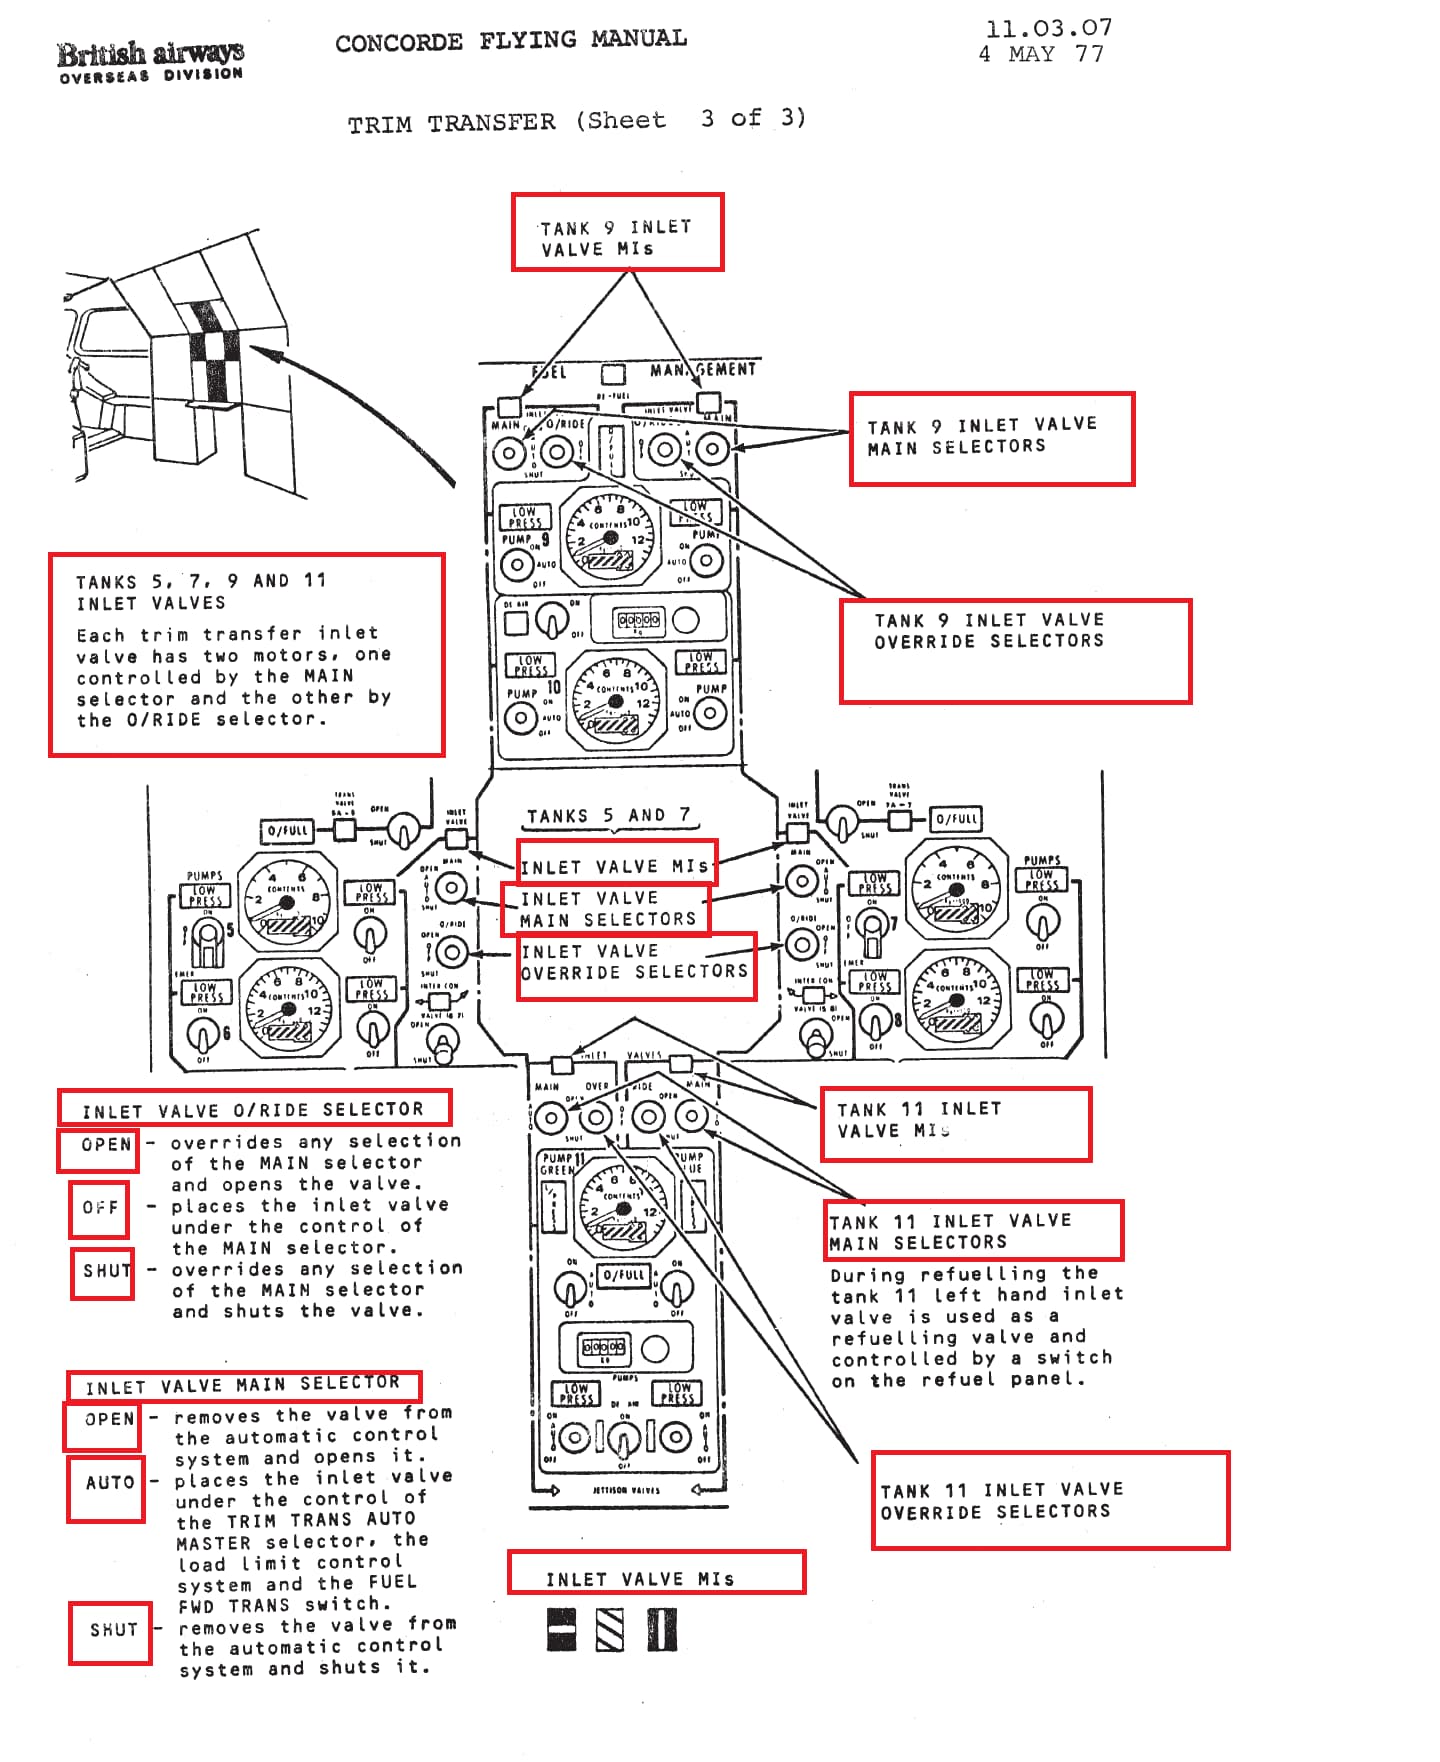
It is managed by inlet valves 5, 7, 9, 10, 11 (the numbering is by tank number).
in manual mode, if you want to transfer fuel from tanks 9 and 10 to 11, you close valves 9, 10, 5, 7, and open 11 (but deactivate its 4 pumps so that 11 does not release fuel while receiving it). The operation to transfer fuel forward is the other way around: valves 5 and 7 and 11 closed and valves 9 and 10 open (which pumps 9 and 10 closed to receive fuel). If you don’t want to move the center of gravity, you simply close all the valves (5-7-9-10-11) and you can perfectly deactivate the fuel pumps or not for De-aireation of fuel aorund its tanks. You may want to close this valves during cruise mode when the center gravity is in the 57-59% range (at 60000ft, the recomended CG is 59%).
if you want to feed the rest of the tanks, open the fuel valves 5 and 7, close the pumps 9, 10 and 11, and activate the pumps of the tanks from which you want the fuel to be transferred:
Now we come in with the auto transfers switches (however, I will always recommend that you learn what I mentioned above first so that you understand that the auto transfers would simply do this for you when the Normal and original positions are in AUTO mode).

When this switch is activated, it will govern the entire fuel system from the engineer’s panel with a single objective. Move fuel to tanks 9 and 10 from tank 11 (as long as there is fuel in tank 11). If tanks 9 and 11 are full then it will feed the rest by opening valves 5 and 7.
but I do not want you to confuse this with a switch that does everything for you, it is not like that in reality, since it is the engineer who must operate the panel, not the pilot. This switch will basically move the fuel forward, because the CG must be forward to optimize angle of attack and attitude in the descent, approach and landing phase ( where CG should be between 52-54%), not for the climb and cruise phase ( where CG should be between 57-59%)
(I’m going to expand it…)
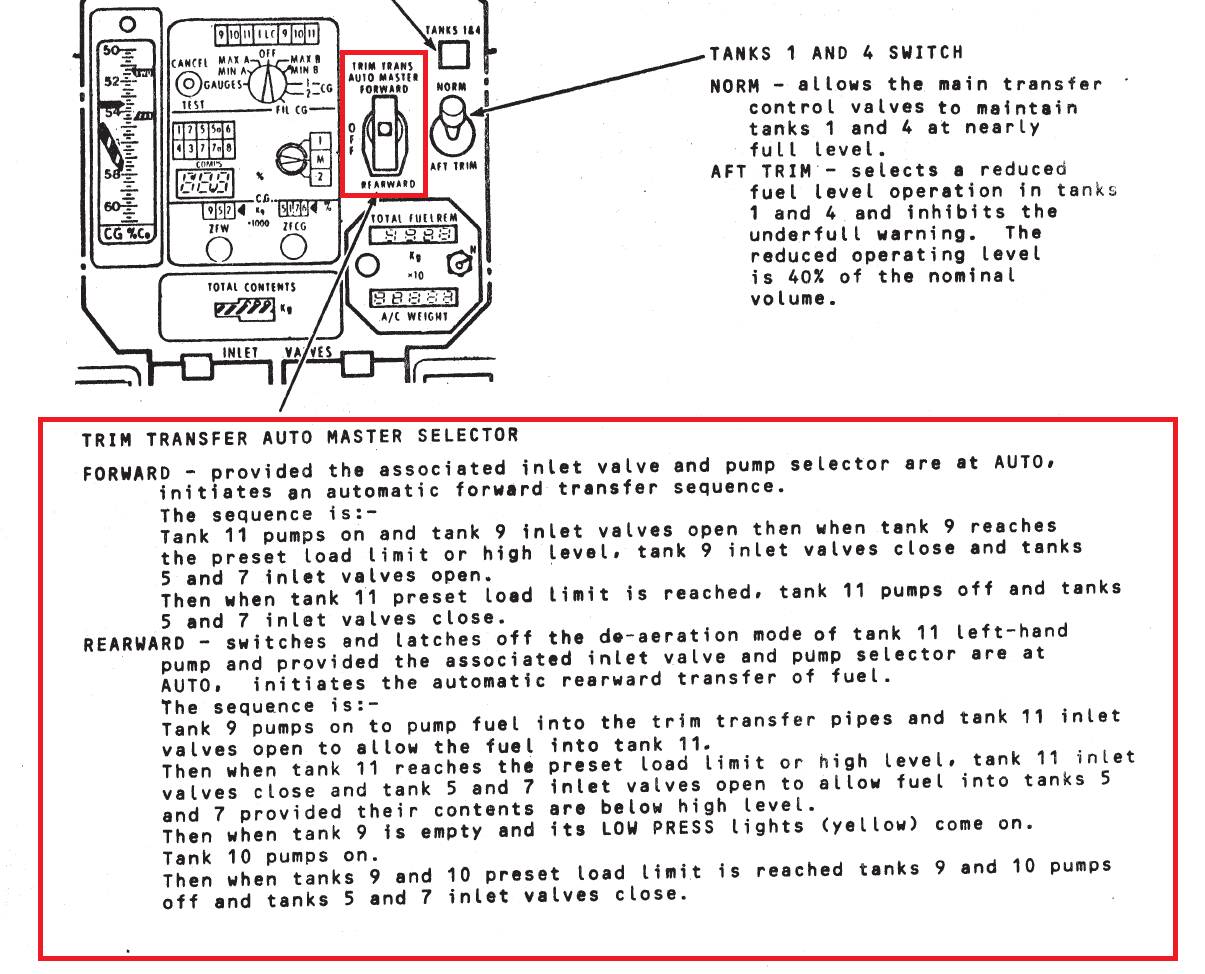
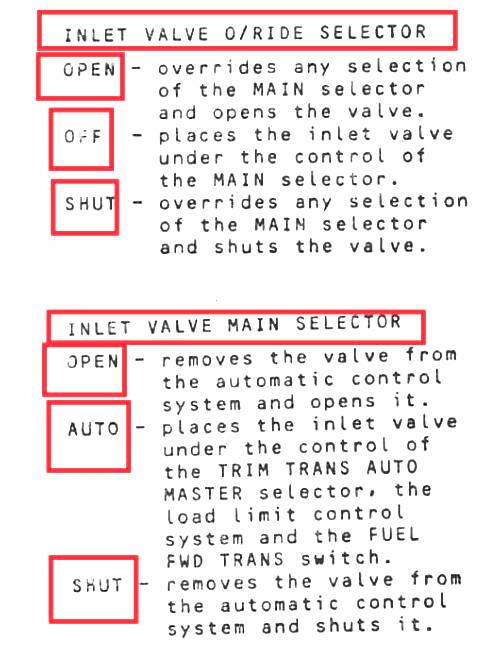
For this switch to do what it has to do, it must be taken into account that the previous switch (the overhead switch) must not be activated (since it is the governor and maximum authority). And that the inlet valves 5,7, 9, 10 and 11 must be in the auto position (it is the intermediate position of each switch, and they are the only valves with 3 positions). Remember:
Likewise, this switch the auto transfer, rearward or forward is subject to the amount of fuel selected in the rotaries that I describe below:
For tanks 9, 10:
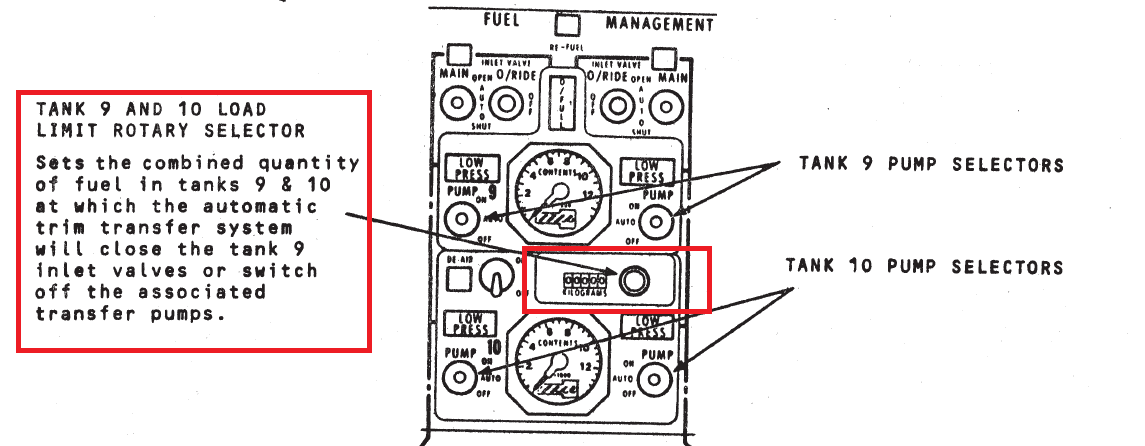
We will point out the following, in the Forward position, the tank will move fuel to tanks 9 and 10, according to the amount specified in the limit rotary selector opening valves 9-10 and closing valves 5-7 and 11, that is, if you want to transfer 4000kg from tank 11 to tanks 9 and 10, they will be transferred if tank 11 has that 4000kg and if the combined space of tanks 9 and 10 have 4000kg of space. If those 4000kg have been transferred, valves 9 and 10 will close and valves 5 and 7 will open, and tank 11 will continue transferring to these tanks (if you don’t want tank 11 to continue transferring, cut valves 5 and 7)
For tank 11:
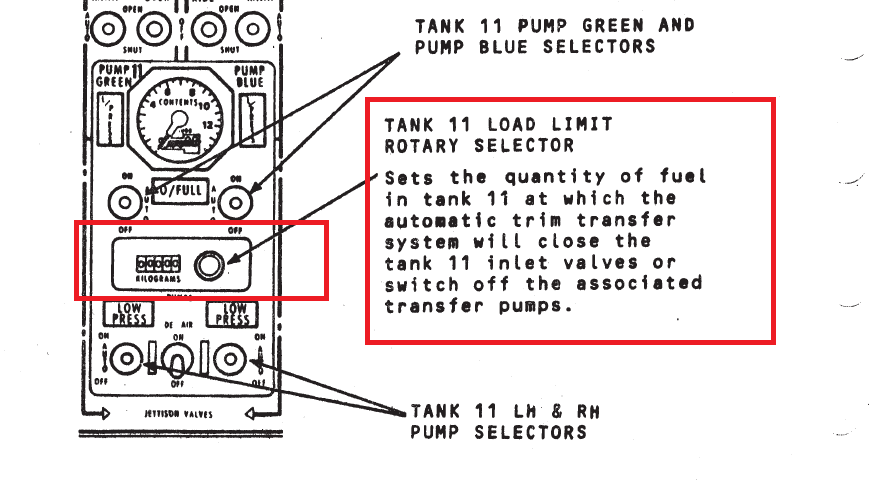
-We will point out the following in this case, in the Reardward position, the tank 9 and 10 will move fuel to tank 11 opening tank 11’s inlet valves and closing valves 5-7 and 9-10, according to the amount specified in the limit rotary selector, that is, if you want to transfer 4000kg from tank 9 and 10 to 11, they will be transferred if combined tanks 9 and 10 has that 4000kg and if the tank 11 counts with 4000kg of space. If those 4000kg have been transferred, valves 9, 10 and 11 will close and valves 5 and 7 will open, and tanks 9-10 will continue transferring to these tanks (if you don’t want tank 9-10 to continue transferring, cut valves 5 and 7).
I know that all this can be difficult to digest at once, but do not let yourselves be overwhelmed, it is a simulator, and you can experiment with it. A two and a half hour flight with autopilot on gives you enough time to operate this panel and observe the effects of each switch. My advice is that you learn the manual transfer method since in this way you will understand the automatic operation.
I was wondering why Singapore airlines…. This is what I found on wiki…
In 1977, and from 1979 to 1980, British Airwaysoperated a Concorde (G-BOAD) which was dual-liveried with Singapore Airlines’ livery on the port side and British Airways’ livery on the starboard side.[71] It was used on the London to Singapore via Bahrainservice. The service was withdrawn for financial reasons and complaints about noise from the Malaysian government.
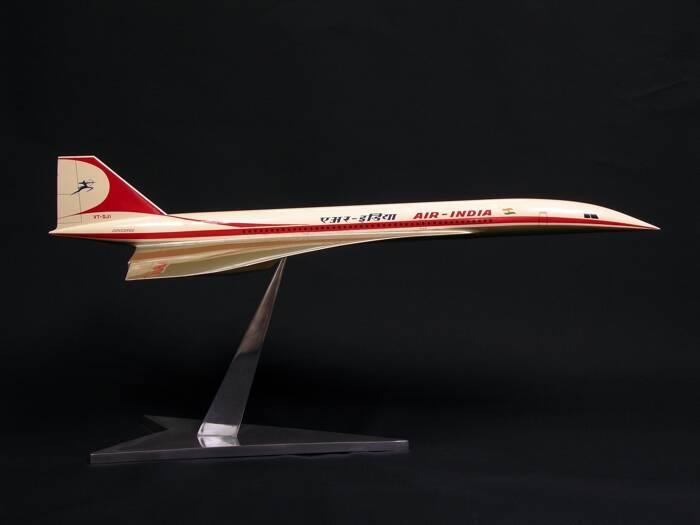
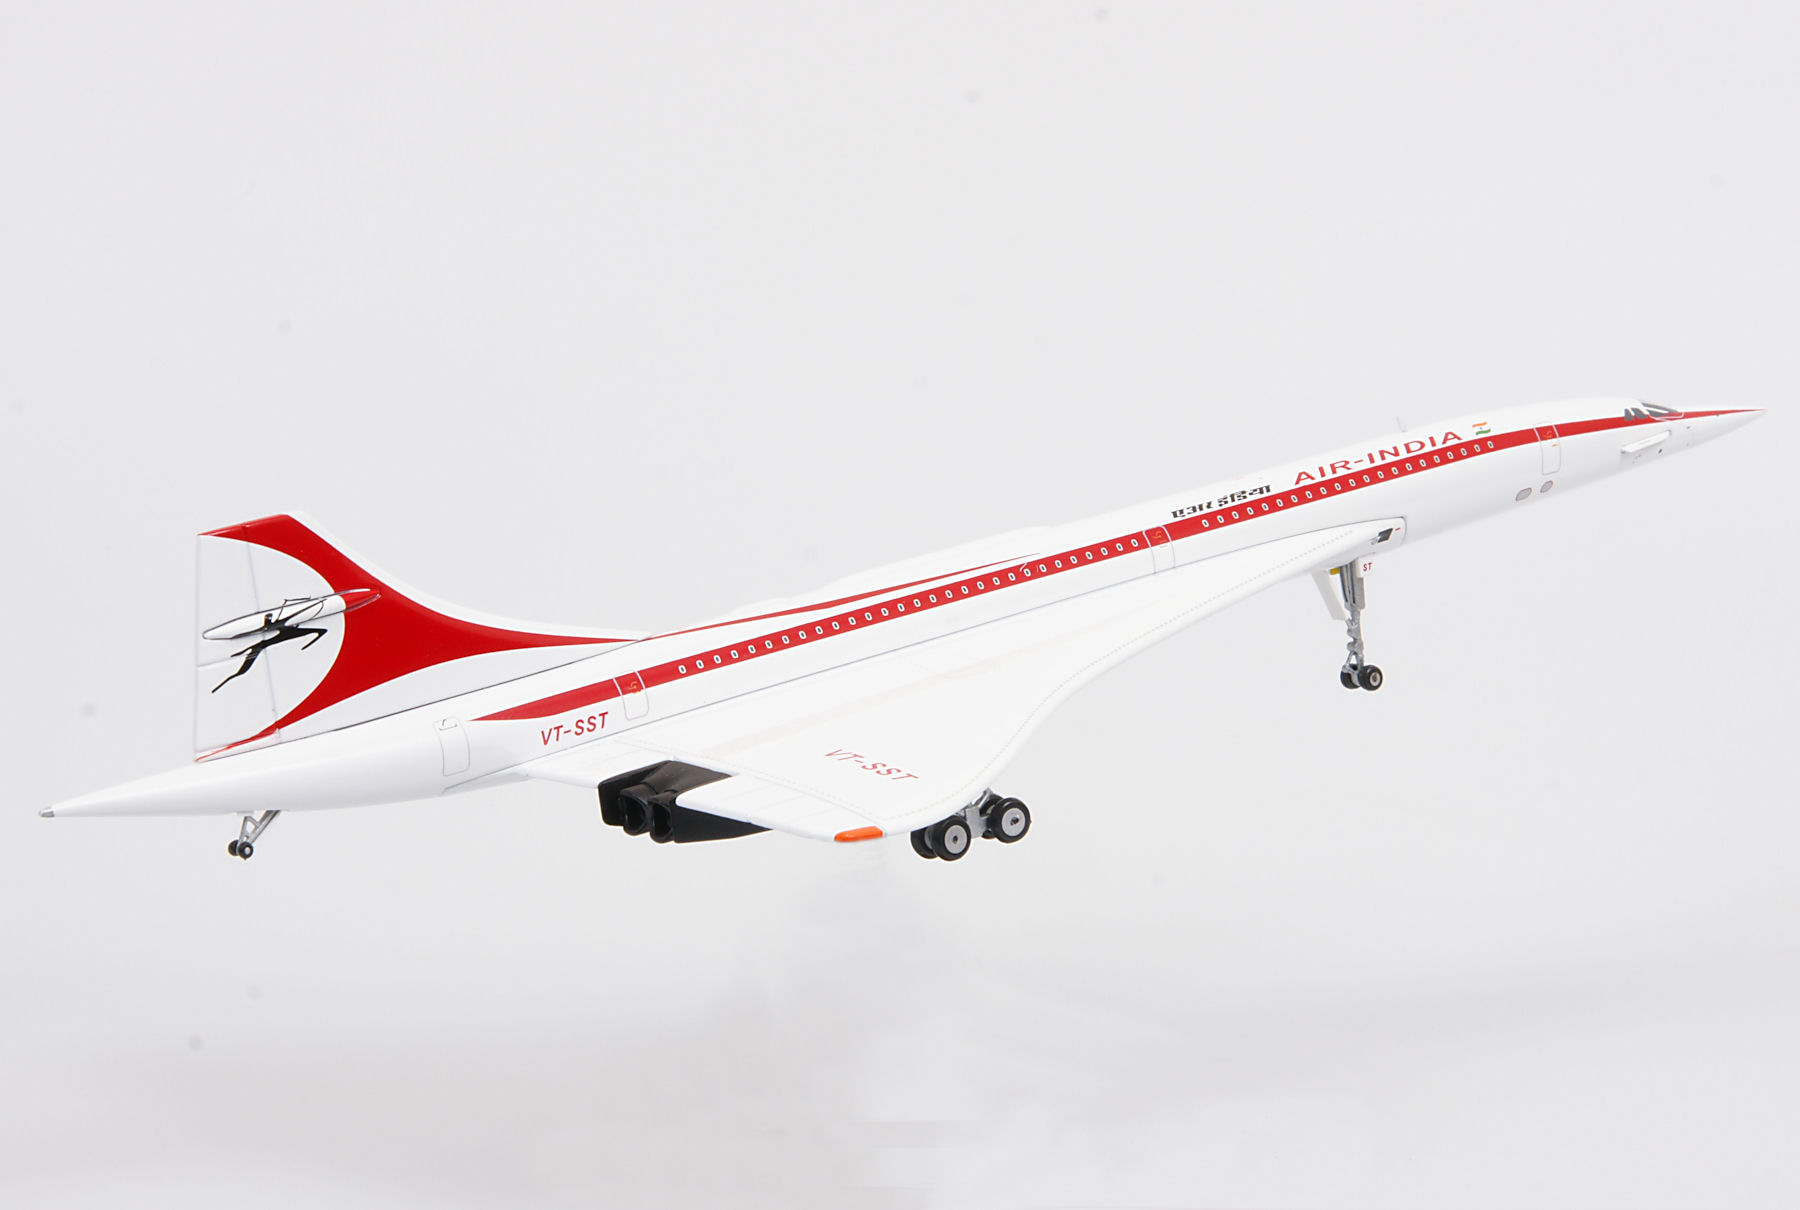
There are already some fun liveries on flightsim dot to. I especially like the retro-Iran Air livery, as that was actually a planned buyer of at least a couple units prior to the fall of the Iranian royal house in the late 1970’s. Fun to see her done up in some anachronistic American and European liveries as well. ![]()
Thank you for that info, I was wondering the same. My ignorance thought it was only BA and Air France…but on topic reading this thread my wallet is out. Also, I think there will be plenty of updates from the devs.
As MSFS matures so will Concorde.
Hello @DEAN01973 , and @CodenameJack447
Congrats for the release ![]()
Already done a supersonic flight at MACH 2.04 at 60’000ft ![]() amazing
amazing ![]()
![]()
![]() .
.
I have some doubts to ask :
I’ve noticed that Cold&Dark condition have a lot of switches “already” on …will you think to increase the simulation and let us set them in future with a patch? ![]()
For example at the moment:
Anti-Stall system is already in ON
Engine Feed Pump are already in ON
Hydraulic pump already in ON
Engine Gen already in ON
Full Heaters already in AUTO
Secondary Air Doors already in AUTO
Then some bugs:
In engine start sequence, the N2 increase when you click the Start Valves from Start to OFF position, and default position of valve is in Start…should be in OFF position ![]() .
.
In checklist when you click to show you the ENG 4 T/O limiter to set 88%, the lever showed is the Eng 2-3 GND-idle and not the right one ![]()
Last things are something about Reheat when you reach MACH 1.7 tried to shut them off…in MAX CLIMB and AT1 ON … they didn’t switch off till MACH 2 … but i will try again tomorrow and see if there’s something strange or different step to do ![]()
Congrats again… i love it! ![]()
P.S. Is it possible to add a switch or an option to disable the pilot in cockpit? Sincerely they are very annoying ![]()
Speaking of auto land, is that when set the ILS frequency, pressing the loc and glide slope will make it goes into auto land mode? Last night I’ve only tried manual landing by visual approach with the aid of ILS yellow markers in the artificial horizon. Pitch wise I know it’s about 10 degrees and speed I kept it at around 160-170 knots
you can do this by setting their weight in the fuel/payload menu to 0.
would be great if this was a button like the passenger one though.

Hey Jeremy, the engine sounds are quite loud, can barely understand what you’re saying.