Chapter 1: Introduction to the Cockpit Hardware HUB (in short “HUB”) and how to use it
Features:
- Connecting with 1 or more Serial USB devices. The tool supports “hot connect/disconnect”.
- Real time monitoring of Serial USB device communication (CmdRxCnt, CmdTxCnt, NackCnt)
- Test function giving an indication of communication speed with the Serial USB devices
- List of all variables that a Serial USB device has registered
- Use of “execute_calculator_code” on the fly. Very handy to test out commands before implementing them.
- Send Commands to Serial USB devices and/or MSFS2020. This includes registering variables (more details further below) and setting their values.
- List of all registered variables with their real time values. The list can be filtered.
- Logging with 3 levels (High, Medium, Low). The log can be filtered, cleared and disabled.
Concept of the tool:
The principle is that if a Serial USB device connects, it tells which variables it is interested in. These variables are then validated and registered with MSFS2020. This concept allows each hardware module individually to decide which variables it needs.
Each variable gets a unique 3 digit ID in the tool. This means that currently a maximum of 999 variables can be registered (000 is not supported).
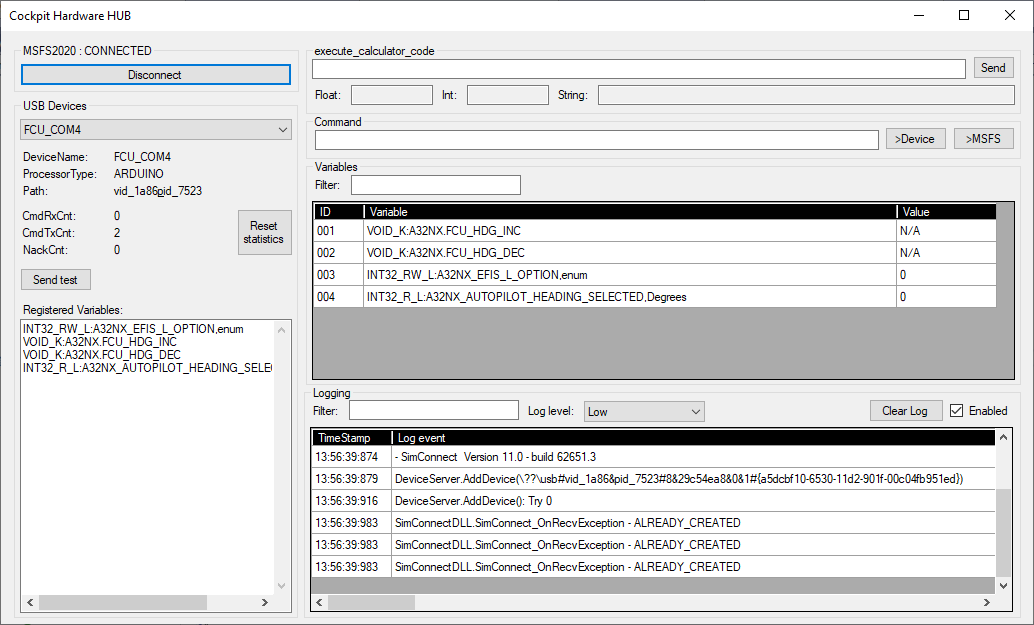
Once the unique ID is known, it can be used to control the variable. In the above screenshot, the command “003=1” will set the value of the L-var A32NX_EFIS_L_OPTION to the value 1 (CSTR). The advantage of using a unique ID is that the command becomes a lot shorter (less communication and easier to use).
The core functionality of the Cockpit Hardware HUB is basically parsing the variable string that the Serial USB device wants to register. This means checking the syntax, and validate the registration of the variable. This makes use of all the technologies as described in my earlier tutorial, which means making use of SimConnect and my own WASM module. The GitHub repository contains the source code of both the SimConnect interface, the WASM Module and the module that controls the connection and communication with the Serial USB devices.
Format of a variable
To register a variable, the below structure has to be used.
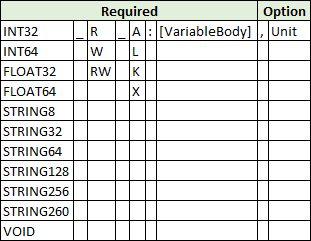
- The first part is the type used to send and/or receive values. VOID is used for variables that do not send nor receive any values, such as Events.
- A variable can be Read only, Write only or Read/Write. This will restrict the usage of setting/getting values. You can not set the value of a Read Only variable, and can not get the value of a Write Only variable. The ability to define Write Only variable also avoids that the SimConnect module is continuously listening to the variable value, which would be a waste of resources. In case of a VOID variable, the R/W/RW has to be omitted, because you can’t get or set values anyway.
- Currently, only A, L and K type variables are supported. X-type variables are my own invention, and are variables that are based on “execute_calculator_code” (more details below).
- The variable body can contain any valid variable name that is used in MSFS2020 and/or the add-ons.
- The unit is only needed if required
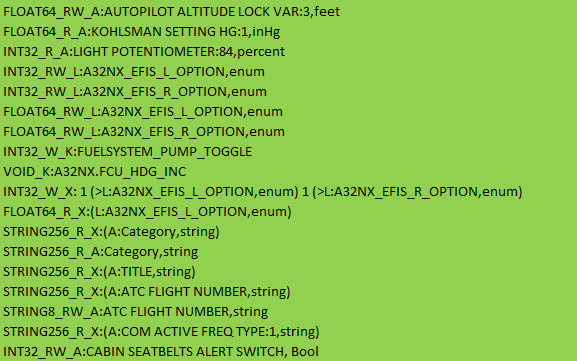
Here are some examples of variables that can be used with the FlyByWire A32NX:
Example 1: Registering and controlling an A-var
My examples always use the free FlyByWire A32NX add-on which you can find here. But in case of A-Vars the default A320 could be used as well. Make sure that MSFS2020 is started, and that the A32NX is at the start of the runway with engines running. You can use the tool without connecting it to Serial USB hardware.
Enable the logging. You can leave it on Log Level “Low”.
![]()
Connect the tool with MSFS2020 by pressing the Connect button:

A successful connection will be indicated by the tool. The Connect button will change into a Disconnect button.

The log will show some information about the connection.
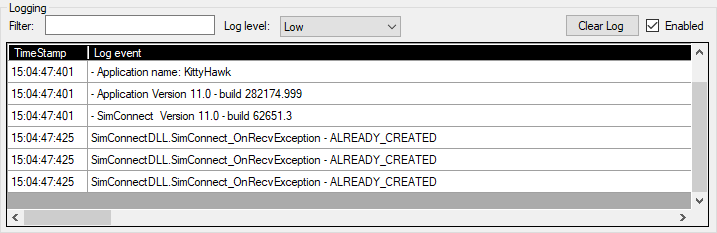
Don’t worry about the “ALREADY_CREATED” messages - this is because the tool tries to recreate some Client Areas that the WASM module has already created.
Now enter the below string in the Command line and press “>MSFS”.
![]()
This will tell the tool to register the variable with MSFS.
- Variable type is FLOAT64 (you could also have used INT64 or INT32, which can hold the altitude value)
- Variable will be Read/Write, which means we will receive real time values from MSFS, but we will also be able to set the value of the variable
- Variable is of type A, and has the name AUTOPILOT ALTITUDE LOCK VAR:3
- The unit used is feet
If all goes well, you should see the below in the Variables list:

It means that the variable has got the unique ID “001”, which can now be used to set the value. The Value is also updated in real time. You can experiment with this by changing the Altitude in the airplane by turning the knob. You will see the value changing immediately. If you have many variables, you can enter some text in “Filter” (example, the variable name).
When you want to change the Altitude, you enter the below in Command and press “>MSFS”.
![]()
Now a few things will happen. The tool will send the new value to MSFS through SimConnect. The value will change in MSFS2020, and because of that, SimConnect will also receive the new value. Because we are listening to that variable (RW). The tool will update it’s value in real time.