Thanks a lot, this works perfect!
Sure! BTW if you find events that can control encoders in G3X (the one in XCub for example) let me know. Seems that only heading and nav works on that one…
BTW I’m also adding 3D printed Trim wheel and rudder trim knob to the project, in a separate box attached to Saitek throttle quadrant and based on a Thingiverse model. And I printed out throttle, mix and fuel handles to have more realistic feel and higher precision due to larder size - a set for prop aircraft, and a set for airliners. I will post everything when I get the encoders and finish it. It’s going to be epic ![]()
1 Like
This is funny, that’s what I did the last days. Instead of using a potentiometer I used an encoder. First with FSUIPC offset, todays the first time with events. Using the offset was better, the steps per detent was bigger and for me better to be handled. I tried to change everything to MSFS2020 events, but couldn’t find the event for “vertical speed on”.
I also printed “dual shaft” encoders from thingiverse, these are waitung to be installed. And I bought a 4-way “joystick” with encoder included, but I am unhappy with it as the encoder button is also pressed if the direction buttons are pressed. So I printed a casing (also from thingiverse) which will be finished at the weekend.
Biggest “problem” will be to design a plate where all these parts get be installed ![]() Must be good handled in VR, but still don’t know if for my right or left hand. Favorite is for now “something” which can be screwed to the Saitek Thottle. So everything could be served with the right hand…
Must be good handled in VR, but still don’t know if for my right or left hand. Favorite is for now “something” which can be screwed to the Saitek Thottle. So everything could be served with the right hand…
edit: just read the first thread again, so I guess it will be similiar to your design ![]()
I used this as a base and will use an encoder as well. Already 3D-printed averytyhing. It fits the Saitek throttle quadrant like a glove.
I will use encoders instead of potentiometers and will connect it to my VR Control Box board and use it for pitch trim and rudder trim.
1 Like

The project is complete, and VR Control Box is working fine! Just need some finishing programming touches, and will publish the files soon.
The trim wheel module that is attached to the throttle quadrant is also connected to the same box. It has rudder trim encoder at the bottom that activates only after pressing it in once. Until pressed, it acts as a magneto key rotator, so you can start the engine with it, and test magnetos.
The box itself currently has 2 banks (with possibility of the third) activated by the 3-pos switch. Default bank has all the most-used functions in it. 2nd bank has rarely used NAV2/COM2/ADF radios and I run out of things to add there for now. There’s only so much you can remember and intuitively use in VR. 90% of the time I’ll be using the default bank.

1 Like
Looks great! I got a got a little bit impatient and started my own box, but I’m really looking forward to seeing how you worked the preconditions in mobiflight. I’m only just learning this stuff and I only have two dual encoders so I want to make the most of them, so I’m interested to see how the bank switch works!
I’ll publish my file so you can look what I’ve done. Basically I’m using free (unassigned) FSUIPC addresses to store variables in MSFS itself (yes, I know it’s weird, but it’s the only decent way apparently), so when switch is closed, it assigns value to a variable, which is then used as a precondition for encoder actions.
But I have to tell you it was getting annoying to switch banks all the time, and then you forget which bank is on at the moment and change the wrong thing ![]() This is much better, everything is at the same place every time.
This is much better, everything is at the same place every time.
A nice trick for things like radios and transponder is to use an inner encoder “click” to switch positions: for example I have transponder encoder in “protected” position first (so rotating it doesn’t do anything) and clicking the center "moves " position from “protected” to “digit 1” then 2,3, and 4, while rotating changes the number. So it’s very natural to cycle through 4 positions and put it back to “protected” so you won’t accidentally dislodge your transponder. Radio encoder cycles the same way between COM1/NAV1, and when put to bank 2 COM2/NAV2. Inner/outer knob does MHz/kHz just like the real thing.
One of the encoders on Bank 2 also sets the fuel tank selector Left/Right with center click engaging fuel pump. In PA28 you need to manually switch tanks every 15 minutes, so it was very annoying to do with a mouse. Now I can grab the encoder, press to engage fuel pump, rotate to switch tanks, press again to disengage the pump, all without letting it go. Need to switch to bank 2 before I do that though, but still so much better than reaching for the mouse and doing all that with it.
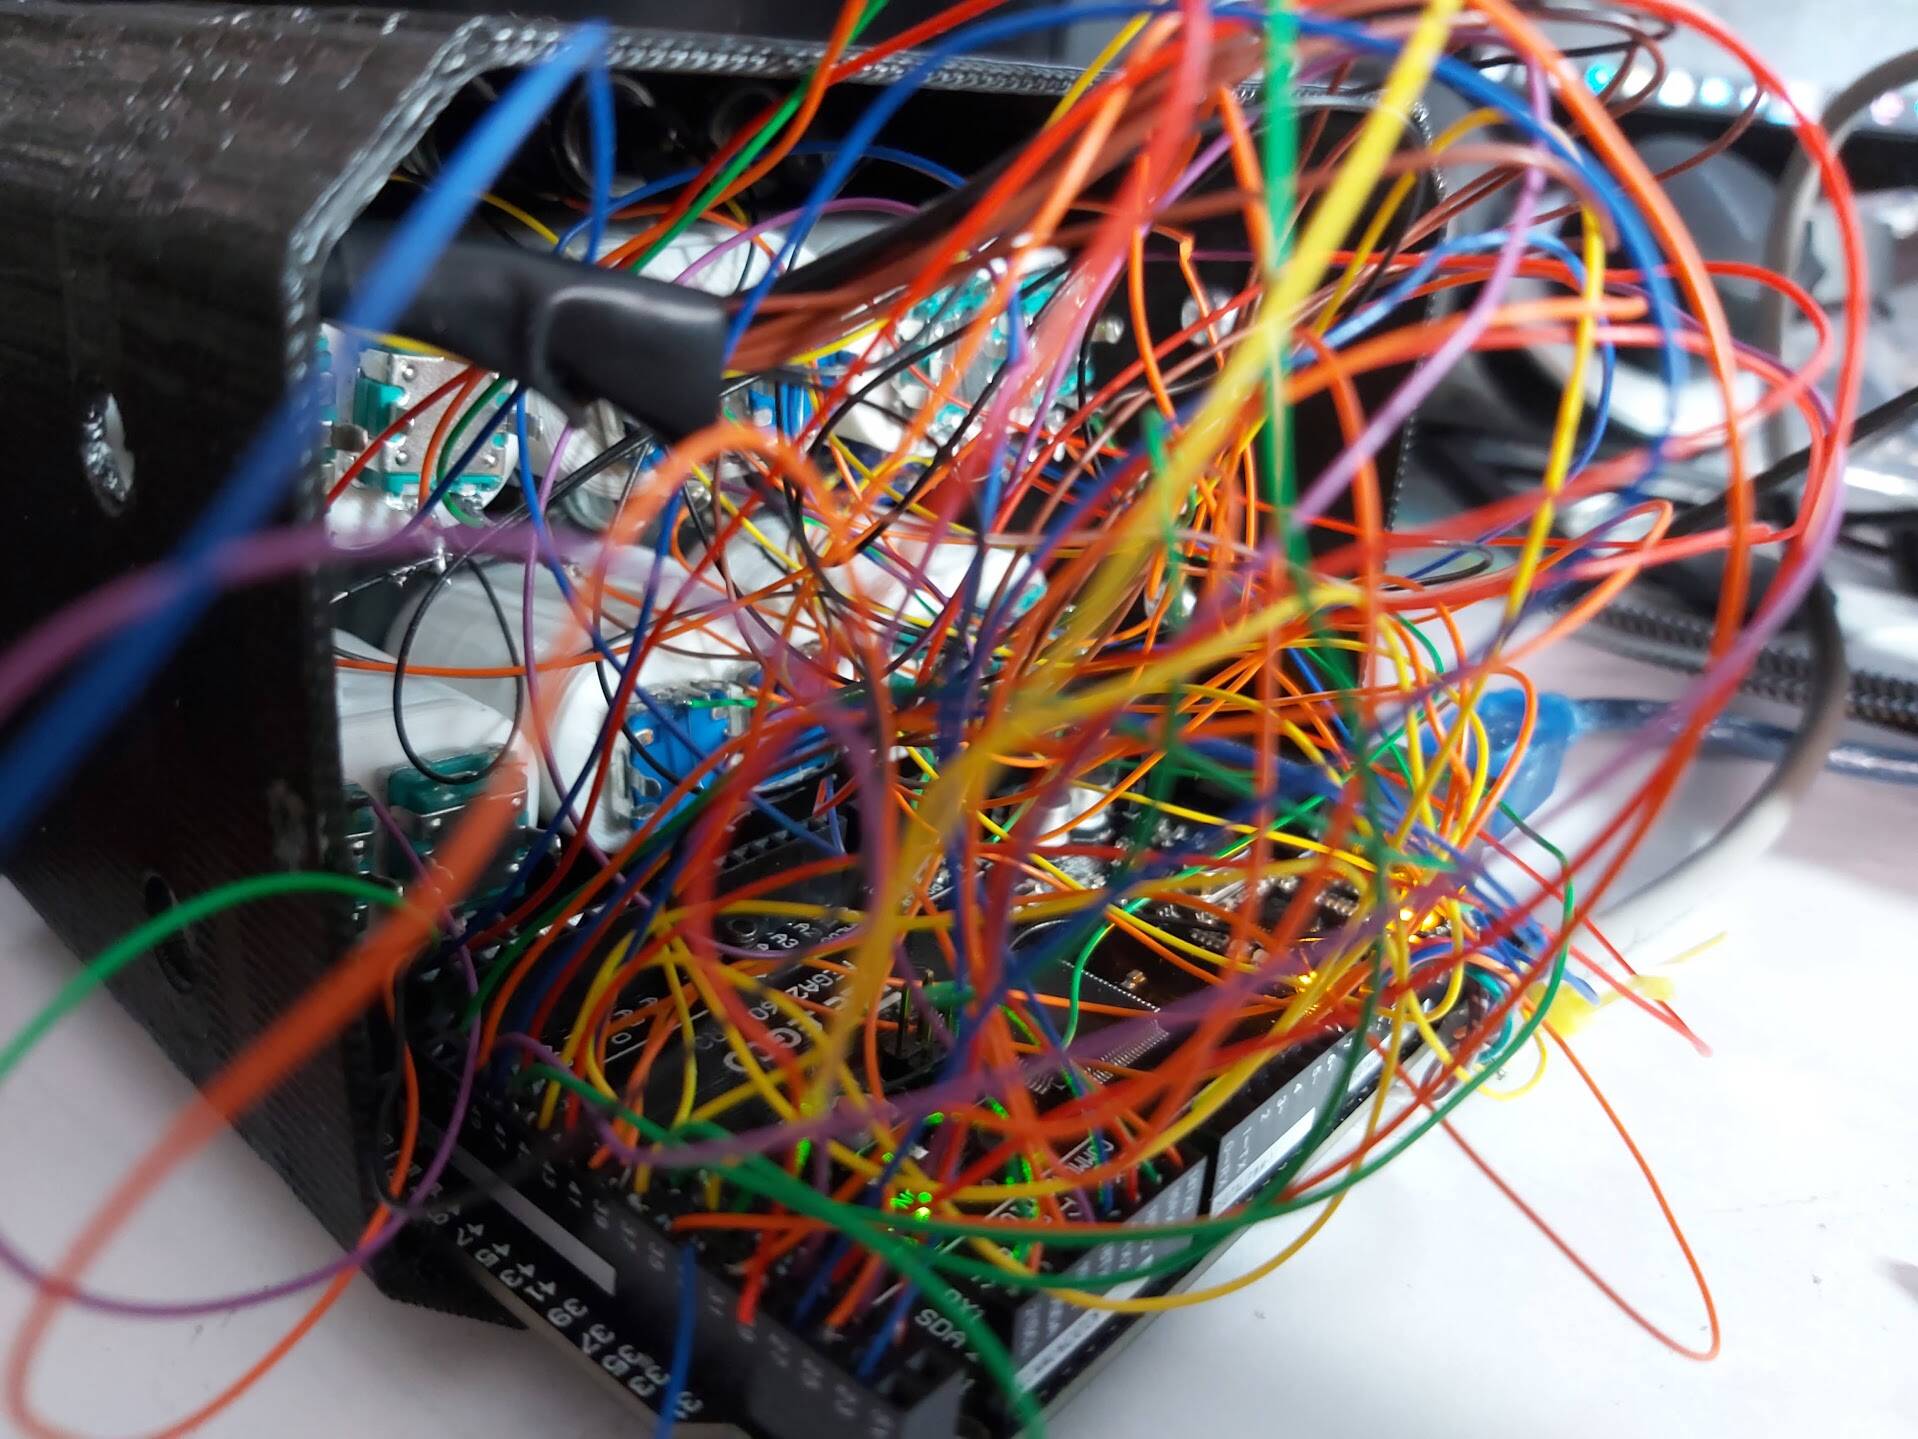
Wiring slowly developed to a huge mess though, but it works just fine:
1 Like
Haha Looks like a bit of a spaghetti incident!!!
I only want a simple setup, I’m a basic flyer. I just want to adjust AP alt hdg and maybe input a “direct to”, I find it hard to do with a mouse. I’d like a switch to change the function of the knobs for different aircraft though, so I could use the altitude knob for the piper and then flick a switch and have it work with the CRJ.
off topic, I saw your post on the buttkicker and that was the tipping point for me to buy one, it’s on order! So thanks for that as well!
Welcome! Vibration is great, you’ll like it. I’m actually going to build a motion simulator now, hope it’ll work well. Need several hundred $$$ of parts. But it beats spending over 2K for a commercial one.
For different planes MobiFlight developer recommend to me creating different profiles and loading as fit. However I did a different thing: as my knobs should serve the same functions at all planes, I created parallel actions that operate everywhere where default ones won’t work, i.e. I tested with G1000 / G3000 units and few different autopilots and added G1000/G3000/JustFlight specific events when default output won’t work. So I have a single profile that works in all/most aircraft.
That’s a great idea! So you can layer different events onto one encoder? And I can theoretically have an altitude encoder and assign Increase alt events for CRJ, JF, and Standard to it so when it’s turned right it fires all those events at once?
Yes, exactly. Although developer was doubtful when I asked on Discord if this would work. It does work though. You need to be careful, because if both events work on a specific aircraft, they will all fire, so you can end up increasing altitude by steps of 2 or 3 instead 1. In those cases it means the default event works in the aircraft, so any customized events should be used only in cases that default ones don’t work. For example, heading and radio tuning work in steam gauges, G1000/3000 and everywhere else. So no need to do custom events. But any G1000 custom events for example, don’t do anything when there i s no G1000 in teh cockpit, so can be safely overlaid. Same for G3000 etc. For example, G1000 right knob (push-for-cursor, outer knob for position, inner knob for letters etc.) requires 3 actions that only work in G1000. So this has to be done in parallel for all GPS systems supported.
So basically, create the generic events first, then see where exactly they won’t work properly and try to find parallel custom events that would work in those cases.

I was able to score 3 electric wheel chairs at the landfill. all 6 motors and their controllers work. The motors and controllers are the major cost of a motion pit. So you might want to check out your local landfill. I’m currently drawing one up based on Bergison’s G-seat. I fly in VR with a WMR headset so I need his solution.
That’s a nice box! But I think it’s too complicated for VR. With so many identical buttons, switches and knobs, I’d be lost very quickly. Even remembering where everything is, it would take a lot of effort to find it by touch, count up “the fifth knob from the left” or something, etc… Bottom pull levers and first row with magnetos may be useful. Then it gets more complicated… but I got to admire the workmanship (if it’s a DIY project)!
That’s cool, I don’t think we have a landfill with public access like that in Toronto area, or at least I haven’t heard about that. Maybe I should have done more research ![]() So far I ordered all the electronics and misc parts, and 2 PGSAW motors. I heard good things about G-seats, but I also was told that in VR with normal motion sim you need small precise movements, and with small movements you don’t even need motion compensation, which is the main problem with WMR/OpenXR. We’ll see…
So far I ordered all the electronics and misc parts, and 2 PGSAW motors. I heard good things about G-seats, but I also was told that in VR with normal motion sim you need small precise movements, and with small movements you don’t even need motion compensation, which is the main problem with WMR/OpenXR. We’ll see…
My box is organized for easy intuitive access with tactile differentiation, so I would always know where I am, and I almost don’t have to feel for things, my fingers are already there if I can feel the box. The idea is that after a bit of getting used to, it’s easy to remember and intuitive to use. It’s easier than it looks ![]()
( inner knob / outer knob / encoder push click / button to the left of the encoder):
- Top left: radio tuning - like a real thing, mHz / kHz, COM1/NAV1 switch, SWAP. On switch set to Bank 2 - the same for COM2/NAV2
- Top Right: Altitude / VS / AP Alt mode / AP VS mode
- Mid Left : Heading bug/AP (shaped like heading knob on Garmin) / AP Hading sync/ AP heading mode
- Mid Right: Course (VOR, OBS - shaped like course knob on Garmin) / Altimeter / STD / *
- Bottom Left (ribbed knob shape): Transponder / GPS Zoom / Transponder position (locked,1,2,3,4) / *
- Bottom Right (smooth knob shape): GPS dual encoder - page flips, push for cursor, letter selection etc. - just like the real thing.
- *GPS buttons: bottom left 2 buttons are DIRECT and FMS, bottom right 3 buttons are MENU, CLR, ENT
Second bank (engaged but flipping the switch) has less used functions like COM2/NAV2, ADF tuning, Fuel pump and switching fuel tanks left-right etc.
Trim wheel is exactly that. Rudder trim knob is Starter/Magneto rotator, after push click it becomes rudder trim knob.
You may find this of interest.
The Motion Integrated G-Seat - part 1: Introduction - YouTube
My first design had everything you could put your hand on in the 172. I downsized it to this one. I wasn’t sure if it would be too much but it’s not. I do long distance flights and use everything on the panel. I was considering adding some diversity to the buttons but realized I don’t need to. I just finished the throttle Tuesday and have the trim wheel on the printer now.
Cool, if you are OK with it and can operate it when i VR - great! This would be a bit of an overkill for me though. Most of what’s there would be better operated with VR controller in VR cockpits IMHO, when (if?) controller support is added later this year as promised. I designed my box to still be relevant after that, because encoders are still better for those kinds of inputs. Buttons and switches are perfectly fine, judging by my X-Pane experience. But that’s all very personal of course, matter of taste.
