Fun with Lightstrips + Arduino + MobiFlight = IRL simulated light

Arduino Projekt – Lighting feature.
Inspiration: Philips Ambilight

Material:
WS2812B 5050 Adressable RGB Strip 100cm (60 leds) cut in half 50cm each (2 times 30 leds)
Arduino UNO board. (or any Arduino board with min. 6 Digital I/O).
A bunch of wires.
Total under 20$ on Amazon

Already installed and running:
Arduino Mega 2560 with Mobiflight Firmware, already setup, and working with simconnect module. (could also be an Arduino Uno, but needed to have Mobiflight firmware installed.)
See: https://www.mobiflight.com/

Hardware setup:
USB connection from PC running MSFS and MobiFlight to Arduino Mega 2560.
Connect Arduino Uno ”LED controller” to the following:
GND wire between the two boards to ensure signal stability
LED strip left side, connected to +5 volt, ground, and digital output pin D6
LED strip right side, connected to +5 volt, ground, and digital output pin D7
Pin D8, D9, D10, D11(for input) to Arduino Mega 2560 pin D8, D9, D10, D11 (for output) or any 4 digital output pin on the Mega board.
Led strips mounted on the backside of you selected monitor/display/tv/table.

Programming:
Simple description.

Arduino Uno ”LED controller”
Using Arduino IDE v2.3.4
If a digital input signal D8 is active, turn on a group of LEDs with a Green and Red.
If a digital input signal D9 is active, turn on a group of LEDs with white color.
If a digital input signal D10 is active, make some LEDs flash white like a beacon.
If a digital input signal D11 is active, turn on a group of LEDs with white color.

Arduino Mega 2560 (Mobiflight)
Using mobiflight interface:
If Simconnet indicates that Nav lights is on, activate output D8
If Simconnet indicates that Taxi lights is on, activate output D9
If Simconnet indicates that Strobe lights is on, activate output D10
If Simconnet indicates that Landing lights is on, activate output D11

Result:


Saitek/Logitech switch panel activates light/strobe the light in the sim, and the lightstrip on the backside of my display lights up.

Feel free to ask for Arduino Sketch and diagrams if you would like to try this out yourself :slight_smile:

7 Likes

Very cool, one of our Air Manager instrument dev’s who wrote a back light dimmer that works with the light in the sim, also wrote it to work with hue light bulbs so the lights in the sim room will also dim and brighten with the sim.

This is all done automatically.

Does mobiflight support ws2812?? I thought it only supported basic LEDs.

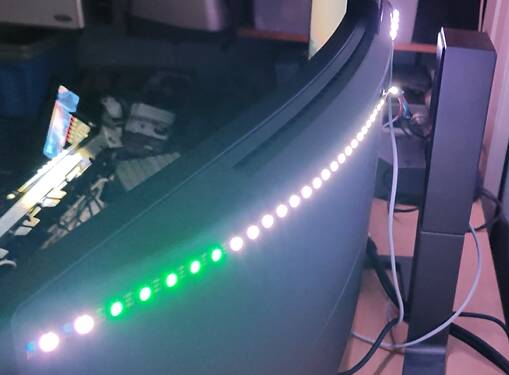
Yep, you got that right… that is why i added a second Arduino Uno, to control the strip.
So only the Mega have the “mobiflight firmware”. The Uno is just programmed using the Standard IDE to create a Sketch.

Only the Arduino Mega have connection to the sim, and the output from Mobiflight signals the Uno, when to turn on/off the light.

#include <Adafruit_NeoPixel.h>

// Definer pin and number of leds for two strips (Left and right)
#define LED_COUNT  30
#define LED_CABIN  5
#define LED_PINL   6
#define LED_PINR   7
#define INPUT_PIN1 8  // Define input pin 1 for Nav-light
#define INPUT_PIN2 9  // Define input pin 2 for Taxi light
#define INPUT_PIN3 10 // Define input pin 3 for Strobe light
#define INPUT_PIN4 11 // Define input pin 4 for Landing light


// Create NeoPixel-objects for both
Adafruit_NeoPixel StripL(LED_COUNT, LED_PINL, NEO_GRB + NEO_KHZ800);
Adafruit_NeoPixel StripR(LED_COUNT, LED_PINR, NEO_GRB + NEO_KHZ800);

void setup() {
  Serial.begin(9600);
  StripL.begin();           // Init left NeoPixel-strip
  StripR.begin();           // Init right NeoPixel-strip
  StripL.show();            // turn off all LED on left strip
  StripR.show();            // turn off all LED on right strip
  StripL.setBrightness(50); // Set brightness on left strip (optional)
  StripR.setBrightness(50); // Set brightness on right strip (optional)
  pinMode(INPUT_PIN1, INPUT); // Define input pin 1 as input
  pinMode(INPUT_PIN2, INPUT); // Define input pin 2 as input
  pinMode(INPUT_PIN3, INPUT); // Define input pin 3 as input
  pinMode(INPUT_PIN4, INPUT); // Define input pin 4 as input
}

void loop() {
static int prevInput1 = LOW; 
static int prevInput2 = LOW; 
static int prevInput3 = LOW; 
static int prevInput4 = LOW;
int input1 = digitalRead(INPUT_PIN1); 
int input2 = digitalRead(INPUT_PIN2); 
int input3 = digitalRead(INPUT_PIN3); 
int input4 = digitalRead(INPUT_PIN4);
  if (digitalRead(INPUT_PIN1) == HIGH) {
    // Turn on Nav-light
    setNavLights();
  } else {
    // Turn off Nav-light
    clearNavLights();
  }

  if (digitalRead(INPUT_PIN2) == HIGH) {
    // Turn on Taxi light
    setTaxiLights();
  } else {
    // Turn off Taxi light
    clearTaxiLights();
  }

  if (digitalRead(INPUT_PIN3) == HIGH) {
      strobeEffect(100); // turn onStrobe light
  } else {
    clearStrobeLights(); // turn off Strobe light
  }

  if (digitalRead(INPUT_PIN4) == HIGH) {
    setLandingLights(); // turn on Landing light
  } else {
    clearLandingLights(); // turn off Landing light
  }
}

void setNavLights() {
  // Left strip (led 23-28) to red
  for (int i = 23; i < 28; i++) {
    StripL.setPixelColor(i, StripL.Color(255, 0, 0)); // Red light
  }
  // Right strip (led 23-28) to green
  for (int i = 23; i < 28; i++) {
    StripR.setPixelColor(i, StripR.Color(0, 255, 0)); // Green light
  }
  StripL.show();
  StripR.show();
}

void clearNavLights() {
  // turn off Nav-light
  for (int i = 23; i < 28; i++) {
    StripL.setPixelColor(i, StripL.Color(0, 0, 0)); // no light
    StripR.setPixelColor(i, StripR.Color(0, 0, 0)); // no light
  }
  StripL.show();
  StripR.show();
}

void setTaxiLights() {
  // Middle 15 LED on both strips on, white
  for (int i = 1; i < 15; i++) {
    StripL.setPixelColor(i, StripL.Color(255, 255, 255)); // White light
    StripR.setPixelColor(i, StripR.Color(255, 255, 255)); // White light
  }
  StripL.show();
  StripR.show();
}

void clearTaxiLights() {
  // Turn off taxi light 
  for (int i = 1; i < 15; i++) {
    StripL.setPixelColor(i, StripL.Color(0, 0, 0)); // Sluk lys
    StripR.setPixelColor(i, StripR.Color(0, 0, 0)); // Sluk lys
  }
  StripL.show();
  StripR.show();
}

void setLandingLights() {
  // Landing light on (Led 15 to 23)
  for (int i = 15; i < 23; i++) {
    StripL.setPixelColor(i, StripL.Color(255, 255, 255)); // White light
    StripR.setPixelColor(i, StripR.Color(255, 255, 255)); // White light
  }
  StripL.show();
  StripR.show();
}

void clearLandingLights() {
  // Turn off Landing-light
  for (int i = 15; i < 23; i++) {
    StripL.setPixelColor(i, StripL.Color(0, 0, 0)); // No light
    StripR.setPixelColor(i, StripR.Color(0, 0, 0)); // No light
  }
  StripL.show();
  StripR.show();
}

void strobeEffect(int wait) {
  int strobePattern[10] = {1, 0, 1, 0, 0, 0, 0, 0, 0, 0}; // Flash pattern
  for (int j = 0; j < 10; j++) {
    for (int i = 28; i < 30; i++) {
      if (strobePattern[j] == 1) {
        StripL.setPixelColor(i, StripL.Color(155, 155, 155)); // White light on led 28-30
        StripR.setPixelColor(i, StripR.Color(155, 155, 155)); // White light on led 28-30
        StripL.setPixelColor(0, StripL.Color(255, 79, 0)); // Orange light on led 0 (middle)
        StripR.setPixelColor(0, StripR.Color(255, 79, 0)); // Orange light on led 0 (middle)
      } else {
        StripL.setPixelColor(i, StripL.Color(0, 0, 0)); // Light off
        StripR.setPixelColor(i, StripR.Color(0, 0, 0)); // Light off
        StripL.setPixelColor(0, StripR.Color(0, 0, 0)); // Light off
        StripR.setPixelColor(0, StripR.Color(0, 0, 0)); // Light off
      }
    }
    StripL.show();
    StripR.show();
    delay(wait);
  }
}

void clearStrobeLights() {
  // Sluk Strobe-light
  for (int i = 0; i < 2; i++) {
    StripL.setPixelColor(30 - i, StripL.Color(0, 0, 0)); // Light off
    StripR.setPixelColor(i, StripR.Color(0, 0, 0)); // Light off
  }
  StripL.show();
  StripR.show();
}

Always wanted to try mimicking the sunlight using something like this. I’ve got other projects ahead of that, but it’s nice to know there’s some possibilities here.

I’m attempting a similar project but a fair bit simpler. I am trying to get some LED strips to brighten and darken when I use potentiometers for cabin and instrument lights so that I can see my instruments when using the sim at night.

I have the mobiflight part figured out. It is outputting a PWM signal on the required pins but I have no experience at all with the Arduino IDE. This is literally the first time I have tried to use it. I have managed to get the LED strips lighting up in the colours that I want, but I have no idea how to feed the PWM signal in to the board and then get the LED pin to use it.

Would you have any idea how to achieve this?

Sure, I will help with the Arduino IDE :slight_smile:

But i need a bit more info regarding the LED strip.

How is it connected to the Arduino board? eg. 3 pin VCC, GND, Data? or 2 pin?

Mobiflight board output PWM signal to “Light controller” Arduino board, Input. and this LC-board then controls the light.

I would first make a very simple IDE project, just to test the led output. Loop, 0 to 100% light. and then work on the imput.

Send me some descriptions, and I can help the programming of the LC-board.

Hi.

Thank you for taking the time to help.

Having given this some thought, an easier method might be to just control the brightness of the LED strips by potentiometers connected to the same board and then split off the signal from each pot back to the mobiflight board and have a ground connection between boards. This way, both boards would use the same analogue signal without the need for data transfer between boards.

Although I do have the mobiflight board outputting a PWM signal, for now, I’m not even connecting to the mobflight board, I’m just concentrating on using the potentiometers.

I am still struggling to get this to work though. I’m guessing that I need to do an analogREAD from the pots and then digitalWrite to the LEDs but I’m not sure how (I’m currently reading through the Arduino documentation but haven’t got that far yet).

Code wise, thanks to you and a couple of youtube videos, this is what I have so far, including comments on where I am missing stuff (this is not the code I am using to simply illuminate the LEDs). I don’t know if this will run, but it does compile.

#include <FastLED.h>

#define NUM_LEDS 40
#define LED_PINI 8      //LED pin for flight instrument lights. A string of 10 LEDs
#define LED_PINR 9      //LED pin for radio lights, again, a 10 LED strip
#define LED_PINP 10     //LED pin for panel lights, again, 10 LEDs
#define LED_PINE 11     //LED pin for engine instrument lights, 10 LEDs
#define Pot_Pin1 A0     //Signal pin for pot 1
#define Pot_Pin2 A1     //Signal pin for pot 2
#define Pot_Pin3 A2     //Signal pin for pot 3
#define Pot_Pin4 A3     //Signal pin for pot 4

CRGB ledsfltinst[10];   //group of LEDS for flight instrument lights
CRGB ledsrad[10];       //group of LEDS for radio lights
CRGB ledspan[10];       //group of LEDS for panel lights
CRGB ledseng[10];       //group of LEDS for engine instrument lights

void setup() {
  FastLED.addLeds<WS2812B, LED_PINI, GRB>(ledsfltinst, 10);   //adding the flight instrument group
  FastLED.addLeds<WS2812B, LED_PINR, GRB>(ledsrad, 10);       //adding the radio group
  FastLED.addLeds<WS2812B, LED_PINP, GRB>(ledspan, 10);       //adding the panel group
  FastLED.addLeds<WS2812B, LED_PINE, GRB>(ledseng, 10);       //adding the engine instrument group

  //MISING CODE... I would like to specify all LEDs to be white and I only want to run that code once. I am not sure how to do this.

  FastLED.show(ledsfltinst);     //show all LEDs in flight instrument group
  FastLED.show(ledsrad);         //show all LEDs in radio group
  FastLED.show(ledspan);         //show all LEDs in panel group
  FastLED.show(ledseng);         //show all LEDs in engine instrument group
  FastLED.setBrightness(0);      //set initial brightness to 0 as the pots will be at 0V


  pinMode(LED_PINI, OUTPUT);     //set pin 8 to output
  pinMode(LED_PINR, OUTPUT);     //set pin 9 to output
  pinMode(LED_PINP, OUTPUT);     //set pin 10 to output
  pinMode(LED_PINE, OUTPUT);     //set pin 11 to output
  pinMode(Pot_Pin1, INPUT);      //set pin A0 to input
  pinMode(Pot_Pin2, INPUT);      //set pin A1 to input
  pinMode(Pot_Pin3, INPUT);      //set pin A2 to input
  pinMode(Pot_Pin4, INPUT);      //set pin A3 to input
}

void loop() {
  // put your main code here, to run repeatedly:
  int input1 = analogRead(Pot_Pin1);     //Read the input signal from potentiometer 1
  int input2 = analogRead(Pot_Pin2);     //Read the input signal from potentiometer 2
  int input3 = analogRead(Pot_Pin3);     //Read the input signal from potentiometer 3
  int input4 = analogRead(Pot_Pin4);     //Read the input signal from potentiometer 4

  //I am now unsure of how to convert this to the required digital out signal for the LEDs
}

Looks great, so far.:+1:

to set all white, try this example:

ledsfltinst = CRGB::White;

Main loop:

If Analog value is showed as 0.000 to1.000 you need to add something like:

ledsfltinst.setBrightness (input1 * 100) // sets brightness of ledsfltins

Add a debug setup for the code:
In “setup” add this:
Serial.begin(9600);

And in you “Loop” you can now do a readout of the analog values

Serial.println(input1,input2,input3,input4); delay(100);

Then you will have a chance to read the actual value, afterwards, you can remove all the debug lines, for the final project.

1 Like

I’ve made some pretty big progress.

To simplify things, I went back to just trying to get one to work… and I have. I now have a dimmable LED strip working from a potentiometer using the FastLED library. Having read your reply, I’ll give the suggestion about colour groups a go.

My next step is to try to get all four working, then try to get them working when connected to both boards.

The working code I have so far is:

#include <FastLED.h>

#define NUM_LEDS 10 //defines the total number of LEDs

#define LED_PIN 8  //Specifies the pin name and number to use for the LEDs

CRGB leds[NUM_LEDS];  //plaes the LEDs into a group for colour control

int val = 0;  //defines the analogue input pin to use

void setup() {
  pinMode(LED_PIN, OUTPUT);  //specifies the LED pin as an output

  Serial.begin(9600);  //This is to monor the behaviour of the pin
 
  FastLED.addLeds<WS2812B, LED_PIN, GRB>(leds, NUM_LEDS);  //adds the type, pin, colour order and total number of LEDS in use
 
 }
void loop() {
  Serial.print(val);  //for monitoring
  leds[0] = CRGB::White;  //specifies the colour for the specific LED... I haven't figured out how to specify this for a group, but I think I am close.
  leds[1] = CRGB::White;
  leds[2] = CRGB::White;
  leds[3] = CRGB::White;
  leds[4] = CRGB::White;
  leds[5] = CRGB::White;
  leds[6] = CRGB::White;
  leds[7] = CRGB::White;
  leds[8] = CRGB::White;
  leds[9] = CRGB::White;
  FastLED.show();  //this allows the LEDs to actually turn on

  val = analogRead(0);  //this says to read the specified input pin
  FastLED.setBrightness(val/4);  //this specifies writing the read value dived by four (1023/4=255.75 and therefore creating a PWM signal) to the output pin but uses the FatLED library equivalent for the write command.

  delay(10);
}

Update: I have everything working.

I got 90% the way there with the previous code, but I could not get the individual strips to dim.

I ended up going down a rabbit hole on the FastLED github and found some additions that were applied a couple of years ago but don’t seem to be advertised anywhere. Trying entirely their way didn’t work for me though.

Long story short, mixing some of what I already had with some of what they had got me exactly what I wanted and it has ended up much, much cleaner code wise.

I now have 4 LED strips, individually controlled by 4 potentiometers, linked with a mobiflight board so that when I use the pots, my LED strip come on and the instrument lights in the sim come on, with their dials moving in the same rotational direction as my pots. It is 100% working how I wanted it to. I now just have to take it apart and rebuild it in its final form.

Thank you for the help and pointing me in the right direction. I’ve learned a lot over the last couple of days.

The code I ended up with is:

#include <FastLED.h>

#define NUM_LEDS 40 //defines the total number of LEDs

#define LED_PIN1 8  //Specifies the pin name and number to use for the LEDs
#define LED_PIN2 9  //Specifies the pin name and number to use for the LEDs
#define LED_PIN3 10  //Specifies the pin name and number to use for the LEDs
#define LED_PIN4 11  //Specifies the pin name and number to use for the LEDs

#define NUM_STRIPS 4  //defines the number of LED strips
CLEDController *controllers[NUM_STRIPS];  //sets software controllers for the strips


CRGB leds1[10];  //places the LEDs into a group for colour control
CRGB leds2[10];  //places the LEDs into a group for colour control
CRGB leds3[10];  //places the LEDs into a group for colour control
CRGB leds4[10];  //places the LEDs into a group for colour control

int val1 = 0;  //defines the analogue input pin to use
int val2 = 1;  //defines the analogue input pin to use
int val3 = 2;  //defines the analogue input pin to use
int val4 = 3;  //defines the analogue input pin to use

uint8_t gBrightness = 255;  //sets maximum brightness

void setup() {
  pinMode(LED_PIN1, OUTPUT);  //specifies the LED pin as an output
  pinMode(LED_PIN2, OUTPUT);  //specifies the LED pin as an output
  pinMode(LED_PIN3, OUTPUT);  //specifies the LED pin as an output
  pinMode(LED_PIN4, OUTPUT);  //specifies the LED pin as an output

  //Serial.begin(9600);  //This is to monor the behaviour of the pin
 
  controllers[0] = &FastLED.addLeds<WS2812B, LED_PIN1, GRB>(leds1, 10);  //adds a controller then specifies the type, pin, colour order and total number of LEDS in usefor that controller
  controllers[1] = &FastLED.addLeds<WS2812B, LED_PIN2, GRB>(leds2, 10);  //adds a controller then specifies the type, pin, colour order and total number of LEDS in usefor that controller
  controllers[2] = &FastLED.addLeds<WS2812B, LED_PIN3, GRB>(leds3, 10);  //adds a controller then specifies the type, pin, colour order and total number of LEDS in usefor that controller
  controllers[3] = &FastLED.addLeds<WS2812B, LED_PIN4, GRB>(leds4, 10);  //adds a controller then specifies the type, pin, colour order and total number of LEDS in usefor that controller
 }
void loop() {

  val1 = analogRead(0);  //reads pin A0
  fill_solid(leds1, 10, CRGB::White);  //fills the entire strip with one colour
  controllers[0]->showLeds(gBrightness = val1/4);  //uses the controller to show a specific strip and sets a value for the brightness up to the maximum brightness.

  delay(10);  //adds a 10 ms delay before continuing

  val2 = analogRead(1);  //reads pin A1
  fill_solid(leds2, 10, CRGB::White);
  controllers[1]->showLeds(gBrightness = val2/4);

  delay(10);

  val3 = analogRead(2);
  fill_solid(leds3, 10, CRGB::White);
  controllers[2]->showLeds(gBrightness = val3/4);
 
  delay(10);

  val4 = analogRead(3);
  fill_solid(leds4, 10, CRGB::White);
  controllers[3]->showLeds(gBrightness = val4/4);
 
  delay(10);

}
1 Like

It’s smart to send the pot analog voltages to both Mobiflight and an Arduino board.

I guess there is enough similarity between planes, to accommodate the fixed code in the Arduino board?

1 Like

There probably is, though I mostly just fly the Milviz C310. That’s what my entire rig is based around.

As for the analogue pot signal, it just seemed the easiest way to achieve to end result for someone with no experience coding.

Hi LPSGizmo, that is awesome project, I’m on my early stage of building my own cockpit for A320, I’m wondering if you can share mobiflight setup, I’ll be using mobiflight for the very first time building this project, I have basic skills in arduino, so I understand UNO is to control led strip and mega 2560 to talk with MSFS, what I miss is how to setup mega 2560 with the correct settings in mobiflight. I thank you in advance for all your “light” you can provide.

Thank you very much,

2 Likes

Sure thing:
rename this txt fill to “LED-only.mcc” And you should be able to open it in MobiFlight.

LED-Only.txt (8.9 KB)

1 Like