Hello, could you share your custom mapping for x56 HOTAS? I know there is a default mapping, but it is not optimal. Which changes did you make? I would welcome other’s mappings before creating my own. Could save a lot of time.
Thank you very much. Happy flying!
10 Likes
I changed a few things on mine. Most of those changes are on the throttle and it’s all controls (mostly AP-related) that are a pain in the ■■■■ to use on screen with a mouse due to the plane moving around so much. Still experimenting with it, as I only got my X56 a little over a week ago, but this is the meat of it for the time being.
Throttle:
- Top wheel controls trim. It’s click function toggles the AP ALT mode
- Pinky “clicky” wheel adjusts heading bug
- Bottom wheel is currently unused, but the clicky selects AP HDG mode
- Switch 1 - down = parking brake toggle, up is spoiler toggle.
- Switch 2 - gear up / down
- Switch 3 - flaps up / down
- Knob 1 - Mixture (Throttle is “split” by default, but it’s uncomfortable using it like that, so unmapped mixture from second throttle axis and mapped to the knob axis)
- Knob 2 - Prop
- Switch 4 - FLC / VS mode
- Switch 5 - VS up / down
- Switch 6 - FLC speed up / down
- Switch 7 - AP Altitude up / down
- Top hat switch - directions show / hide VFR Map, ATC, Nav Log, Checklist panels.
- Thumb button by analog stick - Pause
- Analog stick - drone control in showcase camera view
- Front button 1 - toggle AP NAV mode
- Front button 2 - toggle AP APR mode
Stick: Haven’t changed much from the default mapping here for the most part.
- Pinky ‘paddle’ switch - toggle cockpit / external view
- small pinky button - brakes (not really used now that I got new pedals)
9 Likes
Thank you @Crunchmeister71 for your set-up. I am still not nearly using my X-56 to their full potential, and I got them six weeks ago. I am primarily still using the defaults. I decided that I didn’t care for the aileron trim on the throttle-top axis dial because it was just to touchy for me and easily bumped. I put the aileron and elevator trims on the topmost hat of the stick. I have stalled my engine more than once at altitude because of the mixture /split, but I am sticking with it for now. I also assigned the sim rate +/- to a toggle on the throttle, because I use those a lot for longer trips.
What did you bind in-game to control these functions? I can’t seem to find the correct keybind in the controls section.

Is it the Decrease / Increase Autopilot Reference Airspeed bind?
Yes it is.
Thanks all. I will try the AP settings. And I also mapped the “slider” on the throttle to thrust reversal.
Not sure where to put this …never been in forums. I have used my x56 for a few weeks now. Still trying different configurations for fs2020. Being 75, teaching my brain takes more time than usual. For that reason, I came up with a simple way to attach labels to the switches. Using a one gallon plastic milk or water container, I cut out plastic rectangles about 2” x 1”. Then using a standard paper punch I put a whole in the center of the rectangle. Using a label printer or your regular printer, you can attach labels to the rectangles instead of your controller. Just attach the labels by pushing the switch handle through the whole. As it turns out the LED system lights up the labels
12 Likes
I forgot …thanks Crunchmeister71 for your input.
1 Like
You’re welcome. I hope you find my layout useful, or at least a good starting point for your own layout. For me, putting the autopilot controls on the controller made a lot of difference. It’s just too difficult to deal with knobs and tiny buttons on screen when stuff is moving around. I tried to put the stuff I use most onto my throttle switches and knobs.
Microsoft Flight Simulator 2020
Logitech X56 H.O.T.A.S
I have been using FS 2020 since it’s release. The last time I flew a real airplane, VOR was the primary choice for navigation. As a result, there was a large learning curve when it came to all the nice navaids. The following H.O.T.A.S suggestions are based on the Cessna 172 S with the Garmin 1000 glass cockpit. They are only suggestions for the beginners out there that have asked for help getting started. Keep in mind that these binds may not be applicable for more advanced aircraft such as jets and helicopters. I will try to discuss the logic for my choices as we go along.
I began with the default assignments for the X56 that came with FS2020 and made modifications as needed. Most assignments were based on functionality and ease of access while flying. The X56 system is configured as two separate devices in FS 2020. If I do not mention any component, it means I chose not to use it or leave the defaults.
X56 Stick
- POV – I left all POV assignments with their default view assignments. The physical location on the stick and their various views are convenient
- Thumb stick C – Default assignments - This stick allows you to pan up, down, left and right in all views.
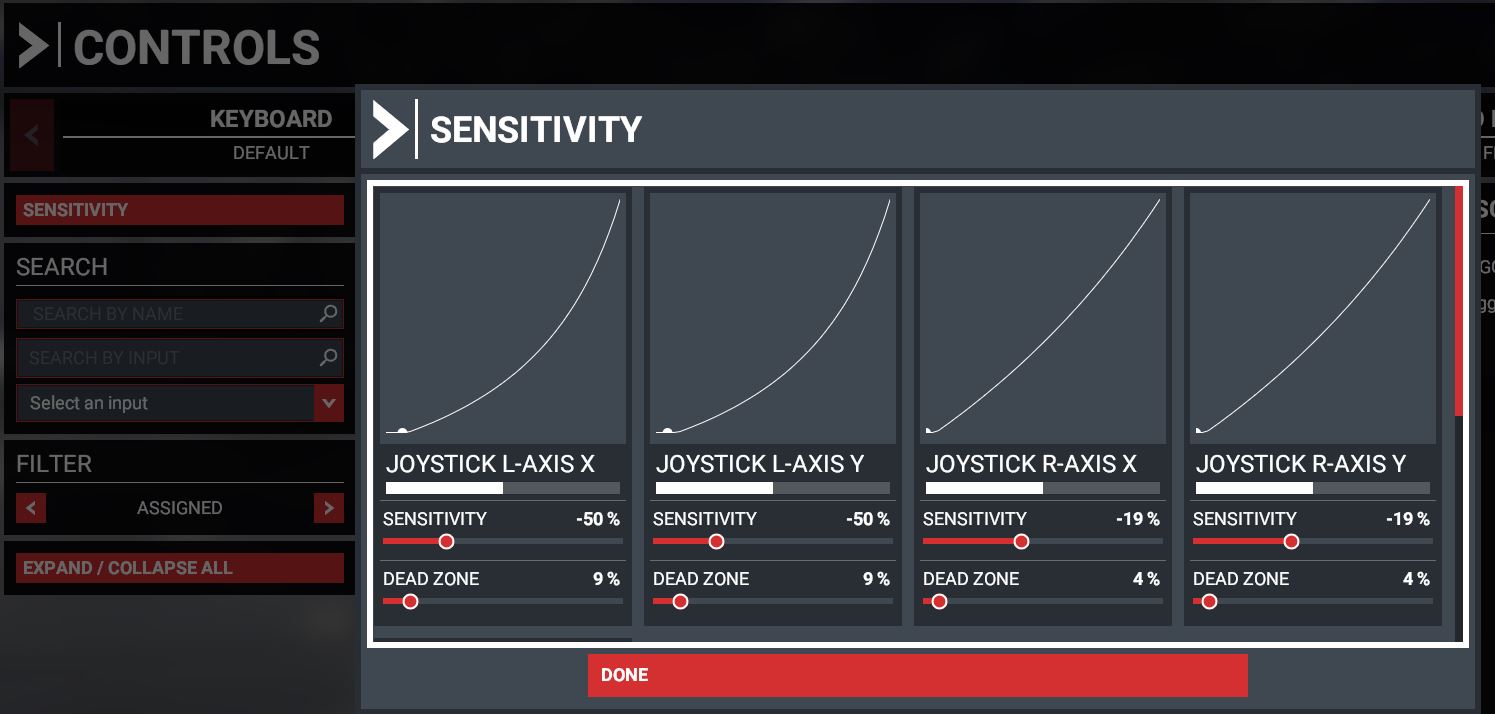
- Stick Axis – Default assignments – Aileron, elevator, and rudder operate as expected. Go to the sensitivity settings and create small dead zones as needed when the stick is centered.
- Hat H2 – Left and right movements provide aileron trim. Down extends the flaps in increments. Up returns the flaps to their neutral position.
- Trigger 1 – Brakes
I was not able to configure Button A, B, D, and pinky in the current version of FS 2020. They appear to be working perfectly with the Logitech software. Hat H2 was a difficult reach for me with my hand around the stick.
X56 Throttle
The left throttle default bind was to the mixture control. It caused my engine to die when I moved both throttles to idle.
I cleared this bind because I am using both throttles as one for now.
When making the next assignments/binds I had two primary goals: Provide easy access to navigation functions while grouping them together in a logical manor. At the same time, I wanted to minimize the need to reach for the keyboard and mouse.
- SW 1 = Heading Hold SW 2 = Altitude Hold
- SW 3 = NAV Mode SW 4 = Approach Mode
- SW 5 = Vertical Speed SW 6 = Flight Level Change
The next assignments were based on easy access and available switches
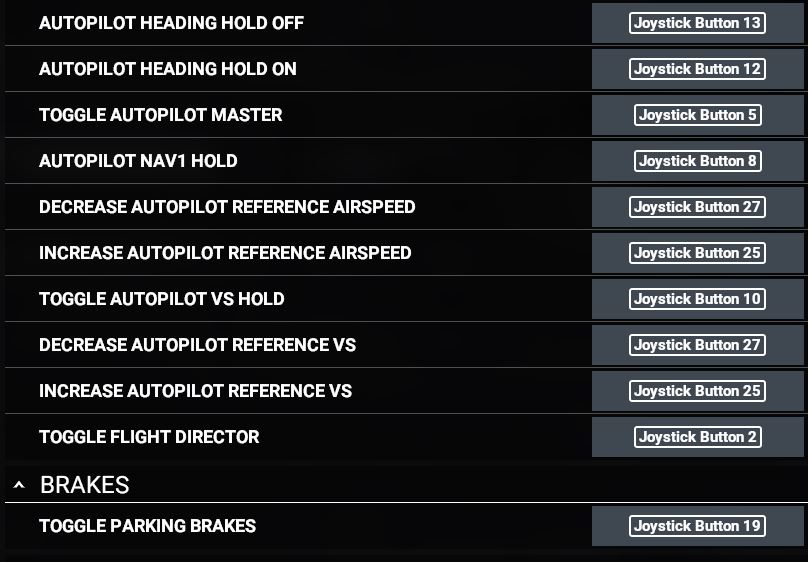
- TGL 1 – UP = Heading Hold ON DOWN = Heading Hold OFF
- TGL 2 – UP = Set Heading Bug + DOWN = Set Heading Bug –
- TGL 3 – Not used at this time
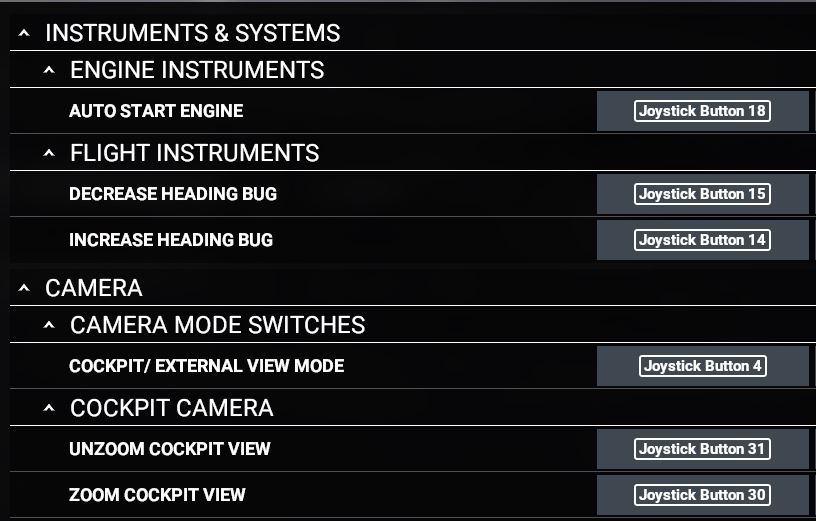
- TGL 4 – UP = Start Engine DOWN = Toggle Parking Brake
At this point I needed more controls, so I moved to the controls on the throttle. There are 3 buttons on the front edge of the throttles.
- Button 5 – Toggle Autopilot Master – Engage or disengage Autopilot
- Button 4 – Toggle Cockpit /External View
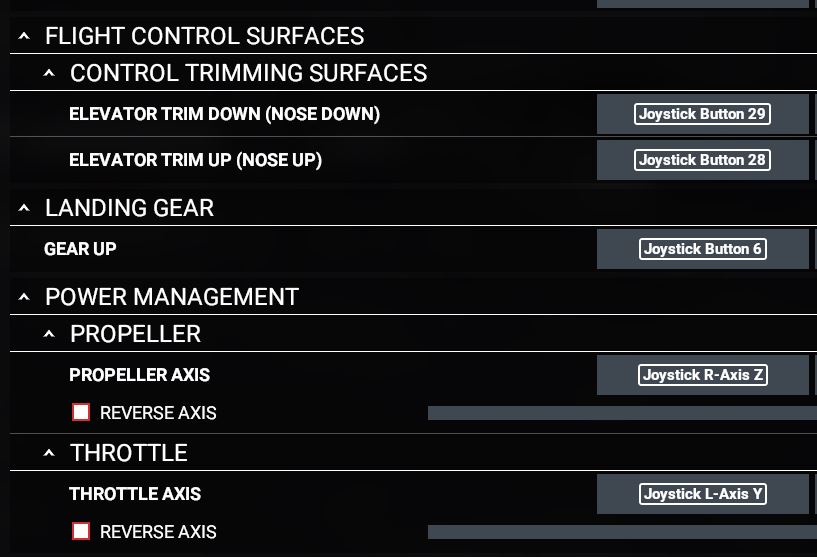
- Button 28 – Elevator Trim – Nose Up
- Button 29 – Elevator Trim - Nose Down
- Button 30/31 - The rolling control on the left side of the throttle is bound to all camera zooming functions
Button 5 was chosen for easy access; the button is in a physical location where it is less likely to be activated by accident.
Vertical trim is established using throttle and elevator. Buttons 28 and 29 allow for easy adjustment while flying the airplane using the stick in your right hand. Button 30/31 allows zooming without reaching for the mouse.
The next assignments were needed for adjusting autopilot settings.
- Button 2 on top of the rotary control seemed like a good choice for toggling the Flight Director.
- Next, we needed controls for autopilot Altitude, Vertical Speed, and Flight Level Change. The bottom thumb hat fills this need – Buttons 24,25,26, and 27. Using 24 for UP and 26 for DOWN – altitude adjustments. Button 25 (push forward) is used to increase Vertical Speed (VS) and Flight Level Change (FLC) while Button 27 (pull to rear) is used to decrease VS and FLC parameters.
These settings are just suggestions and the logic my feeble brane used to make the choices. Buy the time you read this, I may have found better options. I have attached screen shots of the actual flight sim settings. Good luck and have fun!

8 Likes
Some of my previous post did not past correctly:
| 1. | SW 1 = Heading Hold | SW 2 = Altitude Hold |
|---|---|---|
| 2. | SW 3 = NAV Mode | SW 4 = Approach Mode |
| 3. | SW 5 = Vertical Speed | SW 6 = Flight Level Change |
- TGL 1 – UP = Heading Hold ON -------- DOWN = Heading Hold OFF
- TGL 2 – UP = Set Heading Bug + -------- DOWN = Set Heading Bug –
- TGL 3 – Not used at this time
- TGL 4 – UP = Start Engine --------- DOWN = Toggle Parking Brake
I hope this works
3 Likes
Hello,
I thought I would share my setup here.
I’m not using the game for any mappings (except for the “axis” ones).
I use the logitech software to do so because I don’t know a way to make the mode button work in the game.
Using the mode button I basically get 3 times the amount of switches and buttons which is a pretty sweet deal IMO.
This is still being tweaked as I spend more time in game but here is how it looks right now :
- Throtlle : X56_FS2020_Profile/Throttle.pdf at main · Kirikou974/X56_FS2020_Profile · GitHub
- Stick : X56_FS2020_Profile/Stick.pdf at main · Kirikou974/X56_FS2020_Profile · GitHub
- Profile file : X56_FS2020_Profile/default.pr0 at main · Kirikou974/X56_FS2020_Profile · GitHub
I don’t know of a way to export my FS2020 bindings (looked everywhere I know but no luck) but the commands name should be self-explanatory.
3 Likes
You helped me a lot!
Thanks ![]()
Autopilot Nav1 Hold
You’re welcome!
Hey - great topic as my x56 arrived today so itching to get it set up and sounds like you guys have gone through the “test and see” process.
Would you be so kind as to provide the latest screen shots of your mappings/bindings?
Many thanks in advance
Hi - sorry for being simple - but how do you activate the mode switches to work in the game? Sorry for being a noob - but could you provide some further details/screen shots etc?
Your help is very much appreciated
Stu
Hello,
The mode switch work with the logitech program not the game itself.
Not sure if I’m clear ![]()
Anyway, let me know if this is still unclear for you, it took me some time to wrap my head around all of it and I’d be glad to share what I think I know lol
Regards,
Thierry
Hi - so I’m obviously doing something wrong…I have set up some different button mappings in the Logitech app but when i go back into the game and switch modes, nothing changes???