Hi
First, I am a pilot. I am not a computer whiz! At 75 and disabled I wanted to try Sim flying. So, being on the bigger side I didn’t want plastic pedals. So, I bought MFG pedals and Hydraulic damper kit. When I received them there were not any instructions in them. I know now they aren’t that hard to put together but with so many parts that are not for mine in the kit included I didn’t know where to start. I wrote the manufacture and explained the problem. I did not receive an answer! I’m getting to the problem!
Now after running down quite a few YouTube videos, I got them together. They weren’t positioned properly for me, so I adjusted them. After, I calibrated them, and they did calibrate. Then I think it was during trying to validate them, one break was not starting to show until about 3/4 of the way through its motion. Now I calibrated them twice with MFG software and the same thing happened. In MSFT2020 it seems to be worse. When checking sensitivity everything works as it should but when I try to validate one break starts about in the middle! Not only that it not only goes up, but it tries to go down a little. When I contacted the Manufacture with the problem I only received a reply saying.
"There is a manual in side software package which is latest and there is FAQ on our website which will solve most of your problems:
In general, our latest firmware which arrives in your pedals v5.09 solves most of calibration problems with autocalibration feature turned on
The rest of the problem may lie in windows calibration or msfs itself so check windows calibration after turning this feature on and read msfs forums about asigning axis to controls
Now, as I have explained to him and you here, that I don’t know much about computers and software. I haven’t spent my life in programming. So, to get nothing but something to read is a little concerning. I just had two major problems hooking up the
Logitech G Pro Flight Multi Panel and switch panel and yoke system. One was getting the 64bit driver the other which I was not aware of at the time, was not their problem “VCRUNTIME140.dll. and MSVCP140.dll was not found” and I received this answer “Sorry to hear that you are having issues with the panels as well.” And the answer.
So, I hope I don’t just have a $400.00 paperweight. Please if anyone has some help, I would appreciate it.
Thank you
Hank
All of the instructions are on YouTube. Just follow his videos and enjoy your pedals. It’s an easy setup and do note you have extra parts that you won’t use with the dampers.
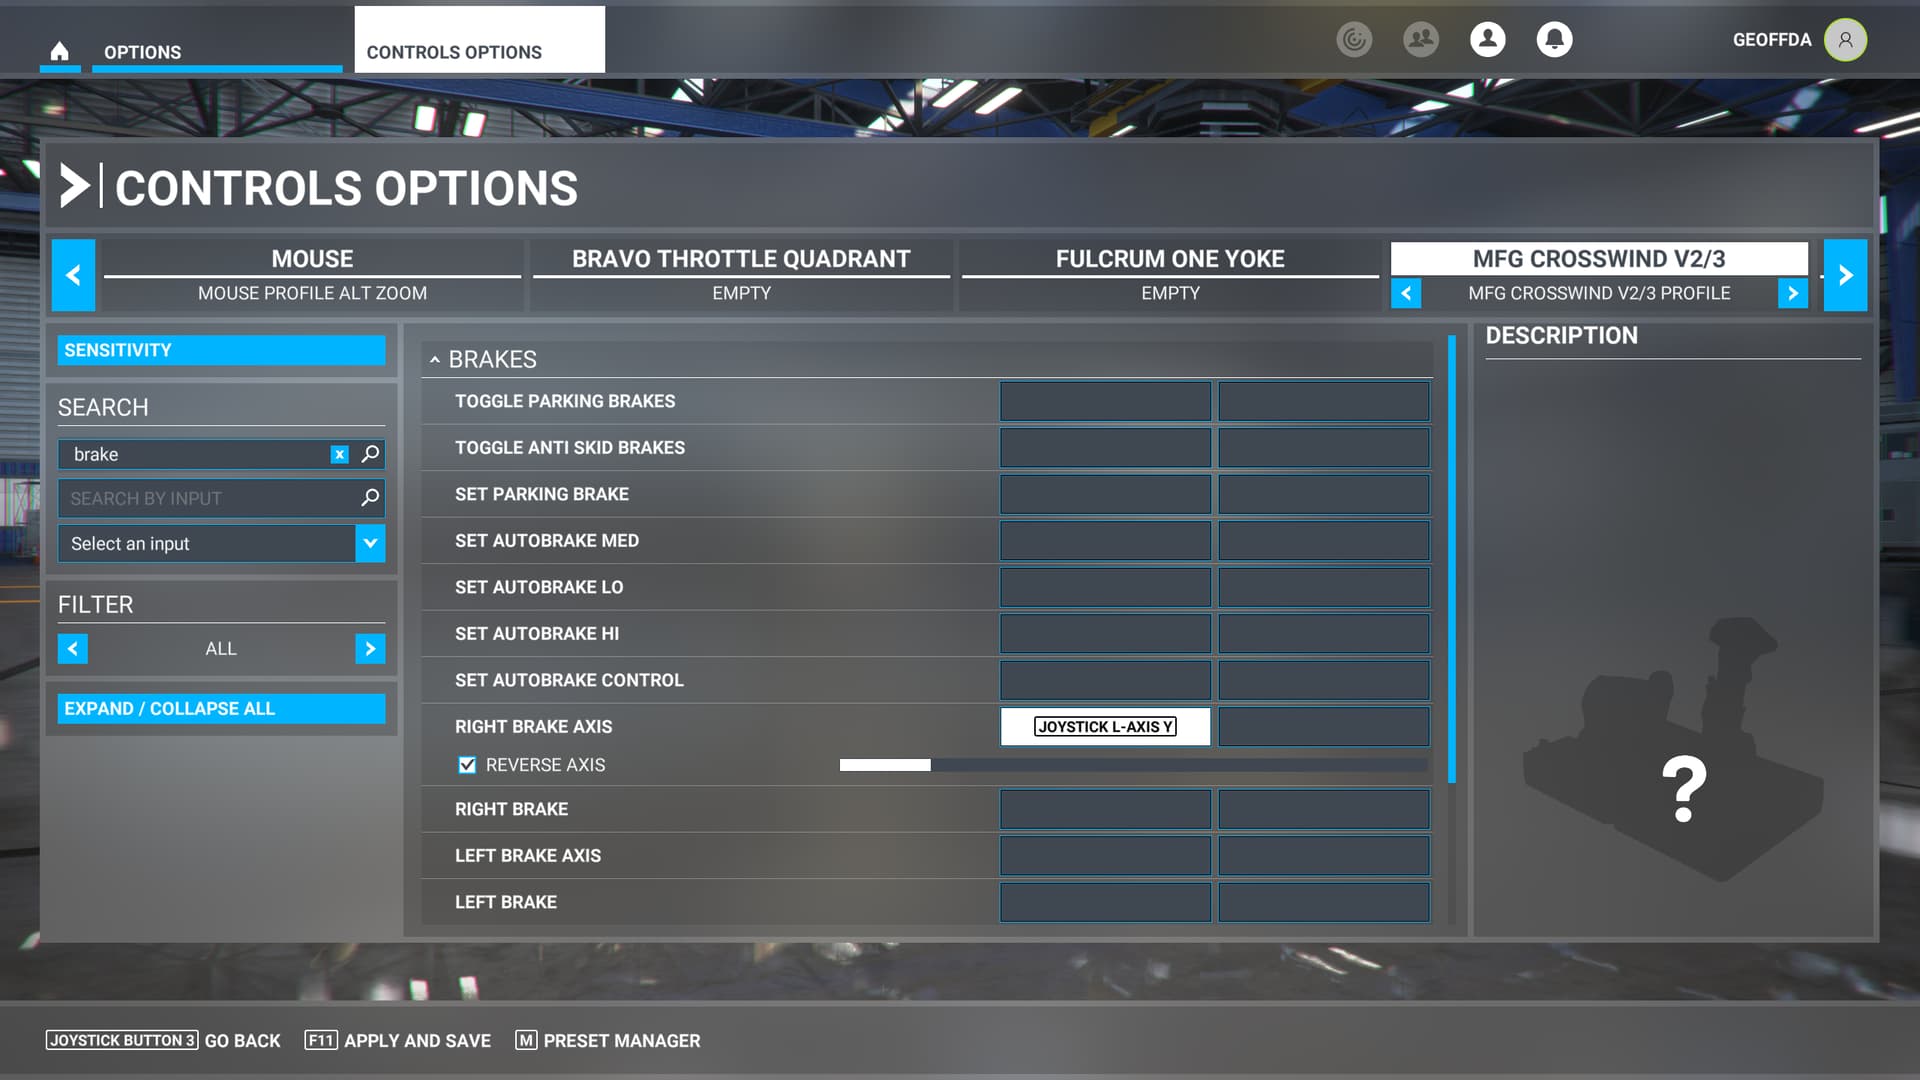
As far as the brakes go, it should be as simple as binding them to left and right brake axes (make sure you aren’t binding to a button). I use Axis and Ohs. so I can’t walk you through the MSFS default binds, but you shouldn’t need to calibrate. It might help to see a screen shot of how you are trying to bind the brakes.
It’s not building them I built them! I’m not able to program them to work! I should not have to search the internet to get answers if I have a problem the manufacture should care enough to explain how to solve the problem! Just as the Logitech tech did when I had a problem loading their equipment. Also, one of the problems was probably my fault he still answered it on a Sunday! Apparently, you did not read the whole question because it was about getting the pedals to validate without having one break start in the middle of its range. Your break starts in the middle. I don’t know why but you should. I have followed everything I can find, and nothing is getting better. At my age I should have known not to buy from out of the country. I should have known better than to buy from a manufacture that says if I have a problem, I can’t solve I am responsible for shipping. It a shame they look like a decent piece of equipment, but they need to have someone who stands behind them I would say, better, but at all. I don’t know of any business in my life that did not at least send a list of pictures and a parts list, that explains how or what parts go in the product. I was sent a bag of parts that do not go in the pedals I received how else was I supposed to know.
I just hope someone here has an idea as to what to do. You should put in your site these are not plug and play!
BTW, The YouTube videos I watched to try and find out how to do the calibration and validate, I stopped at every point in the video to make sure I was doing exactly what they were doing. Not only that I watched everyone I could find to make sure I got it right. So, I didn’t push any button I shouldn’t have. The product didn’t work out of the box. I’ve been watching videos since I got the pedals, and I am no closer to an answer!
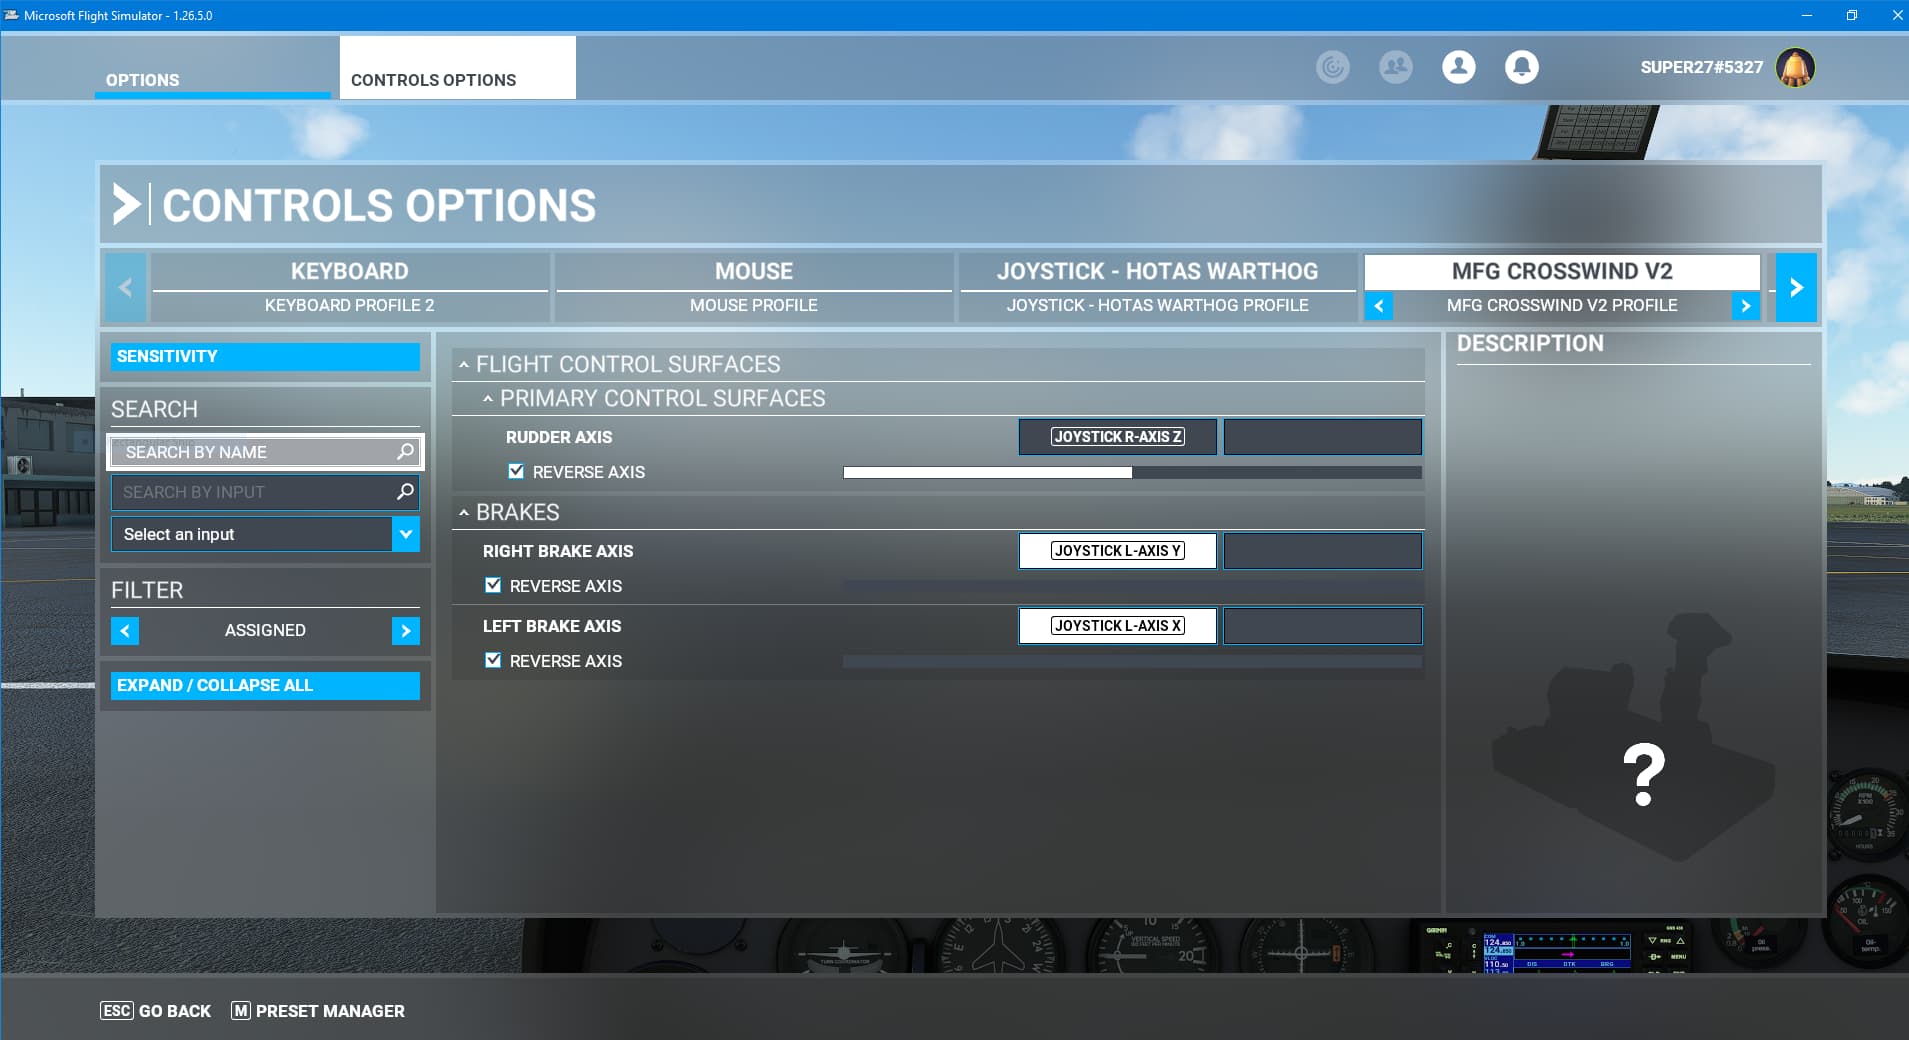
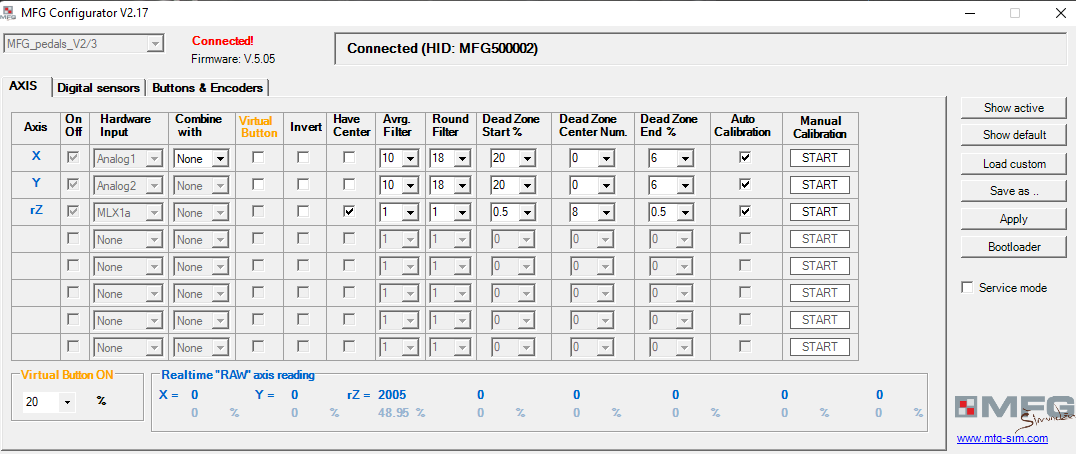
I can also post my images of how I have mine configured, plus what the MFG calibration software sees. I have only calibrated them once, to set the centre point.
Depending on which model you bought, fitting the hydraulic damper may be more work. The V3 model just screws in, but if you have the V2’s then you need to do a little more work swapping out those little spacers. You then need to rotate the little dial on them to get the amount of resistance you want.
For me I have them fairly stiff, and I can add exactly what setting I have, and the tension spring just tight enough to stop it from flapping about so the hydraulics do most of the work.
Hi
Thank you, I have V3. I have them together. I haven’t messed with the settings of the pedals or damper other than to get them on and stable. Most of my time has been dealing with computer problems from ram not posting to the Windows 10 problems. I just built this one after about 13 years away from putting them together. I spent three days trying to figure out why my monitor would on its own change resolution from its highest to a much higher one. All the while not able to open most anything just a small popup at the taskbar but would not maximize. All that time I didn’t know connecting my Samsung 65" to the computer was causing the problem. Just happened to see it in the monitor section and unplugged it and the problem was solved. I have for some reason had a problem with every item I have added to this system. Back to this one, I would be glad to look at anything that might help. I am going to start over and reset the pedals to their original position and calibrate them there to see if things change. So, it might help to have your views. My problem is 1 pedal is only showing up at about 3/4 the way through its travel and at other time it shows at the halfway mark. Every time I check them now, they seem to be getting a little worse or change somewhat.
Thank you
Hank
There are a couple of ways you can view the toe brake axis. You can use the MFG calibration software to see their values, and you can use the sims sensitivity screen to show them as an axis, as @Super275327 showed above. Either is valid.
When I get home I will run up the sim, and capture some images. It is possible you either have them calibrated incorrectly, or you have the wrong binding assigned to one or more axes.
First things first, check your brake cable connections per the video and make sure the plugs are fully plugged in and the cables are not binding. Assuming all is well there, next step is to check that they are functioning correclty.
Go to the windows menu type “joystick”. That should give you an option that says “Set up USB game controllers”. If you can’t find that, go to Control Panel, choose Hardware and Sound and you will find it there. I’m on Windows 11, so things might be slightly different, but hopefully you can find it.
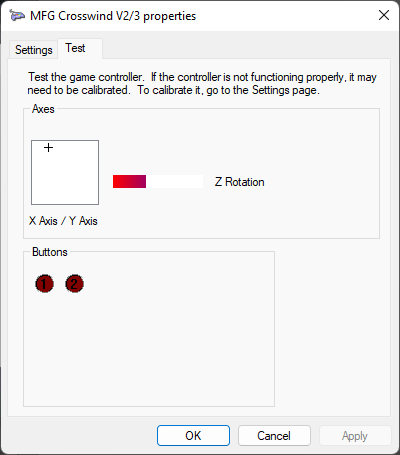
When you choose “Hardware and Sound” a popup window will display.
Select MFG Crosswind V2/3 and click Properties.
Click on the Test tab.
Slowly press the left brake pedal and you should see the plus move along the x-axis in the square.
Slowly press the right brake pedal and you should see the plus move along the y-axis in the sqaure.
Note that if the popup isn’t top level and doesn’t have focus, it won’t get inputs so this won’t work.
Here I have slightly pressed the left toe brake. Assuming this works as expected, then the base PnP and USB functionality of the controller is working.
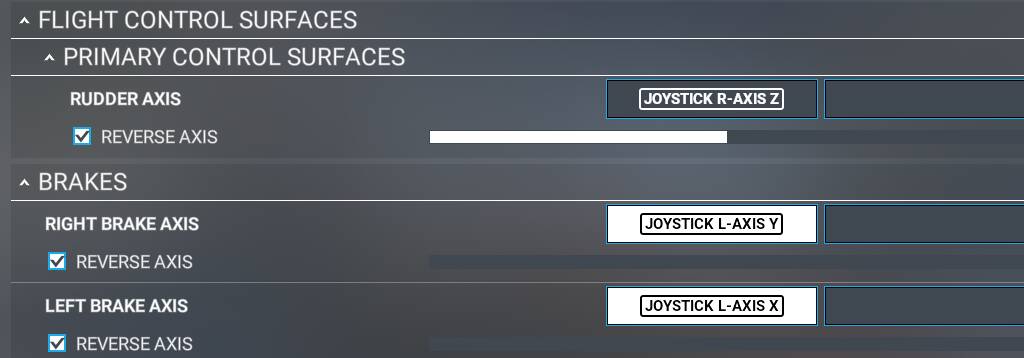
Lastly, make sure you are binding to the proper control axis and not to a button. In MSFS, it should look like this to bind the right brake axis to the Y axis on the MFG Crosswind pedals. I’m slightly pressing the right brake here.
If either of these steps don’t work, first try a different USB port (it is possible to have a bad/weak port). If things still don’t work, unplug every USB device you can except for the Crosswinds and try again. If it works then, you don’t have enough power to drive all of your USB devices. You can either upgrade your power supply or look for a powered USB hub.
Hi
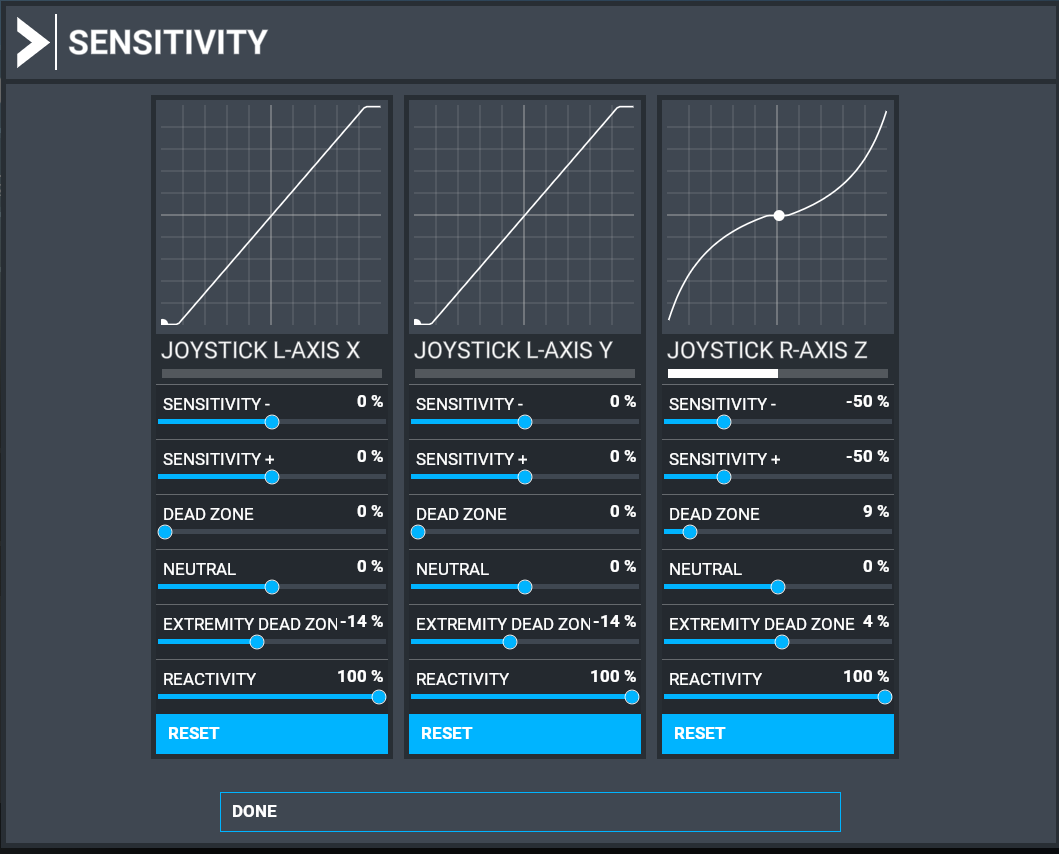
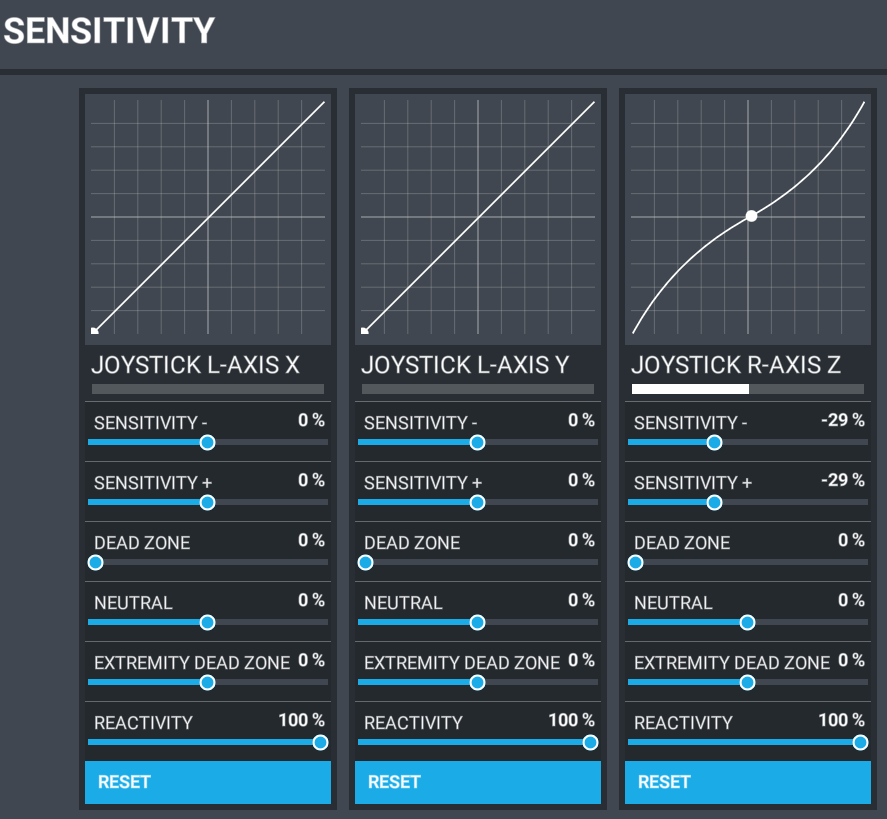
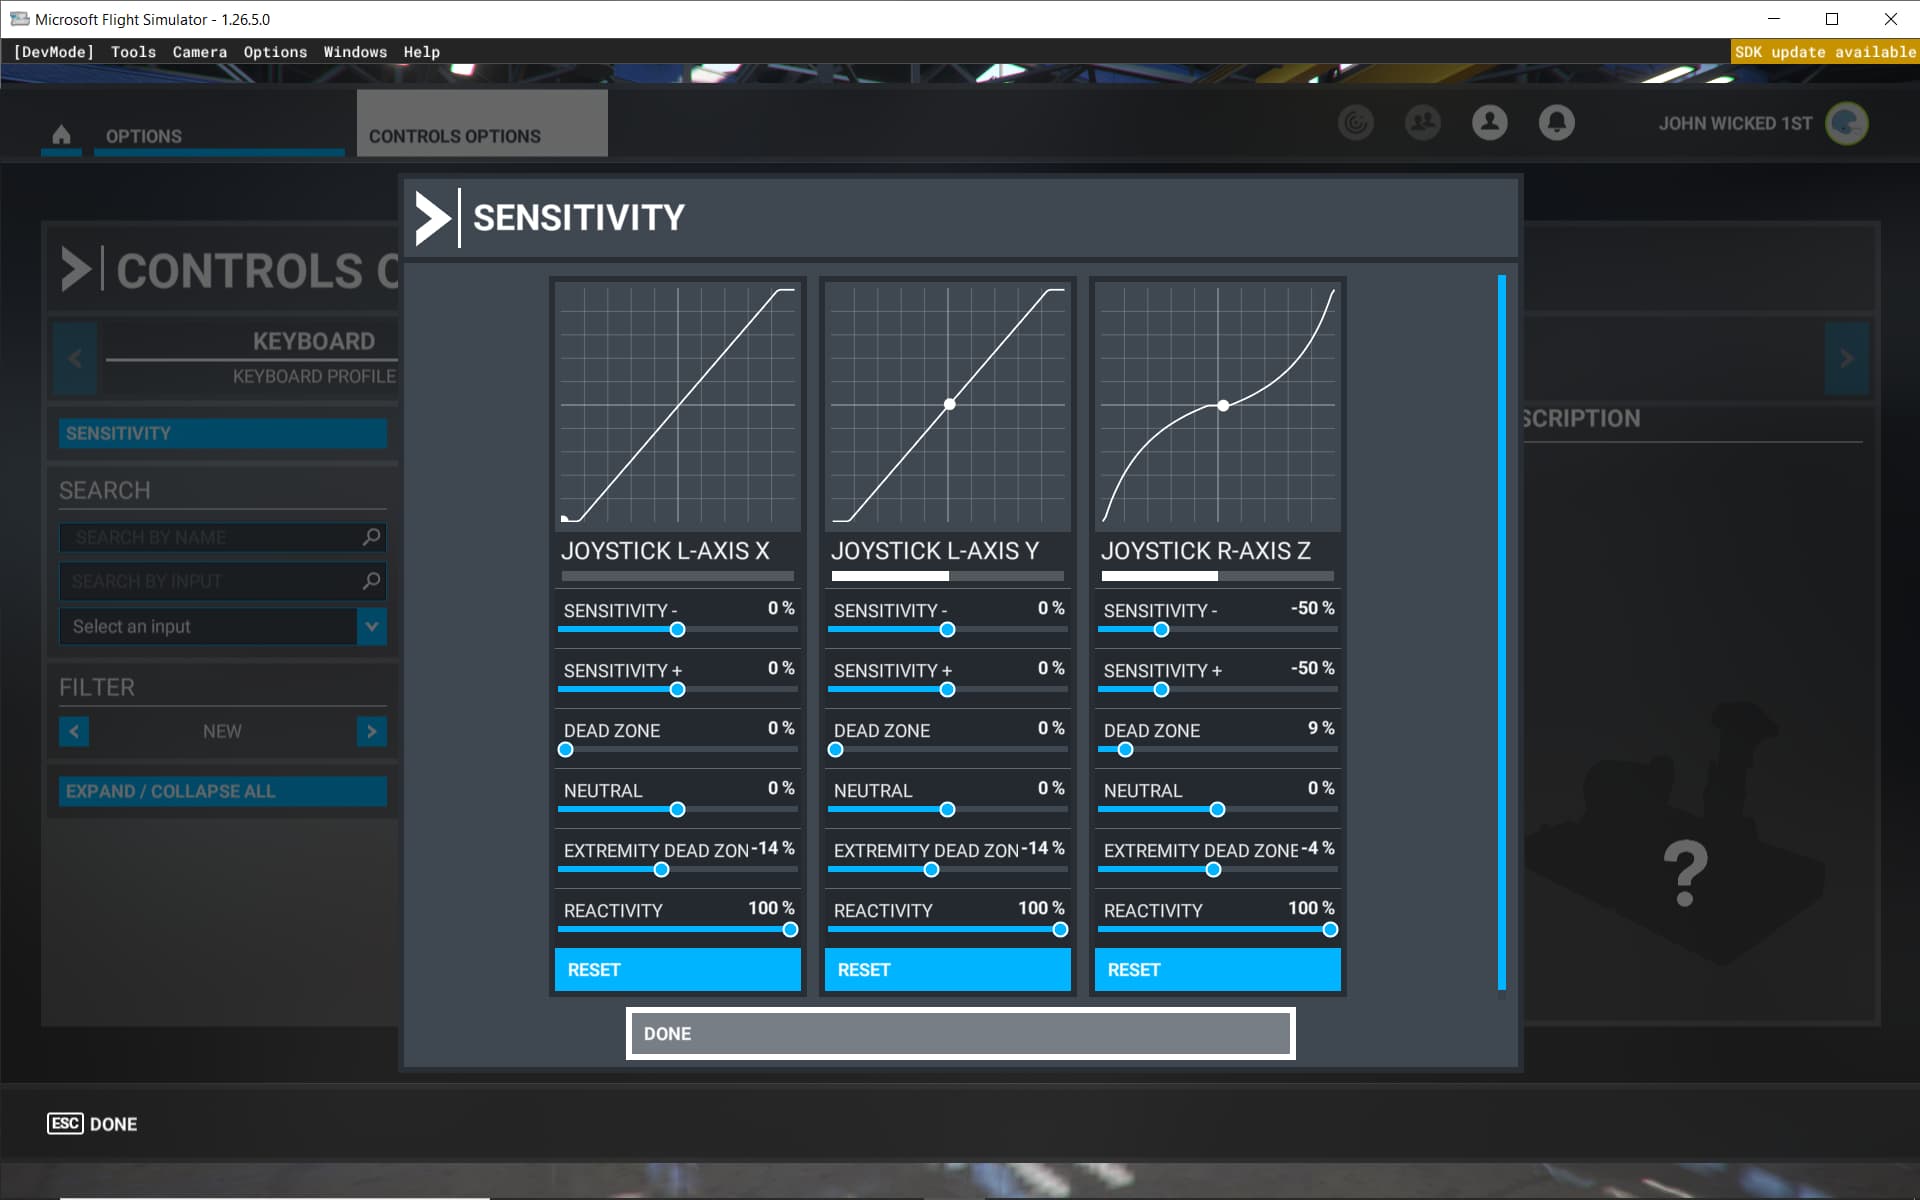
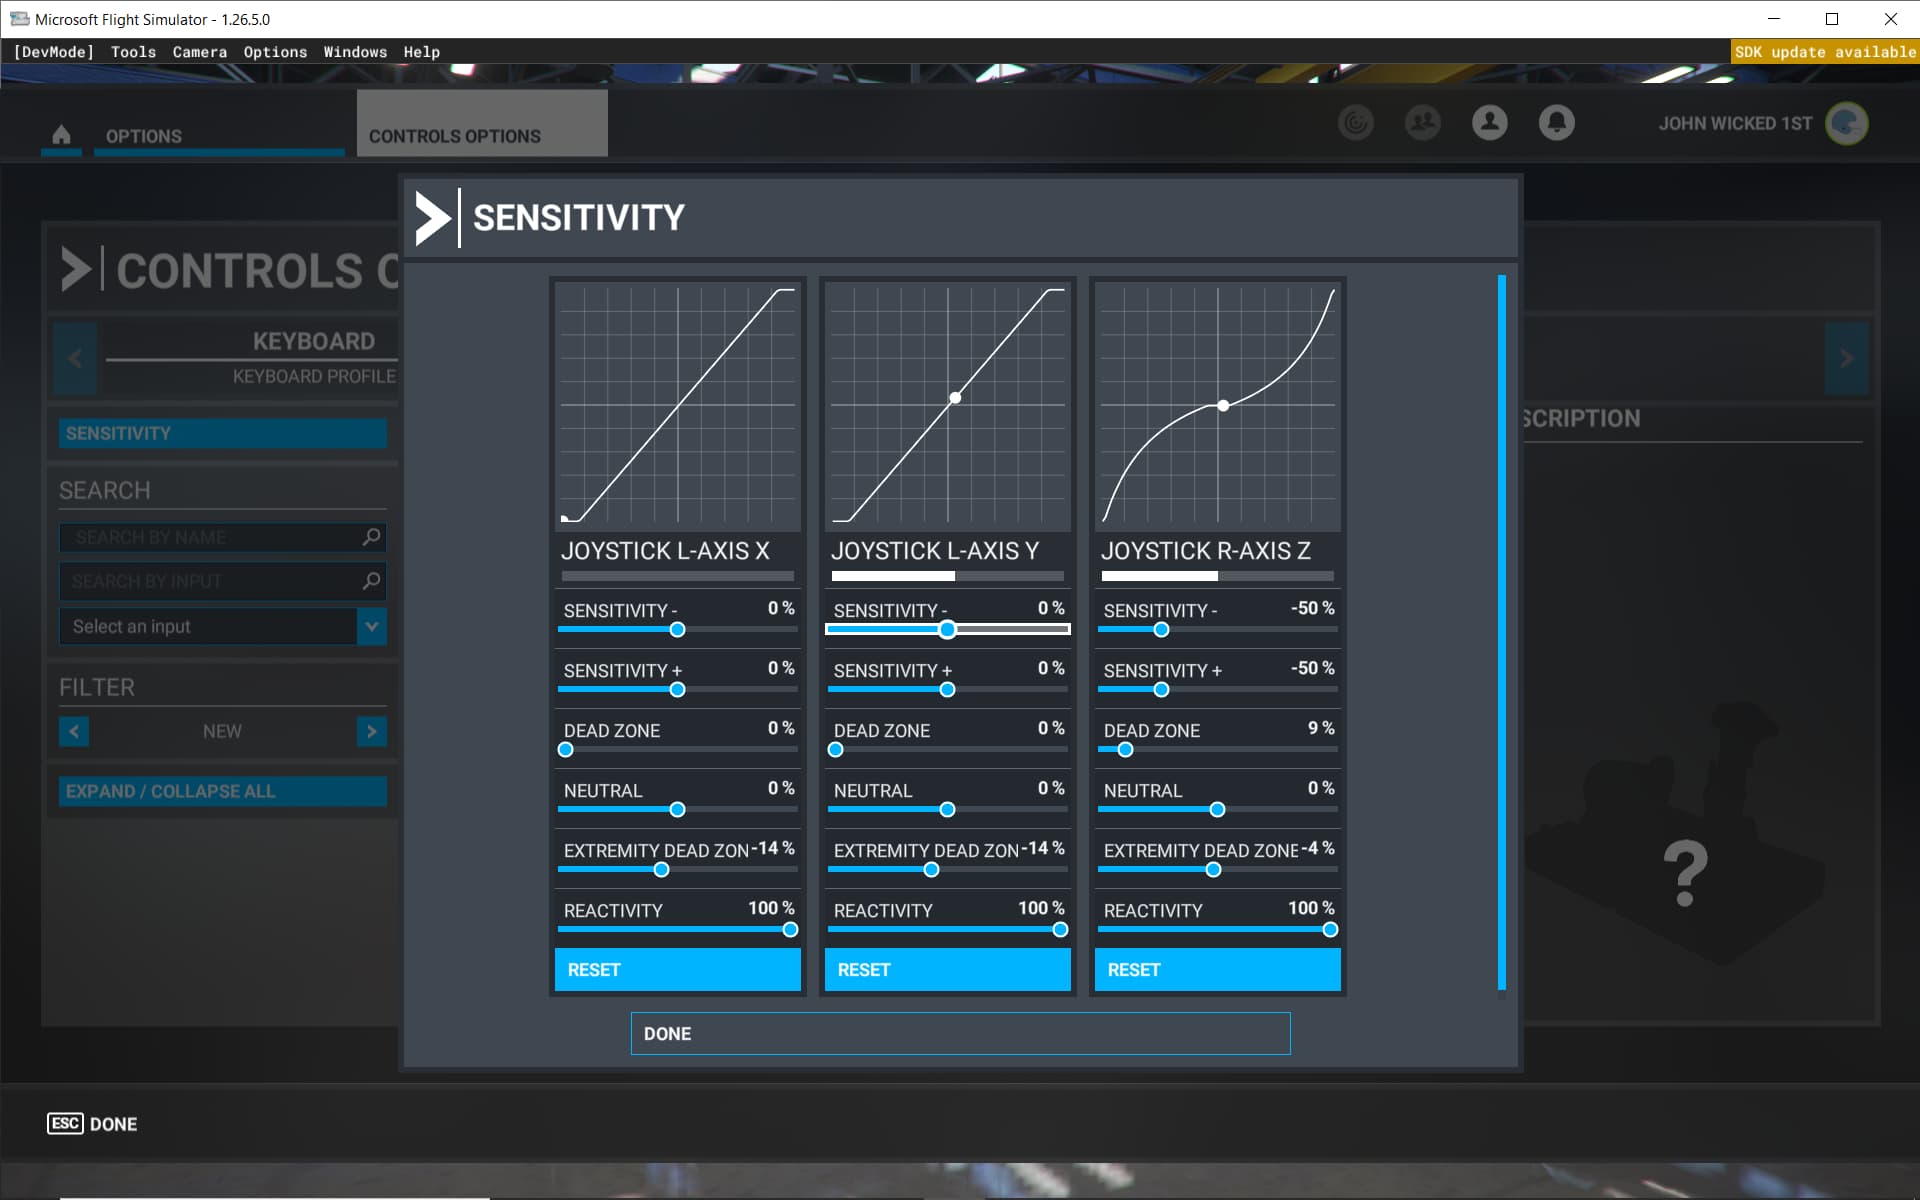
This is what I am seeing when I open sensitivity after calibrating with MFG software: The left brake starts at the bottom with your settings it doesn’t get to the end of the dead zone which is about 1 square only. Thats with full deflection of the brake. The right brake starts in the middle and goes to the top of the line. The rudder does as expected. The right break has a white line halfway across just as the rudder has.
I am going to try your suggestions. I have tried all of the usb ports and I also have a powered hub, so I don’t think power is the problem. I have unplugged the cable several times and reconnected it. Is the cable generic or proprietary?
So, I have no idea why the two breaks look so different in the panel. Not only that but it seems that the way they are setup on the screen and the way they work is changing over time.
When in MSFT2020 I just click on sensitivity and the screen just pops up and I have changed nothing.
Is there a way to watch what is going on in the MFG software on how the pedals are acting? Also, when I go to save the setting there, I see some of your I think calibrations. can I apply one of the 3 I see listed? I am mostly going to be flying General Aviation V-Tail Bonanza aircraft if one is better for that than the others. At least for now if I ever get to fly.
I don’t think you should need to match anything. As long as the pedals are working correctly, the sim sensitivity screen should reflect that. The only thing you might want to set would be the rudder axis senstivity.
Well, the first procedure did as it has been doing x barely moved y moved to the bottom. The control options page looks like yours, but the white line is longer, and I have not touched it, and the left break doesn’t show up at all no movement. I took a screen shot but it just sits and thinks.
My sim sensitivity screen doesn’t resemble anything anyone else has. My left brake barley moves starts at the bottom My right brake starts in the middle and looks like the rudder and from the middle goes to the top. the rudder works for now like it should. I have a screen shot of what I am looking at in one of my posts.
Do you have a yoke or joystick with x and y axes that you could also try? The fact that you aren’t getting the correct movement there suggests either a hardware problem or an issue with the USB driver. However, assuming the rest of your USB controllers are working properly, then that would indicate that the driver is functioning as expected. You could confirm by opening device manager and checking your Human Interface Devices and your USB controllers and making sure you don’t see any errors with any drivers.
The MFG Configurator will show you a real-time RAW axis reading at the bottom for the x and y axes when you press on the brakes. You can also fire up DIView (from the same folder as the configurator) to see the raw readings. You should confirm that you aren’t getting anything when you do a small press on the brake pedals.
If you can confirm that you aren’t getting raw input on small presses of the pedals, then I’d be looking at hardware. Assuming you have verified all connections, the next thing I would try would be reinstalling the firmware. If that doesn’t solve the problem, then it would be time to go back to MFG with a very clear explanation of the issue and what you have tried. I don’t know if the cable is proprietary, but I’d check with MFG before trying to swap it.
Hi
Logitech G PRO Flight Yoke System everything works fine. I’ve been getting up in the air by running off the runway. When I do get up, I have complete control of the aircraft except rudder.
Hank
The left should be at 65535 and the right should be at zero. I’d take one more shot at configuring as suggested by the manual. If that doesn’t work, reinstall the firmware and if that still doesn’t work contact MFG.
One Or All Axis Don’t Work Properly In Game
Check if the axis is OK in Windows Control panel / game controllers (alternative - DIVIEW, or DXTWEAK)
If YES…problem is with your game setup. Consult game manufacturer forums or manual for help.
If axis is not providing full range of motion try to Reset windows calibration to default in Windows
Control Panel / game controller /properties / settings ( or search for joy.cpl in start menu)
If NOT working in windows game controller then try step 2.
Run MFG Configurator, Move axis fully and watch the MFG Configurator “real time raw values” to
see if all axes can move from 0 to 8192.
If axis does not move from 0 to 8192 Replug device or for Manual Calibration → recalibrate axis
following the procedure in this manual.
If calibration did not help, continue to step 3.
Turn ON service mode setting in the MFG Configurator. Check if mechanical axis movement results
in movement of values in MFG Configurator
(In service mode the output will NOT go from 0 to 8192, this is normal)
If YES (mechanical axis movement result in movement of values MFG Configurator Real time Raw
values) then Your axis is working fine, but you did not follow steps 1 and 2 correctly. So go from a
start.
If NOT then try step 4.
Problem must be in wires. Check if cables which connect sensors/potentiometers are plugged in
correctly and the USB port is functioning properly. Re-plug cables, Re-plug USB to PC and retry step
If problem is not resolved your wire connections (or fried sensor) need to be replaced or fixed.
Well, I am part way home. I went back to the MFG calibrate screen. I wanted to reinstall the firmware. I had noticed that the two auto calibrate boxes were not checked but I didn’t think anything of it. I clicked on the bootloader and didn’t complete it fast enough and the calibration screen came back on they were checked. So, I did a calibration again and almost everything is almost back. My left brake is still not working but my right one is now showing the way it should. The left only gets to between a reading of 500 and 600 the right is 8192. I have only used exe. files for downloads and getting into the bootloader I am a little reticent of doing.
If I really mess it up, is it like messing up a Bios file and ruining a motherboard?