After buying a Quest 2, I spent the last week banging my head against the wall trying to get what I considered acceptable performance in VR out of Microsoft Flight Simulator. Today I had somewhat of a breakthrough- I’ve got a clear picture, and a non juddery framerate.
I thought I’d post my setup here in case it is helpful for others. I’ve read literally hundreds of posts on here - thanks to all those who have contributed.
My setup:
- i7-7700k overclocked to 5.0 ghz
- AORUS 3070. Not overclocked- Microsoft Flight Simulator does not seem to like any overclock on the graphic card- Crashes To Desktop at first whiff of an overclock.
- 16 meg of 3200 DDR4 CL16 memory
- nVME SSD drive
My Goals
- No ASW. I like barnstorming round cities at low altitude, and ASW introduces too many immersion breaking artefacts for me on buildings. Even at altitude I cannot stand the “crawling” that ASW adds.
- A steady frame rate of at least 36 FPS (so 27ms frame times- see note on timing below), in my chosen test aircraft (Robin Cap 10) in my chosen test area (Wellington harbour, NZ). I’ve found that any lower that 36 leads to choppiness. “Steady” means that if you bring up the tray tool performance overlay in headset, the frame rate stays pretty much constant at 36- performance graph shows a straight line.
- A crisp picture. I want to be able to read dials, and I don’t want buildings to look blurry.
- Ideally, at least medium settings for both volumetric clouds and reflections- these are both very expensive but give that “wow” factor.
With the settings below, I get the above working perfectly- 27ms frame times, 36 FPS almost flatline, crispy instruments, decent scenery. Note however if I take the same setup to say Chicago, or fly an Airliner, I need to drop the game settings until I get 27ms again.
My Settings
Note some of these are strictly voodoo- ie I haven’t tested on or off. There are so many combinations, and I just want to spend some time paying the game ![]()
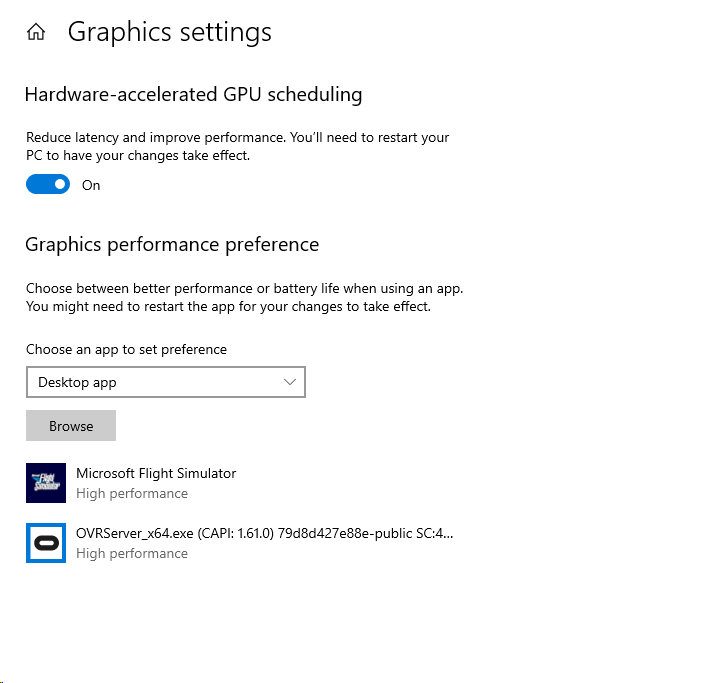
Windows Config
- Game mode: Off
- Hardware Accelerated GPU Scheduling: On (not tested with off)
- Both Microsoft Flight Simulator and OVRServer set to “High Performance” in windows Graphics Performance Preferences (under the HAGS setting)
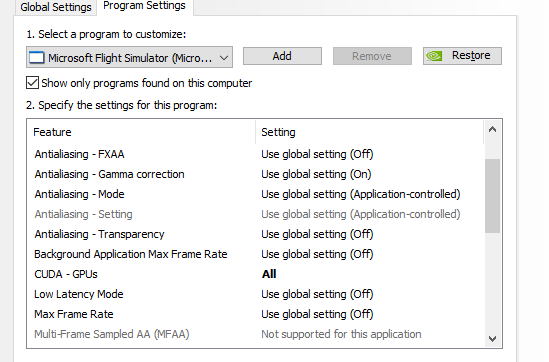
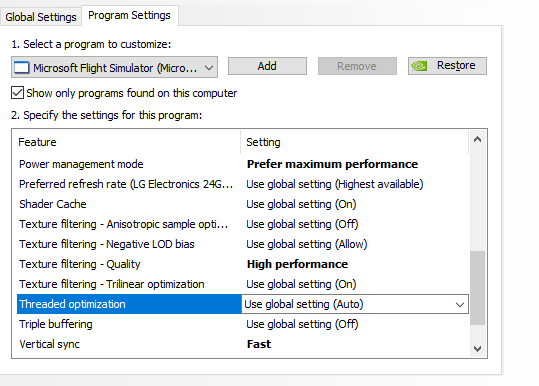
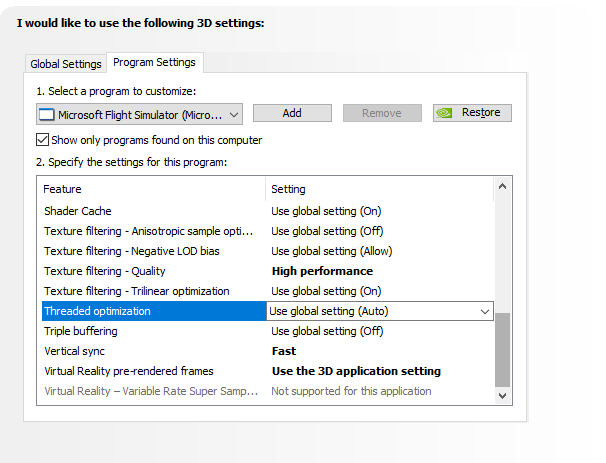
Nvida:
Driver: 466.27 (latest)
Nvidia Control Panel Settings: (I don’t know if I need all of these or not- will test one by one when I get time.)
- Power management -max performance
- Texture filtering quality- high performance
- Vertical Sync- fast
- Virtual Reality pre rendered frames: use application setting
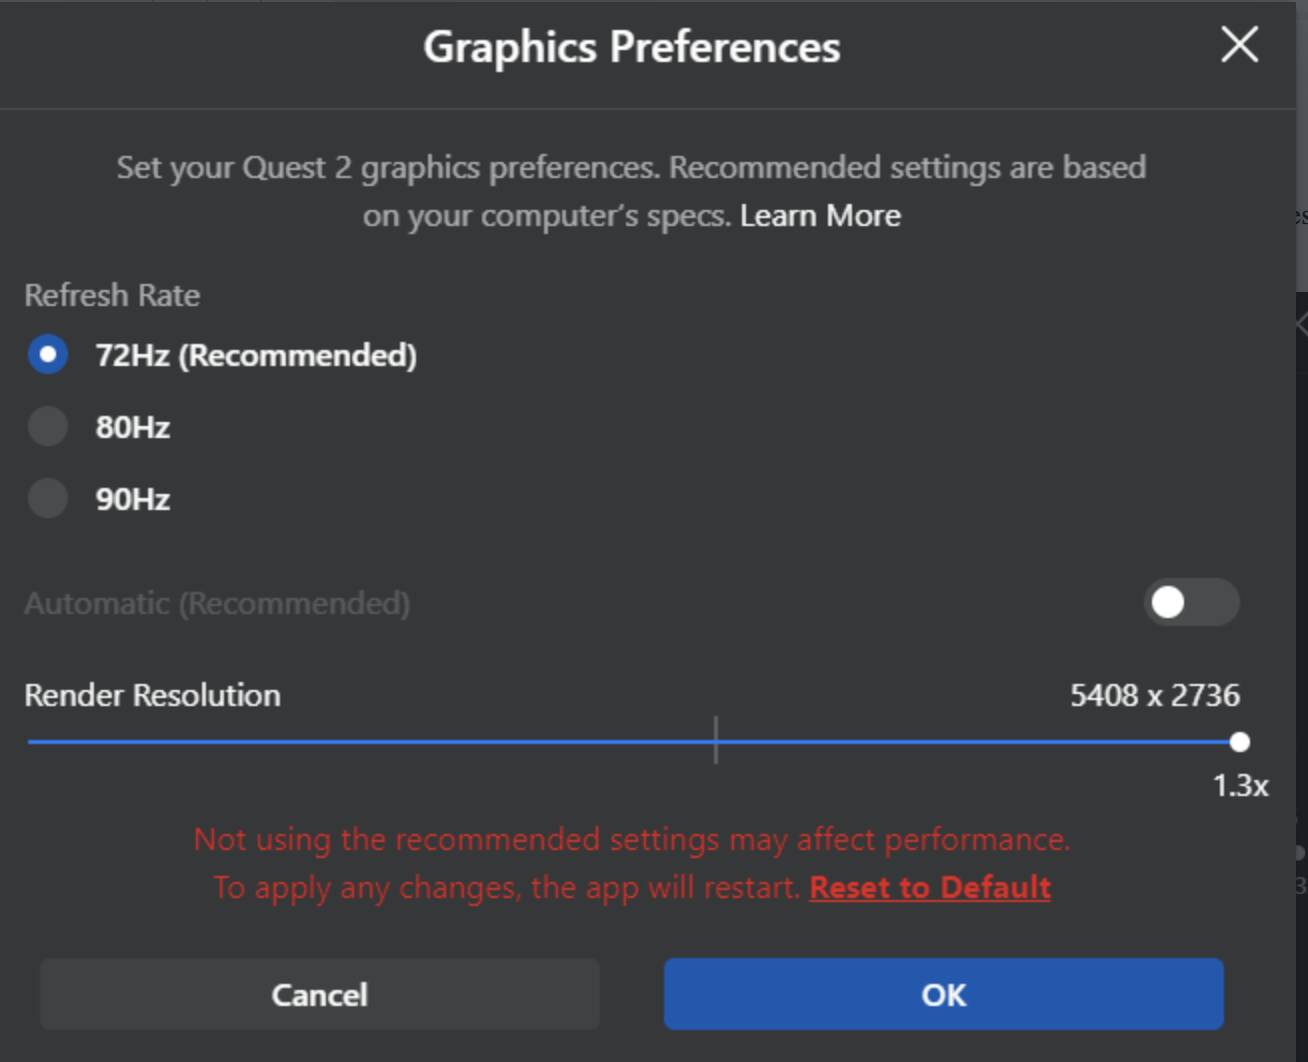
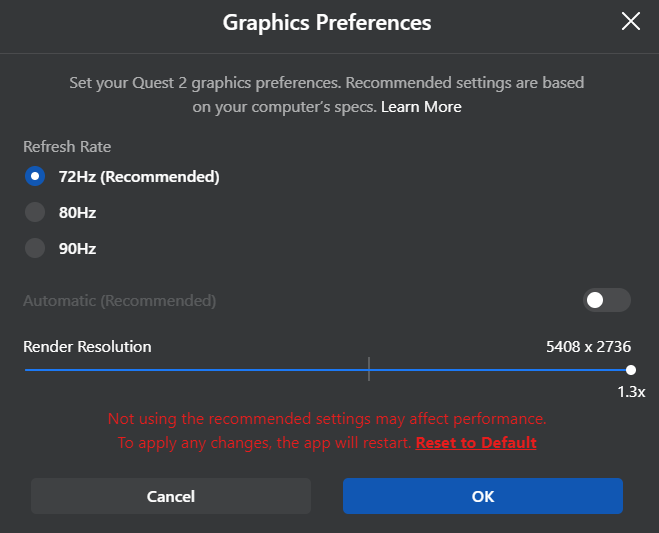
Oculus Application Settings
- Opted in for beta (haven’t tested non beta)
- 72 hz
- Max resolution!! This gives 1:1 picture on the quest. I’m somewhat surprised this doesn’t tank my performance, but the clarity it gives is fantastic, and means I don’t supersample.
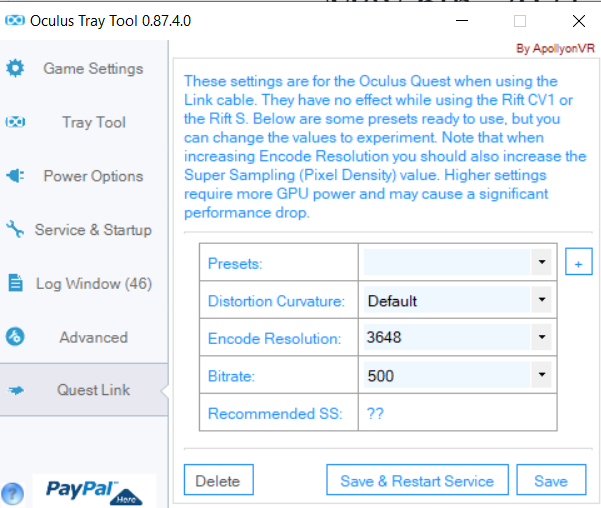
Tray tool
Whenever I connect the Quest to the PC, I need to reset the AWS and Supersampling settings below. This means I change them to something else, then, back to the settings below. The tray tool should do this for me but I can’t work out how to add the Xbox store version of Microsoft Flight Simulator as an executable.
- ASW Off
- Super Sampling 0. I think this means 1.0 but I’m not sure. I know it works for me.
- FOV Multiplier: whatever you can handle- lower values introduce black box around your vision. I need to do further testing to convince myself this actually does anything performance wise.
- OVR Server Priority: Above Normal
- Bitrate 500 bitrate
- Encode resolution 3648

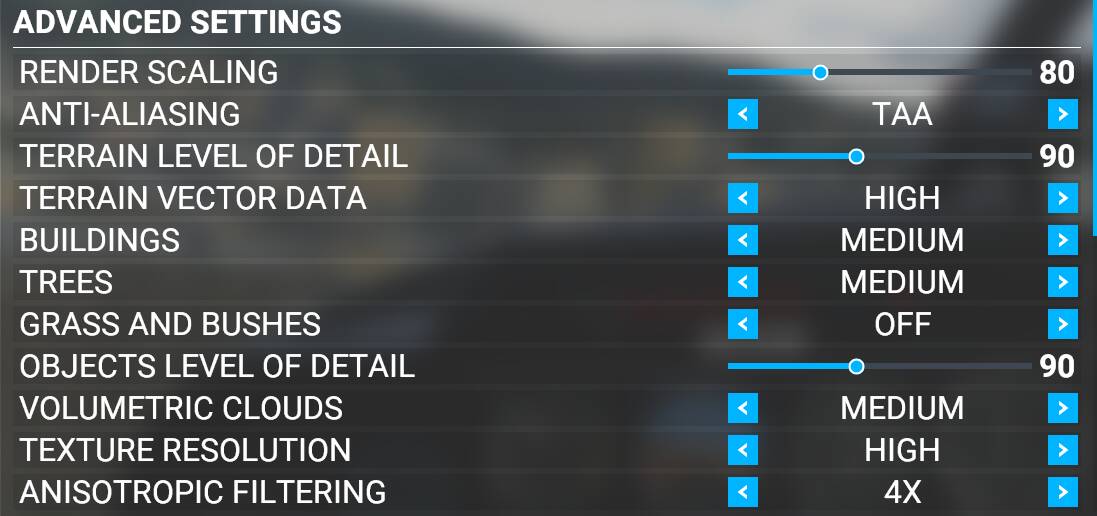
In game
Main settings to play with, depending on your context. I find if my timings are out, I can drop one or all of the first three settings below and still have a decent picture.
- Render scaling: 80%
- TLOD: 90
- OLOD: 90
- Clouds: medium
- Reflections: medium
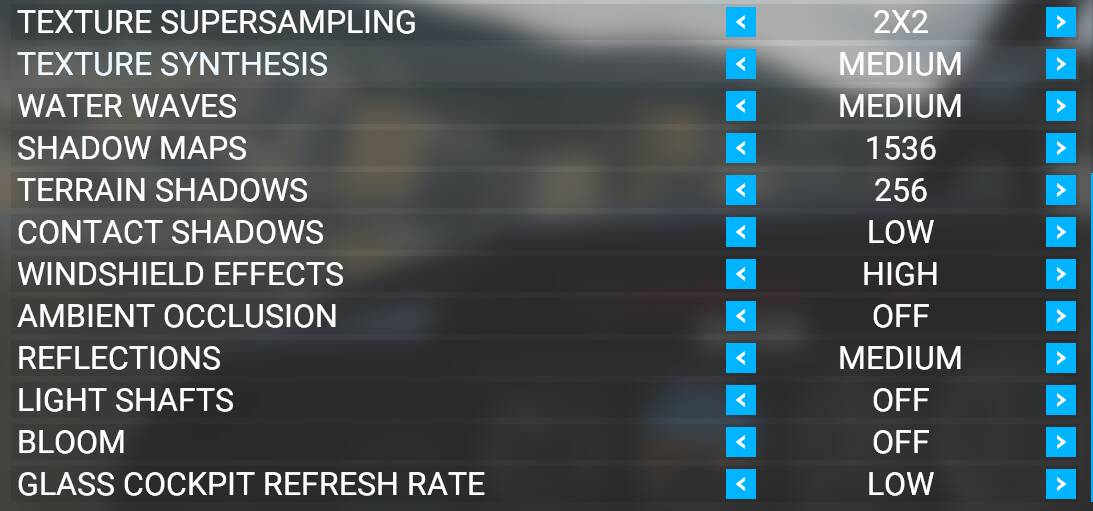
These are the main contributors to frame timing. My other settings are as follows:
- Antialiasing: TAA
- Terrain Vector Data: High
- Buildings: Medium
- Trees: Medium
- Grass: Off
- Texture resolution: High
- Anisotropic Filtering: 4x
- Texture Super Sampling: 2x2
- Texture Synthesis: Medium
- Water Waves: Medium
- Shadow Maps: 1536
- Terrain Shadows: 256
- Contact Shadows: Low
- Windshield Effects: High
- Ambient Occlusion: Off
- Light Shafts: Off
- Bloom: Off
- Cockpit Glass Refresh Rate: Low
A note on startup order.
I don’t know if this is magic or not but this works for me:
First start:
- Boot your PC.
- Start Microsoft Flight Simulator
- Start Oculus
- Start Tray tool.
- Connect Quest from within headset
- Apply ASW and supersampling settings in tray tool, and turn on performance over if you want it
- Choose flight plan
- Switch to VR
When changing settings in sim:
- Just change them and measure. Only exception is texture quality which requires sim restart
When changing supersampling in tray tool:
- Don’t
 But if you do, toggle into and out of VR to apply
When changing headset frequency or resolution:
- Toggle out of VR
- Apply in oculus tool
- Restart headset
- Connect Quest from within headset
- Apply ASW and supersampling settings in tray tool, and turn on performance over if you want it
- Switch to VR
If instability occurs (low frames when you know it was solid, unstable picture etc), restart PC
A note on timings.
I don’t know if this is fully correct, but one thing I found helpful was to consider the frame timings as the main thing to focus on when tweaking. FPS is somewhat variable, as the Quest will jump around depending on the frame timing and the refresh rate. It looks like the Quest jumps to a multiplier of the refresh rate depending on the frame time- either the base refresh rate, one half, one third, one quarter, or one fifth.
You can inspect the CPU and GPU frame times in Microsoft Flight Simulator debug view, and see if you should consider moving the refresh rate in the oculus tool up or down.
The frame rates available to us can be expressed as follows:
| FPS | Base Refresh Rate | Multiplier | Frame Time (ms) |
|---|---|---|---|
| 90 | 90 | 1 | 11.11 |
| 80 | 80 | 1 | 12.50 |
| 72 | 72 | 1 | 13.89 |
| 45 | 90 | 0.5 | 22.22 |
| 40 | 80 | 0.5 | 25.00 |
| 36 | 72 | 0.5 | 27.78 |
| 30 | 90 | 0.33 | 33.33 |
| 26.67 | 80 | 0.33 | 37.50 |
| 24 | 72 | 0.33 | 41.67 |
| 22.5 | 90 | 0.25 | 44.44 |
| 20 | 80 | 0.25 | 50.00 |
| 18 | 90 | 0.2 | 55.56 |
| 18 | 72 | 0.25 | 55.56 |
| 16 | 80 | 0.2 | 62.50 |
| 14.4 | 72 | 0.2 | 69.44 |
The quest seems to “snap” to the next available stable FPS based on the frame time. So for instance if it is taking you 35ms to render a frame and you are running at 90 hz, the quest will run at 22.5 FPS. If you drop that frame time to 33ms you’ll start getting 30 FPS.
So if we are getting 35ms frame time, and can’t do anything to reduce that, we’re best running the quest at 80hz. The quest will the snap to 27 FPS, which is better than the 24 FPS we’d get at 90hz.
In my case I wanted at least 36 FPS, so I aim for a 27ms frame time.
Random notes:
Check that Microsoft Flight Simulator and it’s cache are on a fast drive. I have two SSDs, a fast and a slow, and I saw significant disk queueing (sustained > 20) in windows perfmon on the slow drive. Moving the game to a faster drive fixed this. I used Crystal Disk Mark to measure actual drive speed.
I use the openxr runtime rather than steam as detailed on the zendesk site under “How to install OpenXR”. Seems more stable, and I don’t have to have steam running using up resources. Downside is I can’t run FPSVR to measure frame rate, and have to rely on the oculus tool;
The latest afterburner beta seems to include a c++ runtime that kills my Microsoft Flight Simulator install. If this is happening remove c++ installs as detailed on the zendesk site under “CTD Issues”
Make sure your page file is of a decent size
Make sure your USB port has enough power. I had frustrations at first with the quest or oculus software crashing, until I plugged the quest into a powered usb port on a powered usb hub (you need both of these things!).
Hope this helps someone.