I didn’t talk about the second slider originally because I was concerned it would cause more confusion than help, but let me take a stab now.
The TL;DR is that is can be used to stabilize framerate similarly to the Throttling Behavior setting, except for the GPU rather than CPU work.
It is important to remember that you are trading off smoothness for added latency, so you want to adjust these values only as much as needed and no more.
Added latency shows up in the rubber-banding effect you see when changing the direction of your head movement. For instance, if you look down at the seat and move your head side to side (laterally, not rotating), when you change directions, you’ll notice that the image lags, causing a bounce until it catches back up. This is latency in VR, and it makes people sick. Fortunately, in simulators like FS2020, you’re not making these kinds of head bobs much, so we can get away with more latency than in say an action shooter where you’re ducking behind cover, etc.
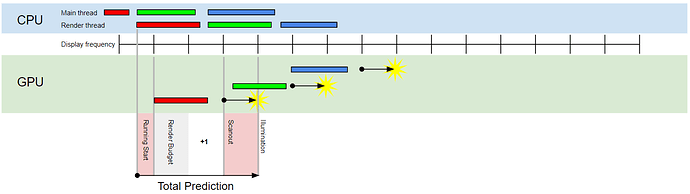
So first, we need to understand how SteamVR handles prediction. Here is an example of an application making framerate:

Three consecutive frames (red, green, blue) each have ~11ms (@90Hz) to finish. In a pipelined application like FS2020, the main thread and render thread(s) operate in parallel, however, for a given snapshot in simulation time, the simulation needs to finish first (main thread) before that snapshot in time can be rendered (render thread). This means that the application is rendering frame N (e.g. red) while simulating frame N+1 (e.g. green).
There is typically some amount of time that passes between when the application’s render thread(s) start work on a given frame, and when the gpu actually starts rendering that frame. To give applications the most amount of time available to render on the gpu, SteamVR tries to align that gpu work to start at a display interval so it can scan out on the next. Scanout (the amount of time to load the finish rendered image into the display) typically takes another frame interval, and then is illuminated for a short period of time.
The time between the render thread(s) starting and the associated gpu work starting is referred to as Running Start. Alex Vlachos did a great GDC talk on this several years ago. https://www.youtube-nocookie.com/embed/ya8vKZRBXdw
Poses used for rendering (i.e. where your head is relative to the cockpit) are sampled at the start of the render thread, but since the image won’t be displayed in the headset until some time later, those poses need to be predicted forward to that time. So that’s prediction. Remember, we want to minimize this to reduce rubber-banding. Now, if you were to select “Force Always-On” from the Motion Smoothing drop-down in the per-app settings, you’ll see a note that says: “Warning: Application will run at half framerate”. Here’s what that looks like using our timeline:
Now, both rendering on the cpu and gpu have had their budget extended by one display interval, and since the main thread runs in parallel, it too gets an extra frame to finish its simulation. But since two display intervals are now passing for each newly delivered frame, the simulation is running at half rate.
Note that running start and scanout has not doubled, just the render budget itself. So when we talk about this situation, we say that one additional frame of prediction has been applied. If the headset is running at 90Hz, this translates to 1/90 seconds = 0.0111111 or 11.1111 milliseconds (ms).
Now let’s look at the new Throttling Behavior setting. I’m going to switch to running the headset at 120Hz to make the fraction easier for this discussion.
At 120 fps, we are applying 0 extra frames.
60 fps = +1 frame (half rate).
If we add two extra frames, that’s 1+2 = 3 or 1/3rd rate. 120/3 = 40 fps.
If we add three extra frames, that’s 1+3 = 4 or 1/4th rate. 120/4 = 30 fps.
If we add four extra frames, that’s 1+4 = 5 or 1/5th rate. 120/5 = 24 fps.
And then the max the slider allows is 1+5 = 6 or 1/6th rate. 120/6 = 20 fps.
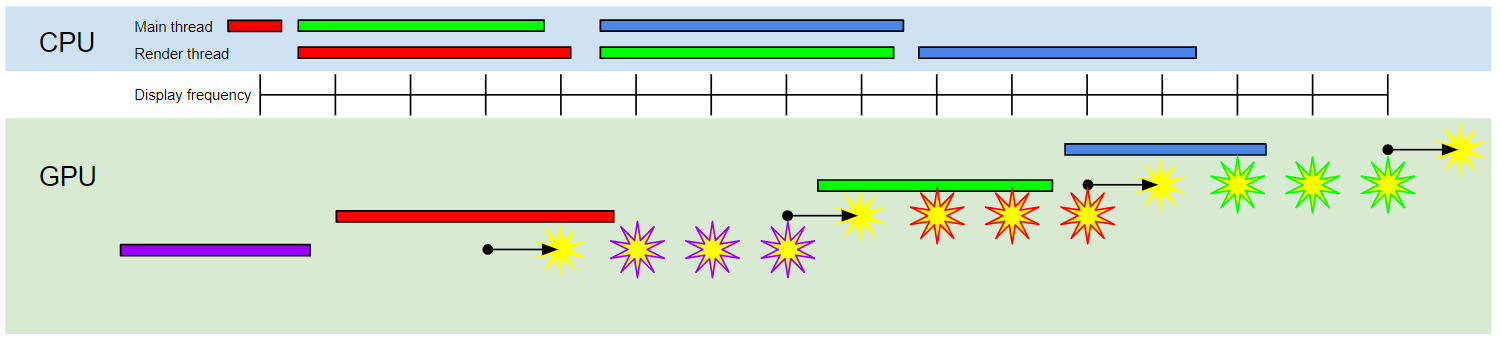
So, let’s take a look at 30 fps on our timeline:

Now the simulation is delivering a new frame every four display intervals.
However, now we have a lot more wiggle room. Ideally, the gpu gets started on the work for that frame immediately after running start. But it might be that the whole reason we needed to throttle the application in the first place is because it is taking too long to render on the cpu, adding a delay to when the gpu gets started (e.g. the green frame).
When changing the Throttling Behavior, SteamVR also adjusts the additional frames to predict to match. You can see this in your steamvr.vrsettings file (in your Steam/config folder):
"steam.app.1250410" : {
   "additionalFramesToPredict" : 3,
   "framesToThrottle" : 3
},
This assumes the ideal case of the gpu getting started asap, and finishing in the extra allotted time.
Don’t forget, the headset needs to display something every display interval, not just when new frames are delivered. So our timeline looks more like this with the highlighted frames using reprojection / motion smoothing:

Now we’re getting to the heart of things. If your gpu is bouncing between how often each frame is getting reprojected, then that is another potential source of jittering. Typically, the workload from frame to frame on the gpu is pretty similar, so you mostly only run into this when you are borderline. However, the cpu tends to fluctuate more and that affects the start time of each of these gpu blocks.
SteamVR will never display an image earlier than it was predicted to, so one thing we can do to mitigate this situation is to tweak that second slider in the per-app settings. This is what the “Additional prediction (ms):” slider is for. In the above case if we add two frames of prediction (16.67ms) then we’ll get a timeline that looks like this:
I added an extra earlier purple frame to show that we will continue to see that (with reprojection / motion smoothing) even though the red frame was ready (i.e. finished rendering).
Again, we are trading off added latency to increase smoothness.
Now the tough part… how do I know what values to set?
First get your Throttling setting dialed in. The Additional Prediction is on top of that, so until you have throttling figured out, there’s no use touching the second slider.
If you bring up SteamVR’s Advanced Frame Timing graph in the bottom GPU section is a cyan line labeled Ready For Use. If this is above the white “Present (count)” line, then that means the frames are finishing late. If this line is bouncing around a bit, then you want to take the higher value. So for instance, if you’ve set your throttling to 3 (1/4th rate), then you’d expect to present each frame 4 times (white line = 4). If the cyan line is at 6 bouncing to 7, then you might want to add three (7 minus 4) additional notches of prediction (second slider = 25ms if running 120Hz). If Ready For Use is going crazier than that, then you probably need to add an extra frame of throttling. Just don’t forget to zero out your additional prediction first - remember we still want to minimize latency - then reassess. If your green “First Viewed” line is consistently above the cyan “Ready For Use” then you may have added too much Additional Prediction and might try backing it off.