Stutters - Am I chasing a dream?

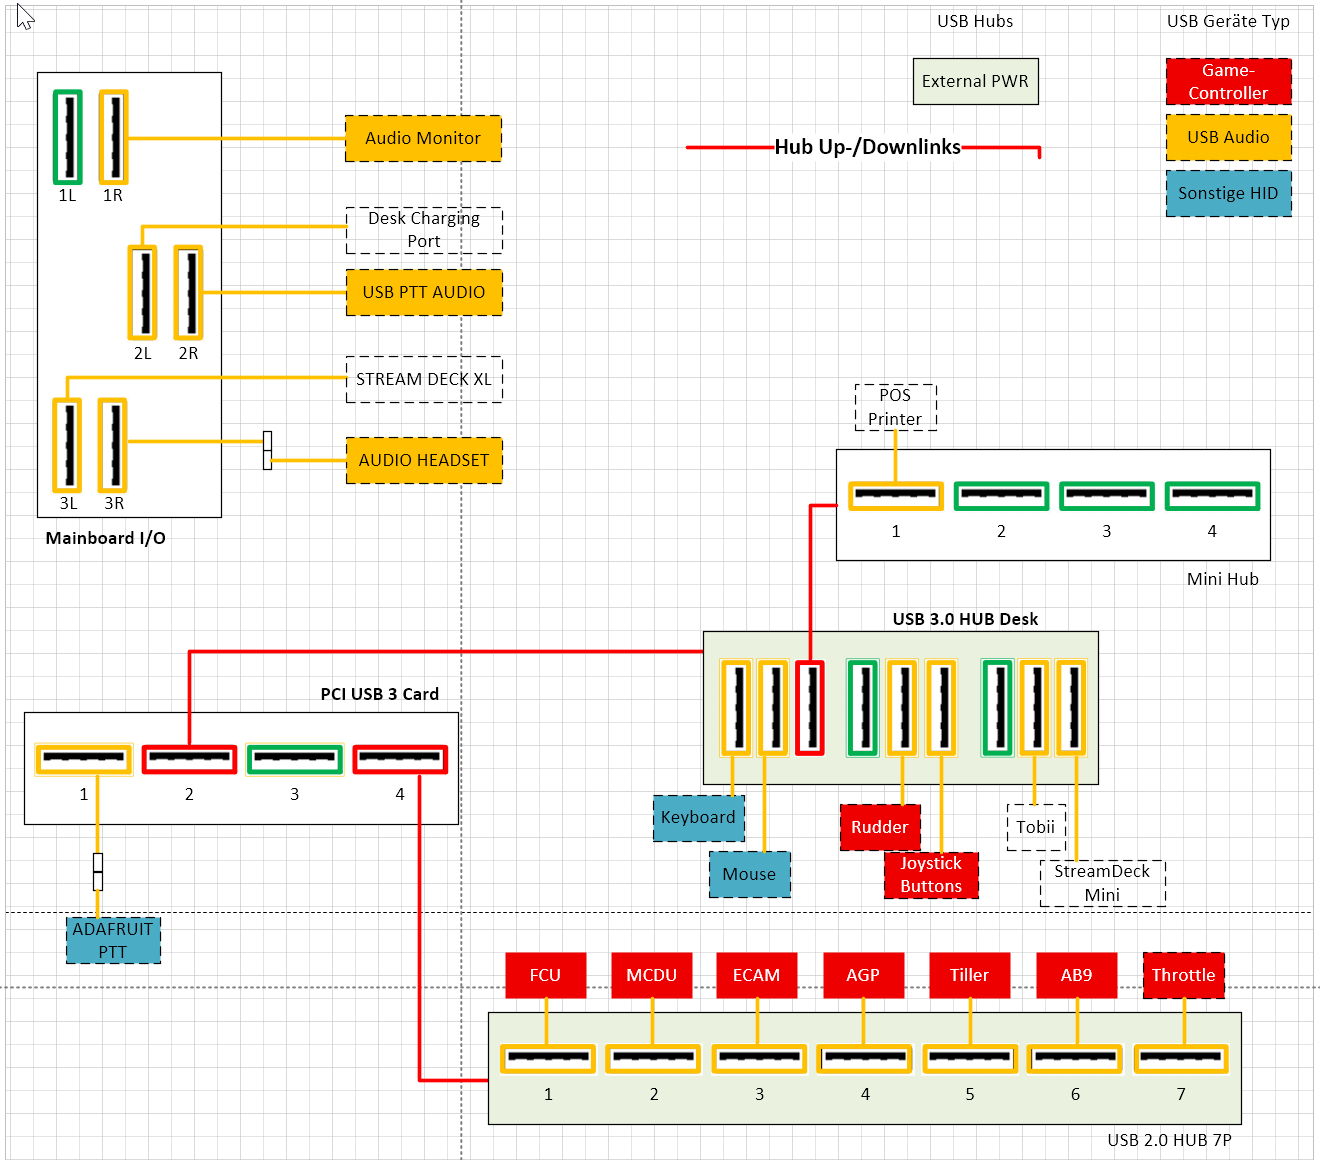
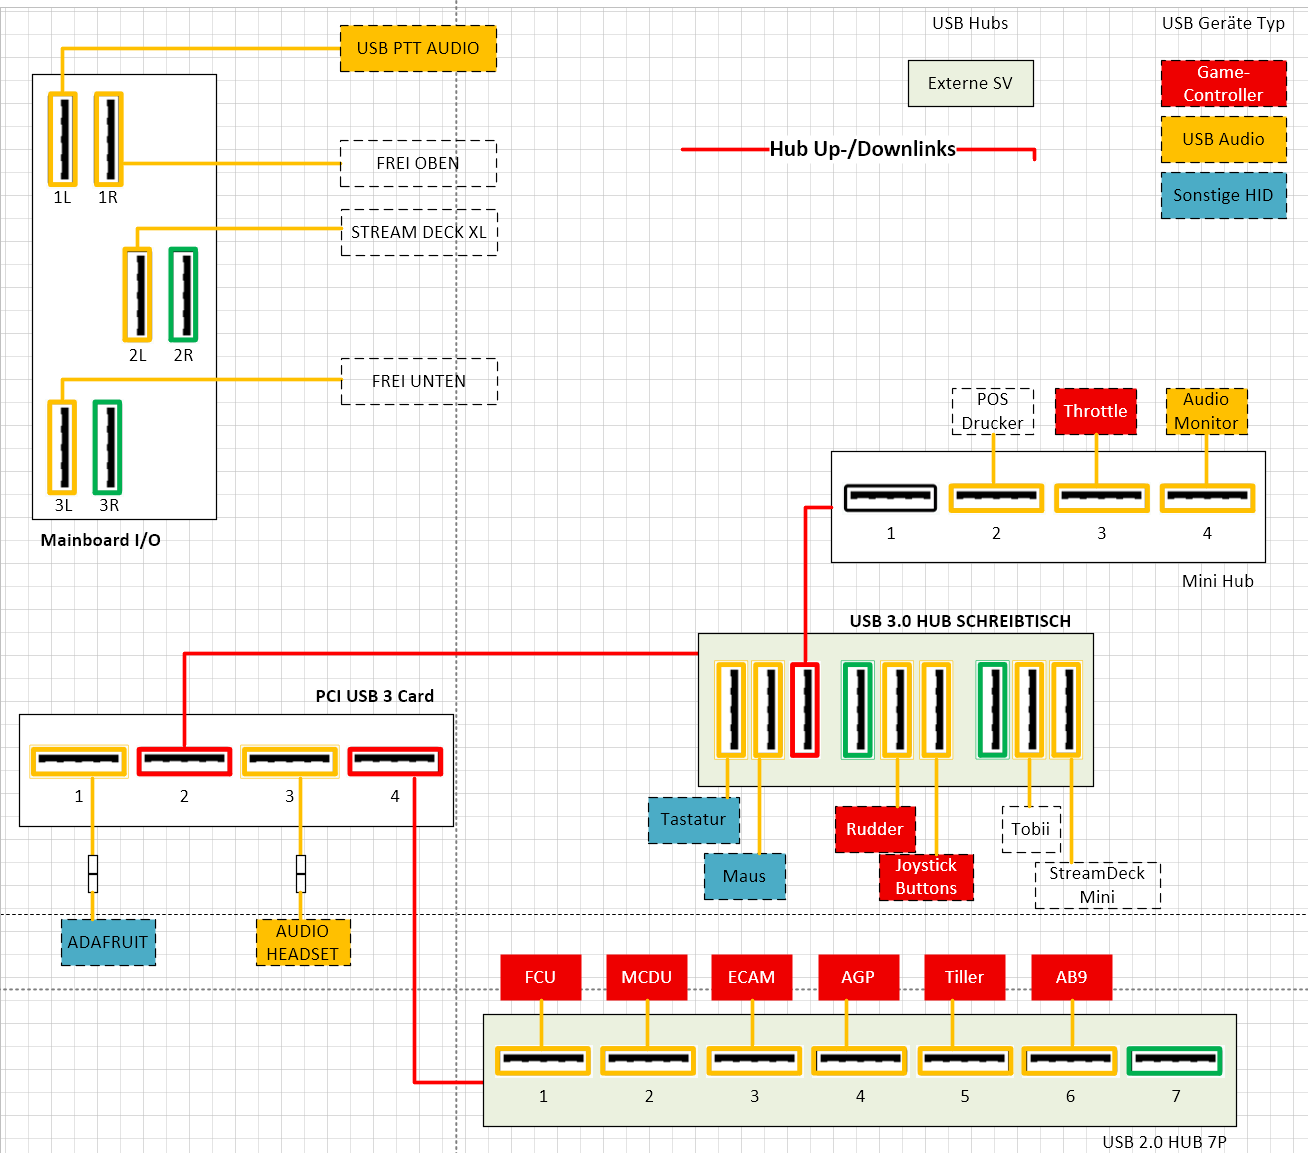
Just today, I had to learn—once again—that it is those ■■■■ little details that determine whether you experience more or fewer stutters: specifically, USB and the question of which devices are connected to which hub, and to which specific port.

The short summary is this: ideally, audio devices should be connected to their own dedicated USB ports; avoid using cascaded hubs, and so on.

I had Google’s AI guide me through reconfiguring my setup, and now I’m seeing drastically lower execution times for critical drivers like Wdf01000.sys (USB/Framework)—dropping from 2.65 ms to 0.96 ms—while nvlddmkm.sys is also performing excellently at 0.42 ms.

I simply showed Google’s AI a screenshot of my current USB cabling layout, and it told me exactly where to plug everything in.

Before

After

Previously, I had run a great deal of hardware through the PCI USB card—so much so that, in the end, audio devices and all the WinWing hardware were sharing a single port, along with the daisy-chained hubs.

And that, too, pays off in the end—so perhaps the dream really could come true after all…
The small mini-spikes in the frame times in MSFS2024 are now significantly fewer than before.

Sorry everyone life has been lifeing the past few days and havnt had a chance to get back to the sim.

Firstly thank you all for your support and advice. I will over the bank holiday try to work through your suggestions.

just to clarify I’m on the 9950x3d, 5090. 64gb ram x2 32gb sticks and a 2tb nvme.

I have tried some default sceneries and granted the stutters when decelerating on the runway after touchdown did reduce as expected. The stutters when doing the same at say inibuilds Gatwick or Heathrow are terrible. It’s interesting how the stutters gradually get worse the further along the runway and slower you get.

I would also like to point out I am a first time AMD CPU user with no PBO or over clocking running. If anyone does have any suggestions regarding BIOS setups to maybe help with the bottleneck I’m all ears.

Again thanks.

On 9800X3D with 5090, I get 20% improvement from some basic BIOS tuning. No joke. If you are willing to try a few simple steps, it’s actually easy to do. First, what is your motherboard, is your BIOS current, and is your RAM on the motherboard’s QVL list?

Hi, sir. I’m interested in assistance regarding my BIOS settings. I have a Ryzen 7 9850X3D and a Gigabyte X870E Elite X3D motherboard. The BIOS settings are mostly from the factory.

First a few questions:

  1. Do you know the model of RAM, or at least the Make and the speeds (eg 6000 CL28)?
  2. Is your RAM on your motherboard’s QVL List… linked here
  3. Is your Motherboard BIOS relatively up to date?
Before changing anything...

t’s a good practice to take a few measurements so you have a baseline to measure what changes.

  1. Download Cinebench
  2. Cinebench > File Menu > Advanced Benchmark
  3. Minimum Test Duration > Off (this keeps it short)
  4. Run the Cinebench Multiple Threads test, and Single Core test and note down or screen shot the scores for each.
  5. In MSFS > Settings > Advanced > enable Dev Mode
  6. From the Tools Menu, display the FPS
  7. Free Flight > Pick an Aircraft
  8. Flight Conditions > No traffic, and Weather Preset “Few Clouds”
  9. Load in to any gate at any airport
  10. Take a screen shot of the FPS from the cockpit view
  11. Take a screen shot of the external view

BIOS tuning: Reboot and press the Delete Key to boot in to BIOS

I highly recommend resetting BIOS to defaults first

There are 2 concepts, both work together:

EXPO, memory tuning

These settings rely on your RAM specs, and require testing to ensure stability:

  1. Click on Advanced > Tweaker > and Click on the XMP / EXPO Profile

  2. I believe the choice will be limited to what your RAM offers

  3. When you enable it the specs will display, make sure they match your RAM

  4. After you have saved and tested the above you can come back to this page and try enabling “XMP / EXPO High Bandwidth Support” - this tightens the memory subtiming for substantial improvement in MSFS, but requires testing for stability.

  5. Depening on your exact RAM speeds, generally you want UCLK DIV1 Mode to be UCLK = MEMCLK

Undervolt aka Curve Optimizer

We enable the PBO (AMD’s Precision Boost Overdrive) algorithm so the CPU is free to use its boost clock, while staying within its own safety limits of power, current, and temperature. We slightly lower the voltage, which means the CPU uses a bit less power, runs a bit cooler, and provides headroom for it to boost when it wants to:

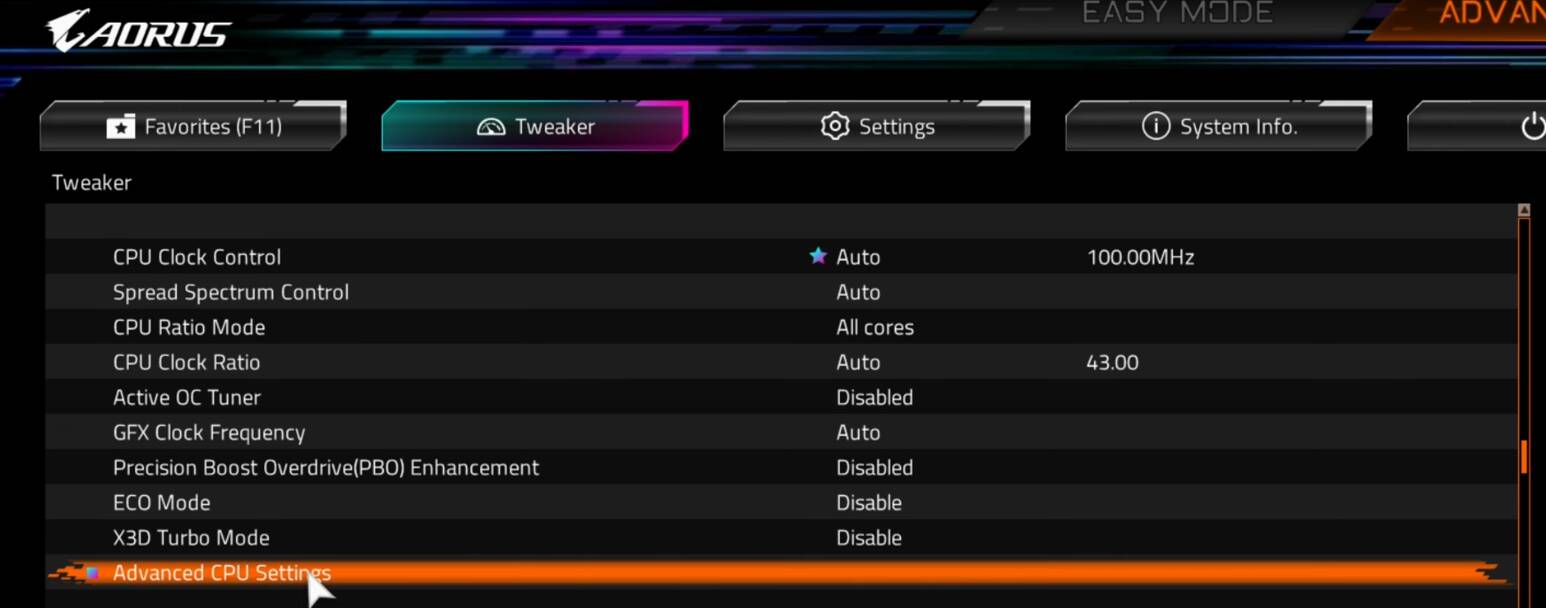
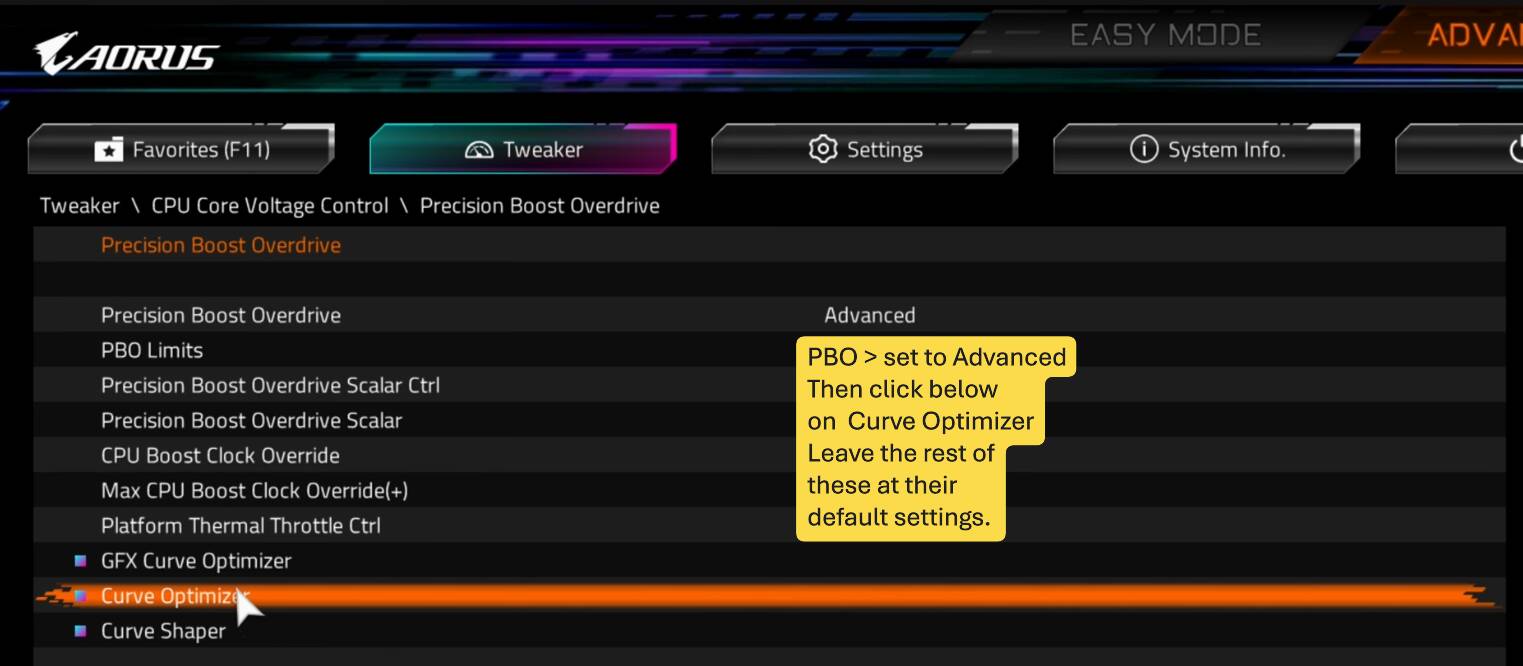
  1. Click Advanced > Tweaker > Advanced CPU Settings > Precision Boost Overdrive
  2. … Precision Boost Overdrive > Advanced
  3. … Curve Optimizer > All Cores
  4. … CCD Curve Optimizer Sign = Negative
  5. … CCD Curve Optimizer Magnitude = start with 10, or 12 at most

Reboot, which will take a while because the motherboard will have to “Train” the memory. Then test again with Cinebench and the exact same MSFS scenario, to compare.

Finally, if all is stable, you can go back in to the PBO section, and try adding 100 MHz to the boost clock.

Additional considerations:

If you use either DLSS or FSR, I highly recommend

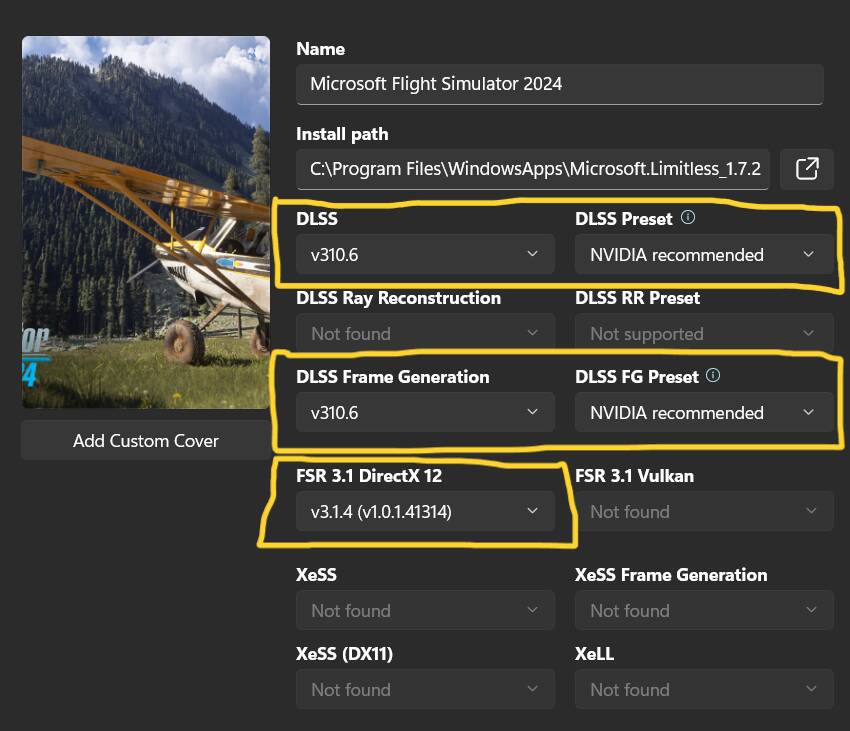
The version of DLSS and FSR installed with MSFS is quite old, and there is significant benefit to updating the versions using DLSS Swapper - only ever install this from Github, the websites that offer it are not by the author, and should not be trusted…

MSFS should not be running, and, if you have used NVIDIA App to “override” DLSS, you should set the NVIDIA app back to defaults. (Also don’t let NVIDIA App optimize).

Here is what DLSS Swapper looks like:

Windows settings, AMD Chipset Driver

These things can also be factors in stability and performance:

  • Have you installed the latest AMD Chipset (from AMD)?
  • Process Lasso not needed with recent Chipset Drivers
  • Windows
  • … disable Hibernation
  • … maybe disable OneDrive, App Resume, Offers, Search indexing, etc
  • … add exception to Defender for the MSFS Limitless folder …
  • … Settings > Privacy & Security > Virus & threat protection > Manage Settings >
  • … scroll down, Add Exclusions > Select Folder …
  • C:\Users[Your Username]\AppData\Local\Packages\Microsoft.Limitless_8wekyb3d8bbwe

There is an active thread discussing strategies for tuning BIOS, here are my results

I hope some of that helps!

I did try to tell you a few times times! Glad you are getting the expected results now. Although I would recommend lowering settings to get more than 30fps, which is something I can barely tolerate in 2D, let alone in VR. But each to their own!

45fps is where I think VR becomes truly enjoyable. Currently I’m foregoing a lot of eye candy and sharpness for 75fps. The smoothness, especially when flying low, is just that magical.

Hi mate, I would definitely be open to see what margins I can get by tweaking some options in the bios. My motherboard is the aorus x870e pro x3d. CPU 9950x3d. Ram Kingston fury beast 6000mhz cl36 x32gb. I’m not sure if it’s mentioned in the qvl list. Cheers

That you did, and I am happy to eat some crow! Lol.

I’ll try and cap at 40. I did lower 2 settings last night that I found made no visual difference for me. Went from high to medium on water waves and windscreen detail.

I am also going to try capping with the nvcp/app and turn off cap in game.

I was trying to cap at my lowest point, but I’d say 90-95% of my flying is 40+.

Editing my post, I realize I forgot some steps that might be important, so here is a more thorough process:

Note, I’m not an “expert” and only really familiar with my own PC, but I believe the principals apply since the hardware is similar enough. I hope they can work for you and others too.

I suggest the following - it’s a bit of a process, but worth the effort:

1. Make sure AMD Chipset Driver for X870E is up to date

A lot of people with AMD CPUs that have 2 CCDs (like yours) used to use Process Lasso. I suggest not using it, and let the AMD Chipset Driver do it’s thing:

2. Windows Hello PIN precaution when updating or resetting BIOS

If you use Windows Hello PIN, you’ll want to make a temporary change in Windows before resetting BIOS (this was really only a concern in Win11 24H2 I think, but I still do it to avoid being locked out after resetting BIOS)

  • Settings > Accounts > Sign-in Options > Additional Settings > Uncheck: For improved security only allow Windows Hello sign-in for Microsoft accounts on this device.
  • This means that if you reset BIOS and can’t use your PIN, you can sign in with your Microsoft Account Password
  • Once BIOS is updated and set how you like it, you can turn this back on
3. Make sure your BIOS is up to date
  • First identify the version of BIOS you are using, and download the same version from the Gigabyte website so you can restore to that version if need be.
  • The best way to see the version of BIOS installed on your mother board is to boot in to BIOS, by rebooting and holding / tapping DELETE until it boots in to BIOS
  • Alternatively you can press WIN + R, then type msinfo32 and hit return, and in the page that opens look for the BIOS version / date.
  • Go to the support website for your board, which I believe is this one.
  • I suggest downloading the version you have installed, and the latest version, so you have both files

To update your BIOS, just looking at the manual for your board

  • Copy the BIOS file to a USB thumb drive, plugged in to the dedicated “BIOS” USB port
  • Shut down the PC, and turn off the Power Switch on the PSU
  • Press the “Clear CMOS” button for a full 10 seconds (where the USB ports are)
  • That resets BIOS to defaults
  • Boot pressing DELETE to boot in to BIOS
  • Choose Q-Flash to update BIOS
  • I think it will find the BIOS file on the USB thumb drive, and offer to update for you
  • Once complete reboot normally in to Windows
4. Benchmarks before tuning, to have a baseline to compare

Cinebench

  • Download Cinebench
  • Cinebench > File Menu > Advanced
  • Set “Minimum Test Duration” to “Off” (to keep tests to 1 short cycle)
  • Run the CPU Multiple Threads test (and if you like, the Single Thread or Single Core)
  • Take note of the scores.

MSFS

  • Open MSFS > Advanced > Turn on Developer Mode
  • Tools Menu > Show FPS
  • Free Flight > Flight Conditions > No Traffic, Few Clouds preset
  • Choose an aircraft and gate to load in to
  • Load in and take screen shots of the FPS while in cockpit view, and external view
  • Exit MSFS
5. Enable EXPO in BIOS (memory timings)

You said your RAM is Kingston Fury Beast 6000 CL36 32GB

  • According to the website, it is
  • Part Number: KF560C36BBE2AK2-32
  • 6000MT/s 36-44-44 1.35V
  • That does show on the Aorus X870E Pro X3D QVL List
  • So the EXPO profile should show up…

Boot in to BIOS

  • Boot your PC holding / tapping DELETE to boot in to BIOS
  • Click Advanced
  • Click Tweaker

Enable EXPO memory timings for your RAM:

  • Scroll down and click on XMP / EXPO Profile
  • It should show something like “EXPO I”, choose it
  • Make sure the specs it shows to the right match your RAM
6. Enable PBO in BIOS

PBO (AMD’s Precision Boost Overdrive) allows the CPU to boost to higher frequencies when it needs to, and manages the current, power, and heat to stay within defined limits, making it safe to use. It also allows us to slightly undervolt the CPU, so it runs a bit cooler, creating headroom for the boost function to work better:

  • In BIOS > Advanced > Tweaker
  • … click on Advanced CPU Settings
  • … click on Precision Boost Overdrive
  • … set PBO to “Advanced”
  • … click on Curve Optimizer
  • … Choose “Per CCD”
  • … Set CCD0 Curve Optimizer Sign to “Negative”
  • … Set CCD0 Curve Optimizer Magnitude to “12”
  • Explanation, your CPU has 2 CCDs. CCD0 has the V-Cache and is used by MSFS. No need to undervolt the other CCD, as it is tuned differently.


When you make changes in BIOS and reboot, the PC will take a long time to reboot because it is training memory, just let it run.

  1. Test Cinebench and MSFS again, the same scenario, to compare. In my case I saw about a 10% increase in FPS in MSFS.
8. If all is stable, tighten memory subtimings in BIOS

I saw another 10% increase in MSFS performance by doing this - but keep in mind, every PC and RAM combination can behave differently. Easy to try, easy to undo:

  • Boot in to BIOS
  • Advanced > Tweaker > scroll down
  • Set XMP/EXPO High Bandwidth Support to Enabled (or Auto)
  • Set Infinity Fabric to 2000 MHz
  • Set UCLK DIV1 MODE to UCLK = MEMCLK
  • Save and reboot, and Test again!
9. If all is stable, add 100 MHz boost clock

The CPU allows for adding up to 200 MHz of boost clock, but it’s really memory timings that benfit MSFS the most. Still a bit more MHz helps, and assuming you have applied the Curve Optimizer, you have created thermal headroom to use the boost clock

  • Boot in to BIOS
  • Advanced > Tweaker > Advanced CPU Settings
  • CPU Boost Clock Override, enable
  • Add 100 MHz
  • Save, reboot, Test
10. I choose to update DLSS and FSR

The version of DLSS and FSR installed with MSFS is behind what is current, and I see significant quality and performance improvement by updating the files. Note that any time MSFS is updated, you need to return to DLSS Swapper to swap in the new versions again.

  • I download DLSS Swapper from Github
  • (don’t google and download from any other website, not affiliated with author!)
  • If you have used NVIDIA App to “override” any of the DLSS settings, you should return those to the default settings first
  • Also don’t let NVIDIA App “optimize” MSFS
  • Open DLSS Swapper and you can update DLSS, DLSS FG, and FSR like this:
11. Additional considerations in Windows

I do the following in Windows to reduce the amount of background activity:

  • Disable Hibernation (Ram being written to disk)…
  • … click on Start and type CMD, open as Admin
  • … Type or copy the following and hit enter

powercfg.exe /hibernate off

I disable Settings …

  • … Apps > Startup Apps … OneDrive, and others
  • … Apps > Resume
  • … Privacy >
  • … Recommendations
  • … Speech
  • … Inking & Typing
  • … Search

I add exceptions to Windows Defender for the MSFS Limitless folder

  • Settings > Privacy & Security > Windows Security > Virus & Threat Protection…
  • … Virus & Threat Protection Settings > Manage Settings
  • … scroll down > Exclusions > Add exclusion
  • … choose Folder, and the path is (for MS Store)

C:\Users\yourusername\AppData\Local\Packages\Microsoft.Limitless_8wekyb3d8bbwe

Updates, it’s a good idea to regularly open MS Store app > Downloads > and check for updates, often there are updates to Gaming Services, etc, which you don’t want to happen mid flight.

I hope the above is useful, and I hope you see improvement.

You can see the results of my own testing here in a thread about tuning BIOS
I have the same setup with a 144hz monitor and lock FPS in-game to 30, but run frame gen at 4x. (30fps x FGx4=120fps.) This gives me stable and stutter/hiccup free 120fps at all times since the system is tricked to only thinking it needs to maintain 30fps and has a lot of overhead to do other things, preventing stutters. But the frame gen x4 gives me the 120fps and low latency mode ensures that there is no input lag. The math works out well 30x4 = 120 and I lock FPS to 120fps in NV Control Panel. Vsync off in-game but on in control panel. Low latency mode on in both game and NVCP. Obviously GSYNC on in NVCP too. I set rolling cache at 32GB and Terrain Precaching on ULTRA. This prevents the blurries, terrain texture loading, etc. Also, my DLSS is set to DLAA instead of DLSS Quality or TAA. Makes a huge difference in distance rendering. Turn down the aircraft and ground vehicle traffic densities, quantities, and variations all to medium. That is partially why you get stutters around airports. Too much ■■■■ being loaded in. Even at medium you get a good amount of air and airport vehicle traffic. In big citiy airpots even medium is A LOT.

I have the same setup as you and am stutter free, even landing 737 at KJFK in New York with a thunderstorm. I have a 144hz monitor and lock FPS in-game to 30, but run frame gen at 4x with the 5090. (30fps x FGx4=120fps.) This gives me stable and stutter/hiccup free 120fps at all times since the CPU is tricked to thinking it only needs to maintain 30fps, giving it a lot of overhead to do other things, like preloading and preventing stutters. The frame gen x4 gives me the 120fps and low latency mode ensures that there is no input lag. The math works out well 30fps lock x FG@4 = 120 and I lock FPS to 120fps in NV Control Panel. Vsync off in-game but on in control panel. Low latency mode on in both game and NVCP. Obviously GSYNC on in NVCP too. I set rolling cache at 32GB and Terrain Precaching on ULTRA. This prevents the blurries, terrain texture loading, and stutters since its keeping everything in the RAM and VRAM (you have more than enough). Also, my DLSS is set to DLAA instead of DLSS Quality or TAA. Makes a huge difference in distance rendering. Turn down the aircraft and ground vehicle traffic densities, quantities, and variations all to medium. That is partially why you get stutters around airports. Too much ■■■■ being loaded in. Even at medium you get a good amount of air and airport vehicle traffic. In big citiy airpots even medium is A LOT. If you still experience stutters, you may try DLSS Quality instead of DLAA. But Frame Gen x4 is the magic ticket with 30fps locked

That’s great. I’m a little different because I’m running triple screens. All of my testing and tuning was to make enough headroom to get MSFS working well on 3 screens, so I’ve learned at least some ways to do that - still some compromises, and still some areas with minor stutters, but getting closer.

With high specs, it’s now possible to have choices of settings on 1 screen as you are doing.

@CayeLopez339 @Taipan1991
If you have any questions regarding BIOS settings, please refer to the topic linked below, which is specifically intended for this kind of BIOS-related support.
https://forums.flightsimulator.com/t/optimizing-bios-for-msfs-2020-2024-tips-advice-and-discussion/756831

It’s better to keep everything in one place rather than having valuable tips and advice scattered across many different threads.

In the future, it will also be much easier for someone to find useful tips in a single topic instead of going through 100 different threads whose titles don’t even suggest they are related to BIOS settings.

Thank you for your suggestion, I will refer to that post!