0.1.6 is newer than the version 0.2 hosted on Flighsim.to.
The “INCREASE/DECREASE COM1 (WHOLE) for horizontal and INCREASE/DECREASE COM1 (FRACT)” commands have been changed to different commands a few versions ago. They were interfering with the DG808’s radio frequencies in sim.
" Keybinds -Several functions can be operated by keybinds from joystick or throttle:
lxn-dg808s
Replacement mod for the Touching Cloud DG808s Nav computer
Fixes and Features:
Overspeed Warning:
Coded and contributed bei LeNinjaHD - thanks for that! Gives you a red warning if exceeding 152 knots true airspeed. Depending on altitude that can be way before reaching the red line on the VSI.
The message will pop up each time you pass the threshold for ten seconds and the disappear without any harm. Connected to the “Cockpit Warnigns”-Switch in “Interface options” so can be deactivated. Or even is if you have deactivated those gear and ballast warnings.
No matter if deactivated, exceeding Vne will be recorded and evaluated at the end of the current task.
The speedtape gauge also shows a dynamic estimation of Vne translated to indicated airspeed as “red zone”. This estimation will always be a little on the “pessimistic” side, placing the red overspeed line a little lower than the popup trigger to give you an early warning.
New type of datafields
Two new variables: “Waypoint Min Altitude” and “Waypoint Max Altitude”. These behave differently from all other vars: Fields will only be displayed, if a min/max value is present at the current waypoint. Otherwise the fields will be invisible, de-cluttering the interface. Now that the technique is there, it might be reused for other variables in the future.
Installation:
Simply drop the included folder "touchingcloud-aircraft-dg808s-lxn" into your community folder. No need to change anything in your existing installation. To uninstall delete the folder and you're "back to normal".
Basic Features:
All Information is organized in „pages“ (horizontally) and „sub-pages“ (vertically). Pages can be changed by „click and drag“ with the mouse or - more comfortably - through keybinding „INCREASE/DECREASE COM1 (WHOLE)“ for horizontal and „INCREASE/DECREASE COM1 (FRACT)“ for vertical scrolling.
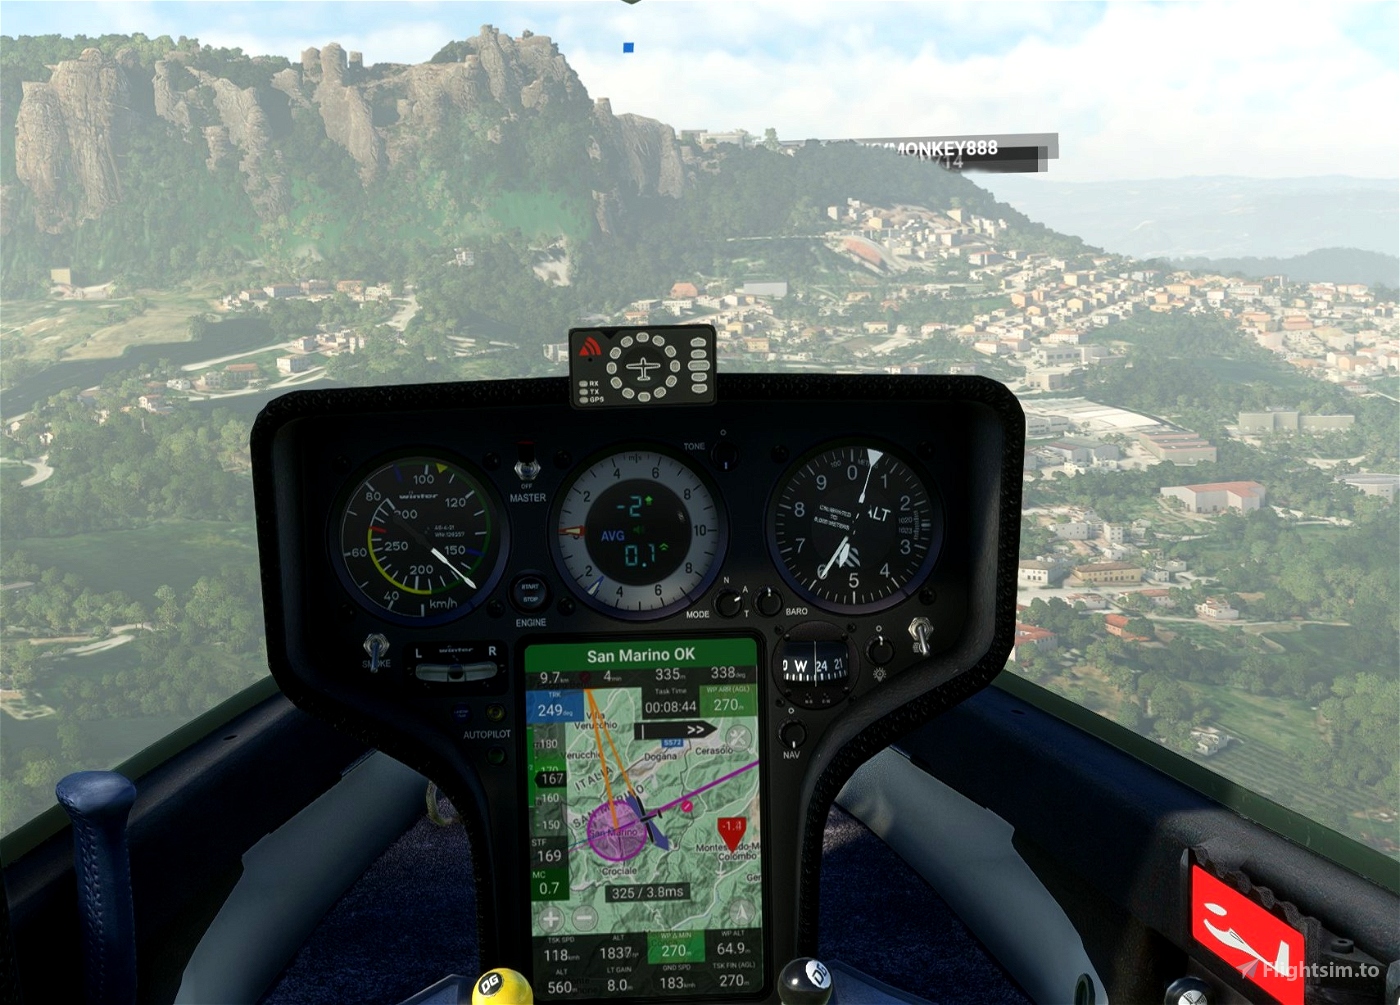
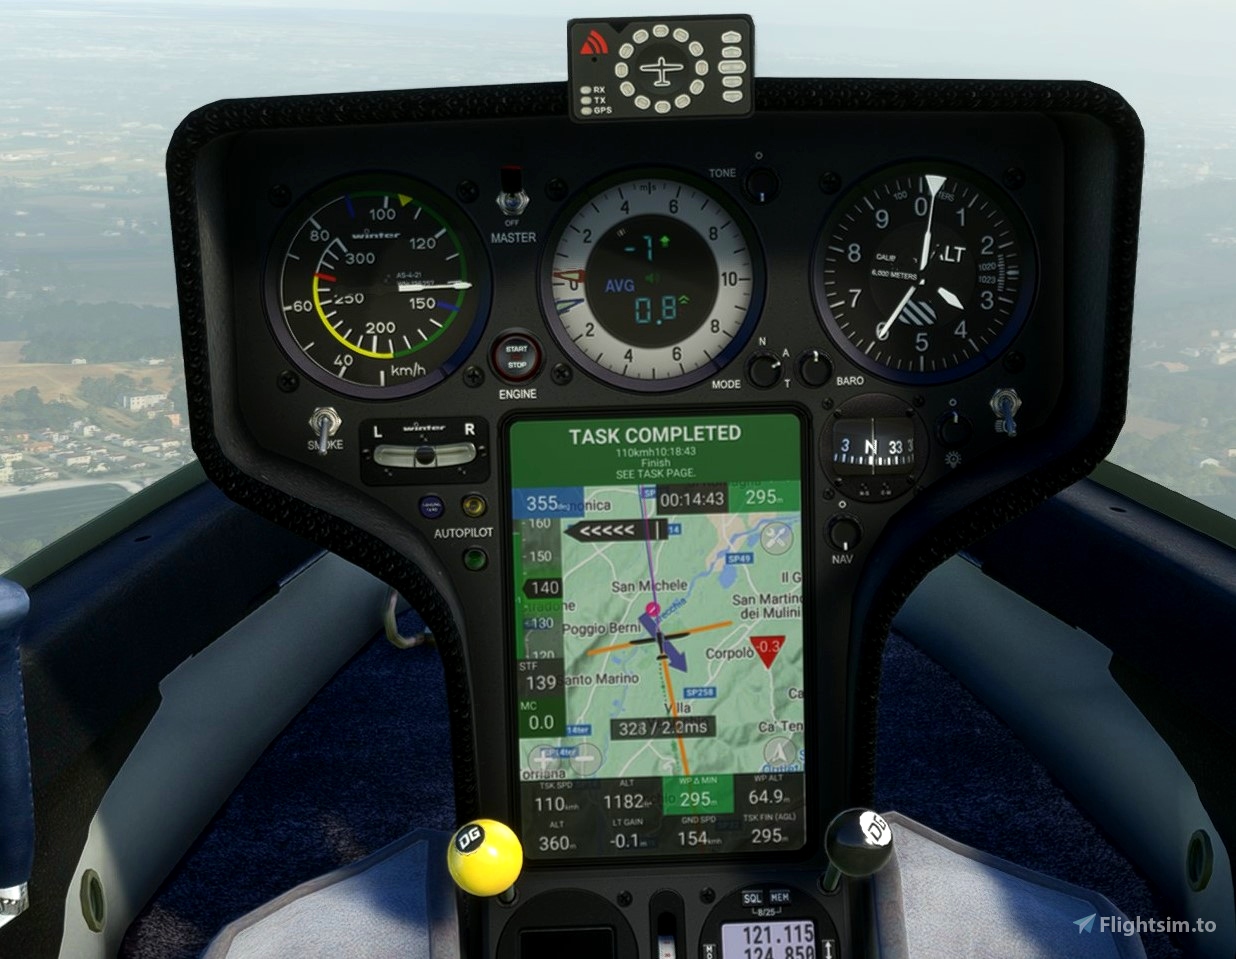
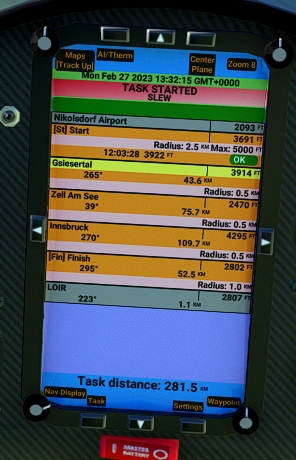
Currently there are five main pages: „APT“ for navigation to the selected Airport, „WPT“ for navigating a task/flightplan, „TASK“ for the current state of the task, “Kinetic Assitant” for launching through KA and „CONFIG“ for Unit switching, ballast management and some system settings.
„APT“ Page automatically selects the nearest Airport as target. On the first subpage there’s a bit of info about that airport including runway orientation and dimensions. The second subpage features a list of close airports where you can click any airport to select it for navigation. Click the selected airport again to return to “closest airport navigation”. On the map a yellow line will be drawn from your glider to the selected airport to show the direction to fly.
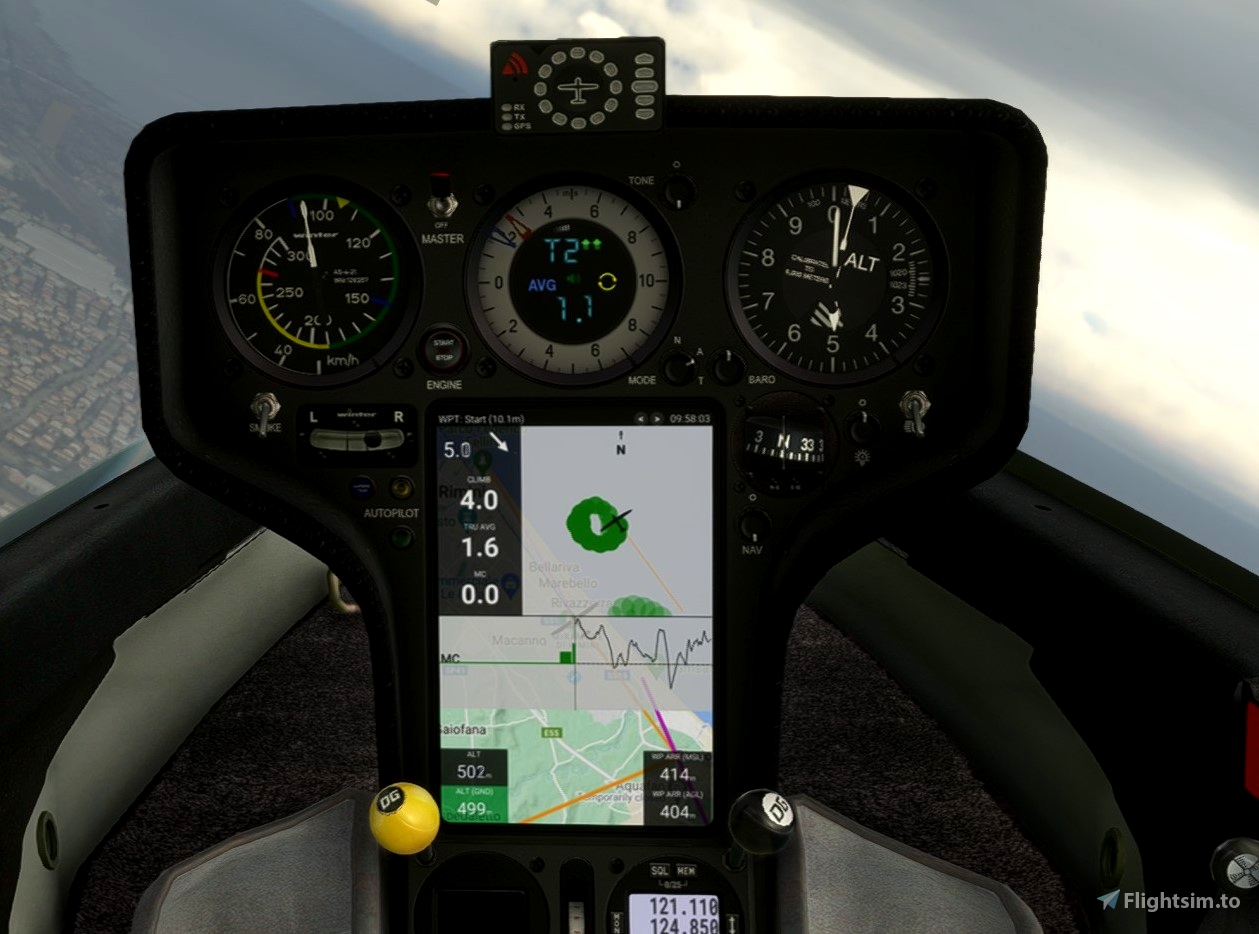
“WPT” is similar, except the navigation target is the current waypoint of the loaded flightplan. Using the buttons in the headerbar waypoints can be selected. The map will also show a yellow course-line from your glider to the waypoint to indicate the direction to fly. As a subpage to “WPT” you find a “thermalling help” page, displaying wind, climb and average climb for the current/last therma (a “thermal” is detected, when circling for more than 25 seconds). The lower section displays a bar chart of all thermals in the löast 40 minutes on the left and a graph of climb/sink values in the right half.
„APT“ and „WPT“ feature a maximum of 16 data fields each, that can be configured in game. The „tools“ button in the upper right hand corner of the map toggles „configuration mode“. Data fields are then marked with a light blue outline. Click any data field to bring up a popup, where you can set background color, text color and Information to be displayed. A second background color can be selected to be displayed when the displayed value <= 0 (e.g. switch background to red when arrival height is negative)
Data field Configurations are persistent between simulator sessions. Click „reset all“ in the configuration popup to reset all data fields to default. Configurations are also persitent with different versions of this mod, so if you used an oder version or install an update, your settings will be save. There is however a slight chance, that a variable name gets mixed up, so if you experience any erratic behaviour with the datafields, try “reset all” and see if that helps.
The task management system is Ian „B21“ Lewis’ Soaring Engine from the AS33. Some features like calculating glide ratios could not be recreated, as they are dependent of other instruments in the AS33. Others are still on the to do list.
The wind indicator in the center of the map is loosely based on the real world LX-„Hawk“ system displaying current (blue) and average (grey) wind-arrows and a green/red column indicator for the vertical wind component.
The Config-Page gives you access to various settings:
- Ballast: A light version of ballast loading system that can even be used in flight - which would be shameless cheating of course!
- Units: allows you to select the units of measurement to use for various categories or generally “metric” or “imperial” system. Only “metric” or “imperial” settings have an effect on other instruments in the cockpit. Detailled settings only work inside the nav computer.
- Interface Options: Settings for the Nav Interface. “Readability Mode” can be activated here to get some bigger readouts (and less data fields) and the liftdot-trail on the map can be deactivated
All config settings apart from ballast are persistent between sessions. Just make sure to click “close” after making any changes.
Multiplayer racing
Multiplayer-Info is located as a sub page under the task list - simply page down.
First view asks you to enter a username. As default the aircraft registration is used. You can change that to your pleasing. A good idea would be to use a name short name, as it will later be displayed on other pilots nav map and you don’t want to clutter that with a username like “bestpilotinthewholewideworld2338992” 
Once connected you see a - most likely very short or empty “events” list, showing all available flights. You only see events that use the same task/flightplan you have currently loaded. Click an event to join or click “add new flight” to create your own event and then join it. You need to enter a title and the start time (hour and minutes) in UTC/ZULU time.
Once other pilots join you’ll see the list of participants and also see other pilots position on the nav map. If you assigned “task time” to a data field it will now show a countdown to task start.
When a pilot crosses the start line, his/her average speed and flown distance is shown in the list. The list will now be sorted by distance flown, effectively a live ranking of the race. When a pilot crosses the finish line, total task time will be displayed instead of distance flown and used for sorting.
Communication is done via a google cloud service that has a traffic limit, so the feature might not always be available.
Some more Details
The map view features a lot of information to help you optimize your flight:
-
There are three thin lines pointing away from your glider:
- the blue line is simply your plane’s heading
- the pink/magenta line is your gps ground track, the direction, your plane is travelling over the terrain. The stronger a crosswind, the more this will deviate from your heading.
- the yellow line points to your current nav target. Depending on which page you are, this is the selected airport or the current waypoint. So as a rule of thumb: “put the pink on the yellow” and you’re going where you are supposed to go
-
Your loaded flightplan is diplayed as the current “task” in broader pink/magenta lines, circles and semi circles.
- the active “leg” of the task is displayed in black/yellow stripes leading from the last waypoiont to the current one.
- Semi circles indicate the start and finish lines of the task, where the task timer will start and stop automatically.
- Small pink circles mark the turnpoints of the task. Entering the circle around the current waypoint will trigger the “waypoint ok” message and automatically switch to the next wp. But take a good look on the task page, if there are “Min/Max” values for the waypoint for altitude restrictions (usually for start and/or finish waypoints)
To make all this soaring task magic work, the flightplan needs to provide more information than usually present in MSFS generated flightplans. Easiest way to achieve that is to use B21’s task planner to plan your flights: B21 Task Planner
MacCready setting can be changed by clicking the green “MC” button beneath the speed tape.
Why use that MacCready setting? There’s a lot more theory around that than can be covered here, but on thing important: calculation of estimated arrival height and time enroute is based on the suggested speed to fly (indicated as STF under the speed tape instrument), which is in turn influenced by MacCready setting and carried ballast. In short: the more ballast and the higher MacCready, the higher the calculated speed to fly. The more your actual speed deviates from the calculated speed to fly, the less accurate your arrival height estimations will be. You can also turn that around: on final glide you can turn the MacCready value up and see the estimated arrival height go down (due to more sink at higher speeds) until you get a safe altitude estimation. Now your computer tells you the maximum speed to fly, that still gets you to finish safely.
Keybinds
Several functions can be operated by keybinds from joystick or throttle:
- Page left/right: INCREASE/DECREASE AUTOPILOT REFERENCE ALTITUDE**
- Page up/down: INCREASE/DECREASE AUTOPILOT REFERENCE VS**
- Waypoint next/prev: INCREASE/DECREASE TRANSPONDER (1000)**
- Map Zoom: INCREASE/DECREASE TRANSPONDER (10)**
- Map Orientation: INCREASE/DECREASE TRANSPONDER (1)**
Known Limitations:
Changing pages and subpages with “click and drag” in flight requires a lot of mouse handling skills  I recommend keybinding. Way up on the roadmap is using the rotary buttons aroud the screen for navigation as is in the real world device.
The map can not be panned. To avoid collision with „click and drag“ page changing another „mode switch“ would be needed. Considering the current quality of the ingame map, I don’t think it’s worth the added complexity.
Conflicts with other mods
Multiple mods changing the same aircraft are prone to conflict somehow. If you run into problems the first and easiest option is to decide, which modification is more important to you and remove the conflicting one. If you absolutely want to keep both, you can try to find out which files conflict. In the case of most livery modifications the conflicting file is the file panel.cfg, that is used to modify aircraft registration. This mod also changes panel.cfg. You can try to solve the conflict by either copying panel.cfg from this mod over to you livery completely, or only copy the section [VCockpit02] from this mod’s panel.cfg and paste it to the same file in you livery mod. Sounds way more complicated than it is, but try it at your own risk, of course.
Developer Info:
If you have a basic understanding of what HTML, Javascript and CSS are, jump into the code and try your hand on it. There is no black magic involved
The front end is intended to be easily extensible with new features. New pages and sub-pages can be added by simply copy/pasting the respective HTML-Structures.
All variables that are displayed in the frontend are stored in the „this.vars“-object. This object contains the value itself as well as unit- and label-information and make the variable user-selectable in the in game configuration popup. To add a new readout to your panel all you have to do is add a line to the „this.vars“-object with your own variable name and label/unit information. When you start the next flight, you can simply assign your variable value to a data field of your choice and if the variable value is manipulated somewhere in the javascript, the cockpit readout will be updated automatically.
If you need a variable displayed somewhere outside of the data fields, you can do so directly in the html using the attributes class=“livedata“ data-value=„VARIABLE“. See the total ballast readout in the “Ballast” configuration as an example.
Units: All variables are kept in a „base unit“, which is (currently) „imperial“ units. When displayed in a data field or as „livedata“ in the html the value is converted to the user preferred unit. So if you like to display a distance you should store nautical miles in the variable and conversion will be automatic.