Water Cooled Bucket List PC build for flight sim

In case it’s of interest to anyone, when tuning BIOS for performance, the usual references are for a VF or Voltage Frequency Curve. But temperature matters too, especially at high frequencies, and can throttle. This was part of why I wanted to try water cooling, to keep things as cool as possible under normal conditions. So it’s a VFT Curve.

SkatterBencher has some really informative guides:

Very impressive indeed @GimbalAxis!! You’ll truely be an overclocking expert by the time you get your gpu!

Just a couple of comments:

  • I found the corecycler utility to be very useful to hone in on each cores maximum undervolt. You can find it on github by googling it and it’s very easy to use.
  • With regards to the paramerters within PBO, I look at it from the perspective that since AMD provided these parameters they are all fair game to utilize to eak out the most performance. That includes setting them to motherboard limits and scaler to 10x :wink:. AMD wouldn’t give users these tools along with a warranty if they were that destructive to the cpu :zany_face:. You can be assured AMD has enough failsafe triggers around PBO to protect the cpu.
  • If you think about it, the only way to sustain maximum performance of the cpu is through artificial performance benchmarks and utilities. Real world use (even games like MSFS) only partially stresses the cpu compared to the artificial benchmarks.
  • As long as you have sufficient cooling, you’ll be fine. My AIO cooler never allows my cpu to get hot enough to throttle even with the significant OC that I apply. Even running the sim my cpu temps never go higher than the low 60c’s.

Edit- btw, not sure you’ve tried increasing your CPU-to-memory FCLK but it should easily hit 2100 and possibly as high as even 2200. Sometimes it may not have much of an impact but you’ll most likely be able to find a sweet spot above 2000.

Just be careful with FCLK…
Only a certain percentage of CPU’s are able to handle 2200. Mine is not one of those.
When I tried 2200 my computer wouldn’t boot, and I had to manually clear the CMOS to get all the BIOS settings back to default. I can run FCLK=2133, but I keep mine set to FCLK=2000.

There seems to be a lot of disagreement about FLCK in the overclocker community. Some suggest pushing it as high as possible, while other suggest leaving it alone. I’ve concluded that with my system, stability is king. That means giving up a little performance at the top of the bell curve. Don’t get me wrong - I’m not discounting @WingWarper1 advice. Only you can decide how much you want to push your system, and he knows what he’s doing. You seem to know a lot as well, so…have fun storming the castle!

I’m sticking with FCLK at 2000 for the moment (per RAM’s rating) and have UCLK = MEMCLK in 1 to 1 mode. The tighter subtimings provided by the BIOS and QVL give a significant boost as it is.

There is also no benefit I can see from removing the PBO power limits and setting them to Motherboard. Here’s why:

The Voltage Frequency curve shows, for higher frequency you need higher voltage. Although AMD specifies a Core voltage liimit of 1.4V, in fact, the PBO limits it to 1.35V because that’s the limit for the 3D cache. And this was learned the hard way by Igor’s Lab on an early 5800X3D:

This is why the negative Curve Offset (undervolting) works - it drops the voltage curve down, providing room for higher frequencies.

So the basic idea is, instead of removing power limits (which could hurt the CPU), you undervolt to make more use of the power within the limits, just more efficiently.

Note that since temperature also affects the VF curve, cooling itself helps to undervolt (to a degree). So the cooler you can keep the CPU, the higher the frequency at the same voltage!

I found what I was looking for in terms of switching Curve Optimizer from All Core to Per Core. I’ll post the results if I’m successful today. The basic idea is that the best performing core already operates at a lower voltage than other cores, so it has less room for curve offset, and limits All Core offset. (go too low and it’s unstable). So you tune the other cores use the same voltage (each with it’s own Curve Offset), then collectively lower voltage on the group. It’s brilliant:

You’ll wonder what this guy is doing, but just watch, it’s actually simple. (no sound, and note to measure correctly you need to have Windows power mode set to Balanced)

1 Like

I certainly wouldn’t remove power limits. :hot_face:

I’m debating whether to lower mine a bit. I’m running about 70°C in the sim with my air-cooled 7950X3D. That’s certainly not a problem. But when I use Handbrake to encode videos I hit my thermal limit (manually set to 89°C) Again, not a problem. But I wonder about CPU lifespan.

Reducing PPL1 and PPL2 can lower temps overall (at the expense of a few FPS, to be sure.)
In the end though, the CPU Temp/Frequency/Voltage triad while flying is what really matters.

Keep in mind that the motherboard settings do not remove the PBO power limits :wink:. They merely set the PPT, TDC, and EDC to the safe montherboard limits as determined by the motherboard manufacturer.

I know from your previous post you don’t like to increase the scalar. Increasing the scalar essentially allows the cpu to boost faster and hold its boost level a little longer. Combining this with the Ultimate Power Plan provides a nice performance boost. You can unlock AMD’s Ultimate PP via a Win 11 command - see this article for details. Btw, this power plan is included in AMD’s AM5 chipset drivers and does not run the cpu at 100% all the time as some have said (hence minimal impact on temps). You can verify this by looking at the effective cpu core clock rate in HWiNFO64.

Again, the AMD warranty is still valid with all of the PBO settings so nothing here that AMD wouldn’t approve of because they know they have some headroom with their cpu’s that’s safe for overclockers to take advantage of. Otherwise, they would not advertise it!

1 Like

Setting PBO Power Limits to Motherboard sets the PPT Limit to 1000W, and, when running benchmarks, the CPU will run over the 120 W. Also, I can achieve the 200 boost frequency of 5.4 GHz at the same or lower core voltage (1.2) by undervolting. This is keeps everything within the defined PBO limits, which I’m much more comfortable with. Even if using Scalar is “allowed”, it still affects longevity, which every benchmarker is careful to state up front.

I’m just doing Per-Core Offsets, and it works really well when you harmonize the voltage each core runs at. Will post results shortly.

Keep in mind that “1000W” is bios speak for motherboard limit - in other words an artificially high number that is greater than the actual limit. Motherboard makers do this so you can’t actually ascertain the real value cause they want to keep this info close the their vest.

It’s interesting what your doing to find the best per core offsets by harmonizing the voltages :+1:. I think I’ll try it on my 9950x3d and compare to what I’ve found using the Corecycler utility.

Here is the info I followed: Search “Gupsterg” on Overclock.net and Youtube.

It’s easier than it looks once you understand what he’s doing:

  • finding the “preferred” core with the lowest voltage
  • Using per-core voltage offsets to lower each core to match the preferred core
  • Then start lowering the whole group in a further negative offset
  • Then once there is voltage headroom, add in boost clock and test.

You have to set Windows to Balanced so cores can go to idle power (while testing)
You download 2 apps, and HWInfo64
Ryzen StatusCore allows you to “load” one core at a time:

And the SMU Debug Tool allows you to set a PBO per core offset for testing on the fly…

… of course once you find Core Offset values you like, you’d want to write them down on paper, clear CMOS and set BIOS up fresh with your values, and then do a range of testing, which I’m doing now.

You use HWInfo to find your preferred core, which usually has the lowest voltage and highest frequency, and start changing Curve Offsets for the other cores to match the primary core’s voltage. Once you do that, then you globally offset the group lower, and check again, then add boost clock, check again…

He hides most of the HWInfo sensors to limit the impact, and sets HWInfo to Snapshot CPU Polling, with a 250 ms polling interval.

Be sure to “unload” cores in Status Core before changing CO values. Also let each core ramp up, then reset the clock in HWInfo so you are capturing averages during load. I let each test run about 30 seconds.

Here is how testing looks (on my tiny temporary screen):

My Results so far:

1 Like

So here are my results so far, tuning my 9800X3D for the best performance - within the priority of keeping it cool, and within the power, current, and temperature limits of the Precision Boost Overdrive 2 algo.

The basic idea is to undervolt using a Negative Curve Offset to voltage, which lowers the voltage, current and heat, and provides some headroom for higher frequencies.

The problem is that there are 8 cores in the 9800X3D, all slightly different and under load they fall in to a range of voltages. The most efficient, fastest core (the “preferred” core) is usually already at the lowest voltage of the group - with less room to undervolt.

For example, I could only use an All Core negative offset of -20 or -25, if I went to -30 it would crash.

Thanks to "Gupsterg"s article, I was able to find the per core voltages under load, and then apply a per core negative offset to get them all to around the same voltage level, and then gradually increase the offset of the whole group.

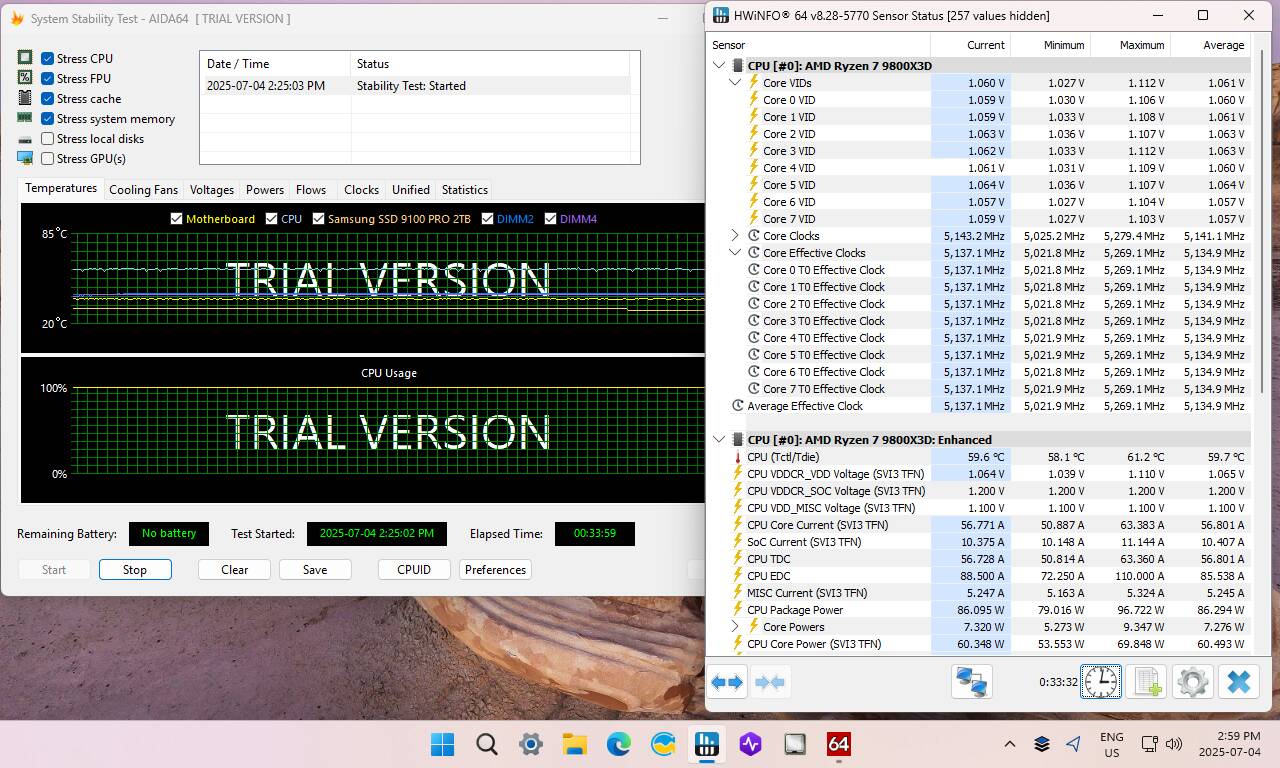
Before any tuning (just EXPO and PBO Auto), under load the CPU would reach it’s maximum boost of 5.2 GHz at about 1.2V, and even with my water cooling, benchmark testing would push the temperature in to the 80s.

After tuning, I had voltage headroom to add the 200 MHz boost clock, so 5.4 GHz, and have core voltage slightly under, or at the same 1.2V, and benchmark testing remains in the 70s.

I’m not advocating this, just observing that there is a way to reduce heat, voltage, and slightly improve performance with per core offset instead of all core.

If I wanted to be conservative, I could stop at Step 1, or 2. If I lowered the boost clock from 200 to 100, the voltage under load would only be about 1.15V, still a significant thermal savings, at 5.3 GHz. And if it’s unstable (because I’ve offset too far) I can reduce each per core offset by the same amount until stable. I have yet to do long duration tests.

Also, AMD provides a “Curve Shaper” which allows adjusting the offsets at 15 points (a matrix of temperature and workload ranges). However this is applied to All Cores - and the wider the difference between cores, the more it limits the range of of the Shaper.

I suspect that harmonizing the voltages using Per Core offset would also benefit those using Core Shaper - since the Shaper value is applied to any Curve Offset value (per SkatterBencher’s research and testing).

Here’s a snapshot running Cinebench 2024, at

  • 5.4 GHz (5.2 + 200 MHz boost clock)
  • CPU Core at 1.2V, 109 W (under the 120 W limit)
  • CPU Package at 134 W (under 162 W limit)
  • Temp at 73C
    If I took away the 200 boost, to run at the regular 5.2 GHz, Cinebench would draw 1.15 V 85 W and about 65C. So I’m pretty happy with having this range of “safe” choices with the boost clock and low temps.

Unfortunately, the Balanced power plan does not park my cores on my 9950x3d unless I start a game and then it only parks the cores for the 1 CCD that has the non-vcached cores. I then got distracted by the curve shaper (which I have never tried :face_with_tongue:) and have been getting some good results after watching SkatterBencher’s you tube videos.

After further investigating, I finally found that using the Power Saver power plan parks all of my cores except for the ones that need to run an app/process/service so I’ll be back on the harmonizing approach :slightly_smiling_face:.

Your results look very promising!

Yeah I’m glad 9800X3D only has one CCD, it’s complex as it is.

I’m really glad SkatterBencher posts such thorough explanations. Eg, he points out that Curve Shaper “stacks on top” of Curve Offsets (All Core or Per Core) so the results combine:

So if you do a -10 Curve Offset, and then +5 Shaper in a given temp/workload region, the result is -10+5 = -5

Yeah and for that reason I turned my per core offsets off as it gets complicated as to how you hone in on the optimal undervolts :nerd_face:

No doubt I will get drawn in to the curve shaper out of curiosity - I worry that the curve offset - which lowers voltage across the whole range of frequencies for any core, from idle to full power - might have regions where the voltage is actually too low for some tasks. I keep asking how there is so much under volting room, and thinking AMD baked in their VF tables for a reason. But those are just my doubts from inexperience Time will tell.

Now I’m reading about how to detect clock stretching (which is what happens when V is too low for a core) just in case I need to back off a bit on the under volting.

Ultimately I don’t need the lowest voltage, or fastest speed - I just want the best sweet spot to run cool that isn’t too hard to manage over time.

Thanks for sharing your test results - much appreciated.

That said, it’s worth noting that Ryzen 7 9800X3D isn’t really a CPU that needs tuning, unlike, say, Intel 13th or 14th gen chips like the 13900K or 14900K.
Also, great job with the neat tables - really well organized. But one crucial element seems to be missing: the impact of your settings on CPU temperature. That would be super valuable context alongside the performance figures.

Thanks for the feedback.

I have almost zero experience, but agree that the CPU seems very capable without any tuning. However, there does seem to be quite a bit of room to under volt - which has the benefit of running much cooler, providing the head room to use the boost clock (which would run much hotter without a bit of under volting). Before tuning, I noted the CPU core voltages were about 1.2V while running Cinebench, so I used that as a guide when tuning, to see if I could undervolt, then boost, and stay at or under that 1.2V.

A few longer (30 min) tests yesterday, running with +200 MHz Boost at 5.4GHz, CPU Core at about 1.2V, had these temps:

Cinebench 30 minutes = 71.9 C Max / 70.2 C Avg
AIDA64 30 minutes = 61.2 C Max / 59.7 C Avg
OCCT CPU + Memory = 63.2 C Max / 60.2 C Avg
Prime95 Small FFT = Maxes out about 73 C
Prime95 Torture Test = running now, is at the 120W CPU Core TDP power limit, and Max Temp is hitting about 78.4 C so far.

I’m pretty happy with this so far, mostly because I’m learning how it works and how to control it. Although this is just CPU - the GPU is due to arrive this week, and I’m still waiting on a water block for it.

The room temp is also pretty cool, about 26C I think, and I have the following settings in MSI BIOS:

  • EXPO
  • FCLK = 2000
  • UCLK = MEMCLK
  • High Efficiency Mode, Memory Timing Preset “Tightest”
  • PBO Advanced
  • PBO Power Limits Auto
  • Boost Clock +200 MHz
  • Curve Optimizer, Negative Per Core between -19 (for best core) and -30.

The result is that when running at full 5.4 GHz speed running Cinebench, the CPU Voltage is hovering at about 1.2V

I was trying to understand how Y-Cruncher worked yesterday, and wow is that a crazy app. I click on one of the CPU tests and the temp shot immediately to 85C (I’ve got my RGB colour coded to CPU Temperature, and it went red which freaked me out). I watched it for a minute but then decided to end it, I doubt I need that kind of extreme stress testing.

1 Like

Thanks a lot for the follow-up and the temperature data - those are nicely low temps, great to see.

Would you be able to run Cinebench with the Minimum Test Duration setting set to Off and do one run each for Single Core and Multi Core? If possible, please also include a screenshot showing the score and temperatures from each run - that would be greatly appreciated

How long should they run?

The score after 30 min each (2 days ago) was:
Multi 1432
SIngle 139
Ratio 10.28x

I don’t remember exactly but it should take anywhere from about 5 minutes to several minutes, depending on the CPU and whether you’re running the single or multi core test.

But doesn’t it run until you manually stop it?
The data will be the same as above, I believe.