No, it won’t - the test will end automatically once the single run is complete. You don’t need to stop it manually.
Just to clarify - I meant a new test with Minimum Test Duration set to Off, so it only does a single run. Ideally, could you include the temperature monitoring window visible (like HWiNFO) in the screenshot during the run? That way we can see both the scores and temps together.
FYI, my method has been to start Cinebench running and then wait 10-20 seconds for it to really start, and then click the clock to reset HWInfo so it starts reading after Cinebench is fully running (to remove the lows that appear before it ramps up).
OK, here are my results. Note, when setting up the PC, I made 2 settings changes to HWInfo, as recommended by the author:
I changed it to use “Snapshot CPU Polling” in the Main Settings. This is specifically for AMD Ryzen CPUs capable of the snapshot, so that polling all the sensors is done with a single snapshot at the polling interval instead of a constant polling which creates an “observer effect” that slightly changes results. Snapshot is more accurate, apparently.
I “hid” a lot of sensors to just focus on the power and temps. Not sure if this also reduces the overhead of HWInfo, but I have a tiny screen connected and wanted to reduce the list to see just what is in the screen shots.
Cinebench Minimum Test Duration Off (single pass)
Multi = 1427
Single = 139
Ratio = 10.26
Ambient room temp is about 28C
HWInfo “reset” 15 seconds after starting each test (to remove fluctuations when starting each test). Screenshot taken the moment each test ends, so HWInfo clock + 15 seconds (approx) is the time of each run.
GimbalAxis: Having built a number of custom water cooled rigs including one using an external rad (MO RA 420 _ look that up) I can tell you that custom water cooling is like a disease that never ends. Short of the price of a RTX 5090, which I have, the cost of custom cooling parts, pumps, rads, cpu block, gpu block can really jack up the cost of a build.
Some observations from my experience.
Get the biggest case you can live with. When you custom water cool the rads, pumps etc really need room.
Buy good tubing. I never went hard tube but I always bought good soft tube.
TAKE YOUR time! When I first started I rushed too much and didn’t lay out the build like I should have. Lesson learned.
Take extra time applying the gpu block. You generally have to carefully remove the stock cooler and then install the custom block. This took time. Follow the directions to the tee.
Buy good fittings There is nothing worse than trying to save a few bucks on cheaper fittings and then the leaks start.
Now even though I have done a number of custom cooled rigs my latest was not.
I knew I wanted a new rig for my 74th birthday and I wanted a 9950x3D rig for MSFS
CPU 9950x3D
Cooler Lianli AIO 360mm
GPU Zotac Solid RTX 5090
MB MSI X870E Tomahawk
Ram GSkill DDR5-6000 64 GIGS (2x32)
SSD Samsung 990 Pro 4tb Nvme
Case Montech 902 High Airflow
PSU MSI 1200W
OS Win 11 Home
The cpu and gpu are so darn fast to begin with, I saw no need to overclock and I run all at stock.
This is a blazing fast system - buttery smooth.
I’m sure some custom water cooled rigs run a bit faster but I saw no need.
Samsung 9100 Pro 2TB PCIe 5 (… I know I should have gone with 990 Pro 4TB PCIe 4, but I was going all the way with PCIe 5…)
Asus RTX 5090 TUF (en route…)
Lian-Li O11 Dynamic EVO XL
Asrock PG-1600G GPU (ATX 3.1, PCIe 5.1)
Cooling:
Alphacool Apex 1 AM5 CPU water block
Alphacool Core 5090 water block
Alphacool Tec Protect 2 clear coolant
Alphacool XT45 420 x 45mm radiators (top and bottom)
Alphacool HPE 420 x 30mm radiator (thinner to fit side)
Alphacool fittings (mostly)
Aquacomputer Ultitube 150 Pro D5 Next pump reservoir combo
Aquacomputer Quadro (to run 3 sets of fans on 3 radiators)
Corsair XM2 water block (crazy, I know, but I wanted to try PCIe 5 and was worried about heat, since I was water cooling, I went all the way. But the bottom plate is NOT well designed, I had to modify it a bit.)
Heatkiller EPDM 16/10mm black flexible tube (after reading a lot about issues with clear tubing, this stuff seems most utilitarian).
Koolance QD3 quick disconnects (2 sets)
Arctic 14 Max fans
So far, testing has been great. GPU arrives shortly, so proof will be in the pudding. Here’s a photo of the leak testing (pre-gpu)…
Thanks a lot for taking the time to run the tests and share the results - much appreciated.
Quick question: did you disable SMT (Simultaneous Multithreading) in BIOS, or perhaps just disable the display Core 0T1, Core 2T1, etc. in HWiNFO? I’m asking because those entries are missing in HWiNFO and I’m trying to figure out whether SMT is actually off or Core 0T1, Core 2T1, etc not being shown.
I also noticed that your PC case appears to be open - just to confirm, did you run the tests with the case open like that?
HWInfo is only showing the first thread (T0) for each core because I have Snapshot CPU Polling on in the HWInfo Settings, which does not capture the hyper-threaded “units” aka T1. I only turned on Snapshot Polling to follow Gupsterg’s method to find the voltage of each core under load - and also was alarmed when T1 disappeared. But was able to find out this is expected behaviour searching the HWInfo forum:
Photo of PC was taken when I was doing first leak test, fully open and no cables connected to Motherboard, so I could react in case of leaks! The glass on O11 is tinted, so a photo would pretty much hide everything except RGB showing through.
For all of my testing, case is properly closed - since the purpose of testing was to see how cooling and airflow will perform in normal use. Note, I have not put a fan on the back, partly because I forgot to order a 120mm, but also because I wanted to see if the positive pressure was enough - bottom and side radiator blow in to the case, and the top radiator exhausts out. My concern is that there be enough airflow over the RAM, as it’s the only part that won’t be water cooled. I won’t really know the airflow until GPU is installed.
I’m curious: how did you set the Curve Optimizer per core on your 9800X3D? I’m asking because I have the exact same motherboard and BIOS version and also the same CPU - the only difference is memory;
I’m running G.Skill 2x32GB 6000 CL26.
If you don’t mind, could you maybe share some screenshots of your BIOS settings related to curve optimizer and tuning? I’d love to compare them and try similar settings on my setup - I really enjoy testing and every degree of temperature saved at the same performance level is a nice win.
Sure, although I posted all this a little further up the thread already…
The setting itself is in BIOS > Overclocking > Advanced CPU Configuration > AMD Overclocking > Precision Boost Overdrive (set to Advanced) > Curve Optimizer > Per Core.
To find the offset values you would use, the concept is this:
each core is different
your best core already uses the lowest voltage
lower the voltages on the other cores down to match your best core first (harmonized) using per core offset
Then gradually increase the values across all cores so their voltages lower as a group by the same amount.
I followed this article and video by “Gupsterg”. The video has no sound, but if you watch it carefully first, you’ll get it - you’ll wonder what he’s doing, but you’ll see. The article is a bit dense, but has all the info if you take the time to open all of the “spoiler” buttons…
Here are the steps:
In Windows set power setting to Balanced, so the CPU cores can idle.
HWInfo > Settings > Use Snapshot CPU Polling, and set Polling to 500ms interval
Open HWInfo, StatusCore, SMUDebug Tool, and Notepad… In Notepad prepare to write down values. It’s VERY helpful to write the Core and Thread number to click in StatusCore.
Click on Thread 1 in Status Core to load Core 0 - Each core has 2 threads b you only use the FIRST thread for each core… meaning stay with odd number threads (note, you can check which core is loaded in HWInfo by looking at the VID values - only 1 of them would be above the others)
Core0 = Thread 1
Core1 = Thread 3
Core2 = Thread 5
AFTER Core0 is loaded, click the clock in HWInfo to reset it’s values, and let it run for at least 30 seconds or a minute, and record (or screenshot) the Average Effective Clock and Average CPU_VDDCR_VDD Voltage (SVI3 TFN). Then uncheck the Core in StatusCore to unload.
Repeat the above for each core, until you have a list.
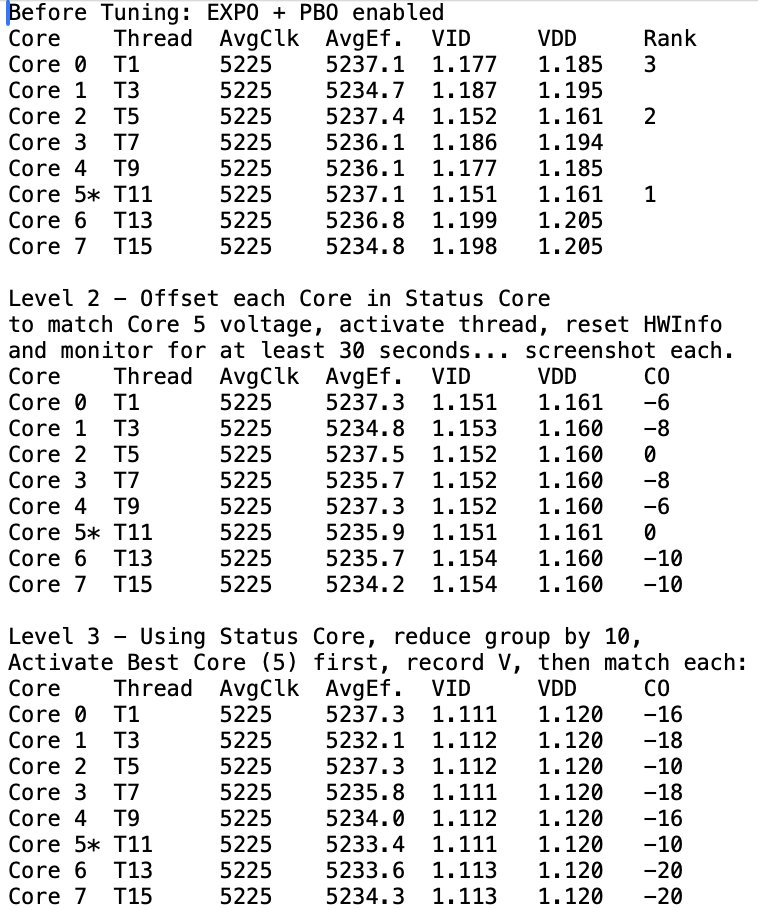
Now the fun part, find voltage of the best core (in my case Core 5, indicated by “perf #1” in HWinfo, and you start applying a negative offset to the other cores, and testing, to get their voltage down to match the voltage of your best core. You just type a negative number in SMU Debug, and click Apply. (**MAKE SURE the cores are unchecked and not loaded in Core Status when you apply a change.) Then load that core, reset HWInfo, and see where it lands, and adjust… See Level 2 in my list above.
Once you’ve got them all about the same, then you simply increase the offset for each core by the same amount (say -10), and then go through and record Voltages for each core under load again… I dared to go to about -30 on lowest one.
Finally, when you think you have good values for offset, go in to BIOS, and apply the values per core, and test. Here were my results:
Thanks so much for taking the time to explain everything in detail - really appreciate it.
I’ll definitely take a closer look and play around with the settings when I get a moment, just out of curiosity. It’s always interesting to see how much can be fine-tuned even on a CPU like the 9800X3D.
The challenge would be, the first time you turn on a PC after installing the CPU, it boots in to BIOS (at least on my MSI board) and offers you a simple choice: PBO “Auto” or PBO “On”… so the definition of where “overclocking” starts is not clear, and, unless the CPU itself records BIOS settings (I’m pretty sure it doesn’t) there would be no way to prove a customer was overclocking unless they inspected your motherboard.
Regardless, my goal isn’t to push my cpu as far as possible - it is to understand how to get it to run as well as possible, efficiently and cool, while staying within the auto safety limits for stability and longevity.
I agree the company has (perhaps intentionally) created an obvious contradiction between how the marketing promotes PBO and indeed initial BIOS setup puts you in to PBO Auto or PBO On - and the explicit statement on their legal page saying damage due to overclocking will not be covered.
I think of it like the Paper Bag (for those who remember The Wire) - as long as you aren’t going too far, you can have your beverage in a paper bag, which is the grey area compromise that gives customers some room, and keeps the lawyers happy they have a way to limit liability.
I really just wanted anyone else reading to not assume warranty automatically covers you if overclocking and something gets damaged. For myself, I’m staying cautious and really just want it to work well and last - hence my motivation for water cooling.
I think it’s fortunate that (relative to flipping a switch on an Xbox) building and tuning a gaming computer for maximum performance is pretty daunting for those without a lot of computer experience.
On one end of the bell curve there are a few gamers who only know what EXPO and XMP do, and that’s all they enable when they get into the BIOS for the first time. They rely on the motherboard manufacturer to default everything else for a balance of performance and reliability, mostly due to a healthy fear of the unknown.
On the other end of the curve you have folks who want to learn everything they can about anything and everything they can manually tweak in the pursuit of a few extra FPS. That can be a slippery and dangerous slope, but it can also be rewarding - mostly for the knowledge they gain. Read the memory timing tweaker posts on overclock.net for some entertainment.
Then there’s the middle of the curve, where caution still rules, even as they explore things like PBO.
Also fortunate is that people like me, who love to play around with the guts of a system, generally are prevented from doing really stupid things, and if I do something really stupid, almost always have a way back. More than once I’ve had to press the ‘Reset CMOS’ button on the motherboard because I did something I shouldn’t have. It’s actually pretty hard to destroy the working parts of a computer, as there are a lot of safeguards built in - one of which is the complexity of the BIOS.
It’s the maniacs for whom overclocking is a game of its own that are fun to watch. Delidded CPU’s catching fire can be a spectator sport.