![]()
Welcome fellow Flight Simmer´s!
Table of Contents|
-|-|-|-
VFR Explanation |Cell 1:1|
Preparing and Downloading the needed Software|Cell 2:1|
Getting Chart Material|Cell 3:1|
Planning the Flight|Cell4:1|
Final Steps|Cell5:1|
Downloads|6:1|
Final Words|Cell7:1|
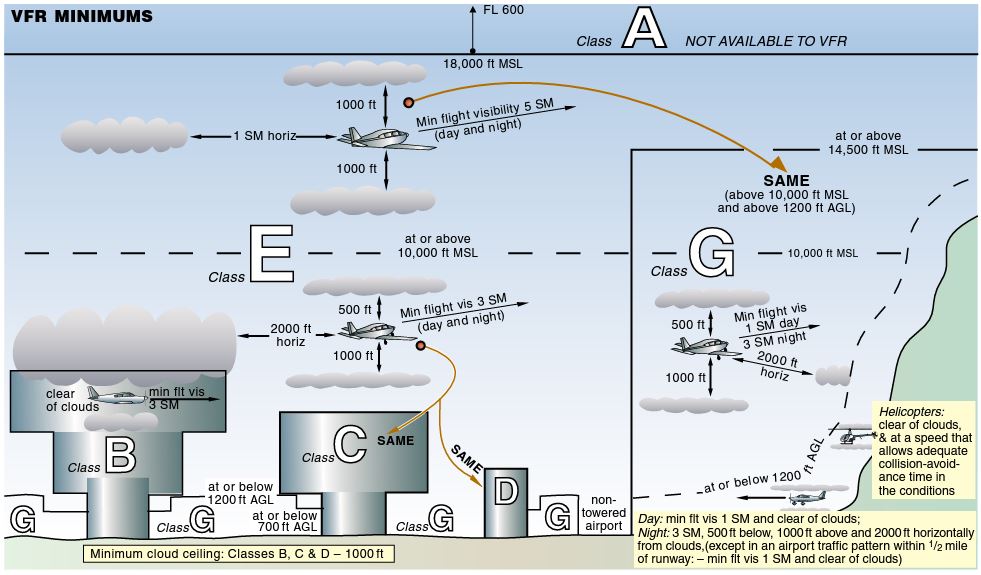
Let´s have a deeper look! What is VFR?
Visual Flight Rules (VFR) are a set of regulations under which a pilot operates an aircraft in weather conditions generally clear enough to allow the pilot to see where the aircraft is going. Using the VFR flight rules, the pilot must be able to operate the aircraft with visual reference to the ground, and by visually avoiding obstructions and other aircraft.
MediaWiki IVAO
Training Documentation Database | IVAO Documentation Library
The definition of VFR sounds quite simple, but do we really just fly with our vision? What are the regulations we need to consider, before starting a VFR flight?
I guess we all know the difference between an IFR and a VFR flight. IFR flying is based on instruments, a flight plan and frequent ATC communication. As stated above, VFR flying is based on our vision and we can decide, where we want to travel even after takeoff. But are we really allowed to go wherever we want and to fly as high as want? No, we are not. One of the most important things while flying VFR, is avoiding interfering IFR traffic.
To demonstrate the VFR regulations, I prepared a short flight near one of the busiest airports in the world, Frankfurt am Main (EDDF). We will depart at Frankfurt Egelsbach (EDFE) going to Koblenz Winningen (EDRK). Please have a look at the following picture. It´s the VFR map of this region. The red marked areas are indicating a controlled airspace, we need to avoid without an approval / permission to enter.
VFR Map | Frankfurt am Main

As you can see, we will have to be careful while departing in this region. But now, let´s talk about the source of information and the tools, we are going to use.
Preparing and Downloading the needed Software:
There are plenty of Electronic Flight Bags, Moving Maps and Tools out there, which can help us flying VFR and IFR. Real World VFR pilots often use tablet software like SkyDemon for flying. These programs are based on GPS technology and they provide all information in a good visual way.
SkyDemon

There are even tools out there, that will let you connect this software with your Simulator. The problem is, this kind of moving maps are expensive and you will have to pay a bunch of money “just” for flying on your computer. Cause of this, we are going to use free software, called LittleNavMap. It is more work preparing a flight, but worth saving your money for one of the 3rd party developer addons out there!
For the installation and setting up LittleNavMap, refer to this How To.
Getting Chart Material:
Getting VFR Maps and Charts can be difficult for some regions and airports. Most of the time, you have to pay for this material but there are also some free providers out there. One great free website, I found during my research is openflightmaps.
openflightmaps provides a free VFR map for whole Germany and also for some other European countries. This type of VFR map shows different airspaces, no-fly areas and radio mandatory zones. This map will be our primary information source after taking off and before landing.
Now, we also need a departure chart. For VFR flying, some airports provide departure and arrival charts on their website. Our departure airport (EDFE) is also providing that information on their Website.
Our arrival information (EDRK) also is provided on the airports Website.
Before starting to plan the flight, check out all provided maps on the different websites, to get a better workflow.
Planning the flight:
Our first task should be checking the weather for VFR conditions. @bertrandch made a good How To about VFR weather. Check it out here.
After making sure, that the weather is fine, we will continue with our route planning. I want to give you guys a more practical way to learn VFR using a flight. But it is still important to get used to the regulations first. Please read @bertrandch information guide about Airspaces etc..
Now let’s have a quick view on our route to analyze, which regions we have to avoid.
Please check the following map.
Direct To

As you can see, we would fly through the controlled airspace using a direct to flight plan. So we need to change our route, to avoid this area.
Let us create a simple flight plan in LittleNavMap now. Departure: EDFE, Destination: EDRK
Attention!
The in-game screenshots I made for the visual fix points are just for showing you, where to fly. I didn’t fly proper VFR while taking them, so please don’t try to fly the same way. For example on one of the departure screenshots, I flew on the right side of the highway. That would result in entering the controlled airspace of EDDF. Always refer to the map and chart material, to get a understanding where you are allowed to fly! Also I did the same on the photo taken of my tablet with LittleNavMap on screen!
![]()
Now we will plan our departure. EDFE is providing a departure plate you can download above. My plan is using runway 08 for taking off. After lift off, we will head for the highway A661. Reaching this highway, we will begin our turn to the south. Head for the powerlines, that are marked in the departure chart. After reaching the powerlines we go downwind of the runway and fly to the highway A5. There, we will turn on Delta and leave the traffic pattern. The pattern altitude is 1300 feet MSL. EDFE, is also a radio mandatory zone. Contact EDFE with your radio’s (optional in the Simulator).
Always keep in mind, that we are flying visual! We while have LittleNavMap as help while flying, but our orientation should be the visual points, that are marked in the departure chart! This is important, cause the planning in LittleNavMap isn’t accurate to the real-life pattern!
Please check the departure plate for this information.
Departure Plate EDFE

To get a visualization of this procedure, we need to setup LittleNavMap.
- Search EDFE and Right Click the airport.
- Left Click “Add Traffic Pattern”
- Enter the information shown on the EDFE departure plate. Try to get the LittleNavMap pattern as precisely as the real pattern.
LittleNavMap Departure


I added the traffic pattern and followed the Delta route. On the departure chart you can see, that Delta is following the highway A5 first and then, it’s following the highway A67. This should be your visual fix while flying. An alternate would be VOR RID.
Here you can see the visual points inside the Simulator:
Ingame Visual Fix Points

→ Highway A661, reaching = Right Turn to Power Lines

→ Power Lines, reaching = Right Turn following the Power Lines to Highway A5

→ Highway A5, reaching = Left Turn for departure Delta

→ Highway A5, follow for departure route
![]()
After we completed our departure, we will plan our cruise to EDRK.
Going direct to EDRK after departure would cross the airspace of EDDF again, so we need another visual point to head on for avoiding entering this airspace. The airport of Mainz Finthen (EDFZ) should be a good visual point for orientation.
Cruise


While flying to EDRK, we need to care about our altitude. We want to avoid flying too high and getting into a not allowed airspace. For that, we have a look at the openflightmaps VFR map.
VFR Map

Most of the time we are flying under the airspace Charlie. The lower value in the boxes, is our maximum allowed altitude. From there airspace Charlie starts. The airspace is ending at FL100, indicated in the upper value. You can climb as high as you need to follow other VFR regulations, but shouldn´t exceed the maximum allowed altitude.
To get the altitude information while flying, add an Userpoint to your flight plan while using another map format in LittleNavMap (Check the location / village on the openflightmap, where the airspace is changing and search this village in LittleNavMap). For example at the village of Klein Winterheim the airspace altitude is changing. Add a Userpoint there by right clicking and chose user point in the dropdown menu. Insert your needed information for this userpoint.
Max. Alt. procedure


By mouse hovering over the user point, you will get your inserted information shown. You could also write down, where the airspace is changing.
For example:
UP (user point) XYZ (Klein Winternheim) : Airspace C - 3500 MSL
For the flight path, we will check LittleNavMap. The easiest way for getting to EDRK, is following the river Rhein. We will be able to spot this river, after passing Mainz Finthen.
Routing via Rhein

Visual Fix Points - Rhein and Mainz Finthen

→ Rhein

→ Mainz Finthen
![]()
Our final step is landing in EDRK. The website of EDRK is providing 2 approach procedures.
Approaching EDRK

We are going to use runway 06 for our landing. Due to our departure airport EDFE, we will arrive at EDRK from South East. So we will use the southern traffic pattern. To enter the downwind of runway 06 we need to spot the TV tower marked in the approach chart. We will pass the left side of the tower and turning left for heading in direction of the highway A61. Over the highway will enter the base of the traffic pattern RWY 06. Near the bridge, that is crossing the river we will do another right turn and enter the final for runway 06. The traffic pattern altitude is 1600 MSL.
While flying this approach, we need to care about some things that are shown in the second approach chart.
Second Approach Chart

Care about the traffic that is flying in the northern traffic pattern and never fly into this pattern when aborting the approach, because you could collide with another aircraft.
Now let’s plan this procedure in LittleNavMap. Add another traffic pattern for EDRK as precisely as possible. Also, add a WP near the TV Tower.
LittleNavMap Approach

Here are the visual fixes for the approach.
Approach Visual Fix Points

→ TV Tower for entering the approach traffic pattern

→ Passing the TV tower on the left side before entering the approach traffic pattern

→ Ahead on the left you can see the highway A61, where we are heading while flying downwind

→ Passing the A61, we will turn right on our base pattern

→ This is the A 61 highway bridge. While flying the base pattern, we will head for this visual fix and turn right for final, shortly before passing it

→ EDRK final after the base pattern right turn
Final Steps:
Now, we will fly. Start your Flight Simulator and make sure, that LittleNavMap connects to the Sim. To get the flight plan on a tablet or a smartphone, start the LittleNavMap Webserver and follow the LNM documentation. You could also use this tool, to get LNP inside your Simulator.
LNM on the tablet

If you followed the instructions already, you don’t need to download the flight plan provided in this topic. If you haven’t created the flight plan yet, you can download it below.
While flying try to spot the visual fixes that we chose during our planning. LittleNavMap should only be kind of our secondary information source. Get your noted airspace information / altitude waypoint information to maintain the right altitudes.
Downloads:
Final Words:
I hope, you had fun reading this guide and flying the prepared trip. If you want to ask or mention something, feel free to DM me.
Special thanks for helping me out, providing tools and supporting this guide! @bertrandch @ByMaximus
Last Update: 2020-10-13T23:00:00Z