Here’s something I thought I’d contribute in that it might help other newbies like myself in learning how to fly in MSFS and perhaps very experienced simmers might further comment and criticize the suggestion as to how it could be further improved or note serious things that I’ve overlooked or got wrong.
I had a bit of an epiphany for a newbie in completing tutorial #8, flying solo on my own from Flagstaff to Sedona, Arizona. That’s the reverse flight of what one has to accomplish in tutorial #7, flying from Sedona to Flagstaff under the watchful eye of the AI instructor but with more guidance.
At least two things make the tutorial #8 flight interesting and challenging. First, there’s a two-thousand foot drop between Flagstaff and Sedona and since the flight is at least 1K above the ground, the overall descent is closer to 3,000 feet, most of it in the last few nautical miles. To add to the challenge, the flight is scheduled only a half an hour or so before sunset and as a 24 minute flight or so, there is no time for missed approaches, etc.
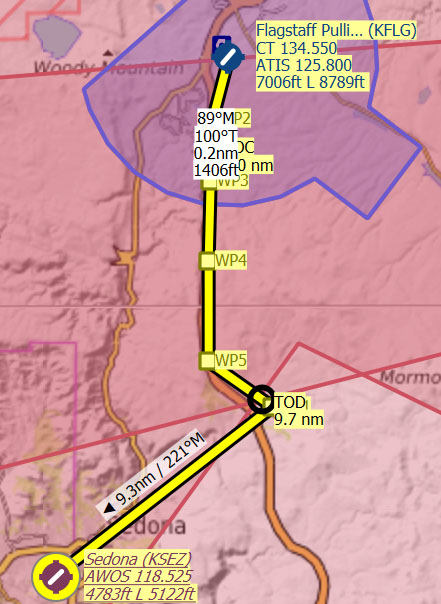
As I’ve previously written for tutorial #7, if one learns how to use Little Navmap, it’s stellar for concisely and clearly presenting flight details to the user in a graphic form that’s easy to grasp. I entered the departure and destination airports, put in Munds Park as a waypoint, and then based to tutorial #7, put in additional waypoints along IH-17 between Flagstaff and Munds Park to follow IH-17, as in tutorial #7, but done in reverse.
Little Navmap VFR Flight Plan, Flagstaff to Sedona via Munds Park
Little Navmap VFR Elevation Profile, Flagstaff to Sedona via Munds Park
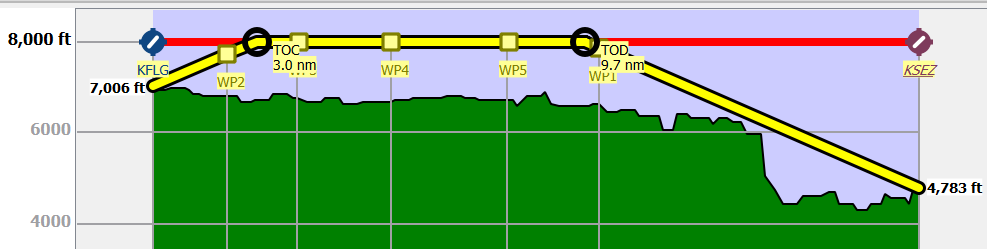
So one can see the Final Approach from the TOD (top of descent) is a doozey, the 3,000 ft drop and you don’t clear some mountainous terrain by much.
Here’s the interesting part. What’s a newbie to do to learn how to fly the descent final approach and what trim, airspeed, and rate of descent works best to make a successful first landing with no missed approaches and no go-rounds as the sun is setting?!
The answer is FILE A LOW-ALTITUDE AIRWAYS IFR Flight Plan in MSFS invoking all the NAVAID functionality to get virtual guidance in the sky. Use the TRAVEL TO applet to jump to the Final Approach in the Flight Plan and fly the final approach with the Navaid virtual markers in the sky as often as you need to train yourself on the rate of descent and airspeed that you need to maintain, the visual cues you need to look out for, to successfully touch down on the runway.
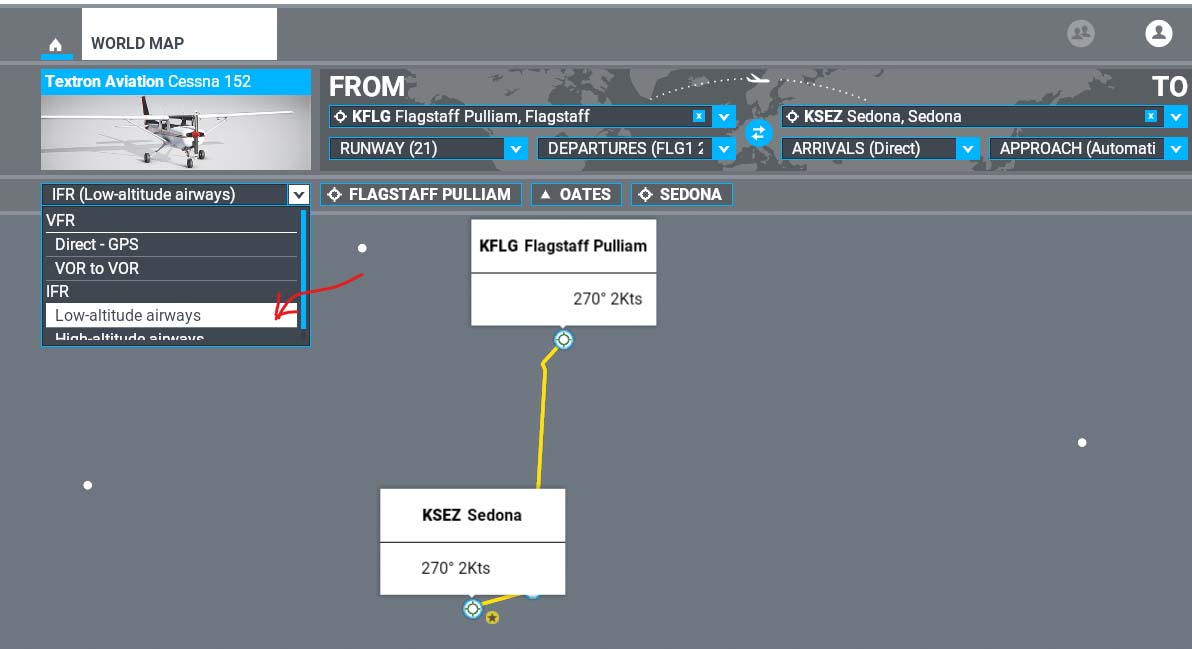
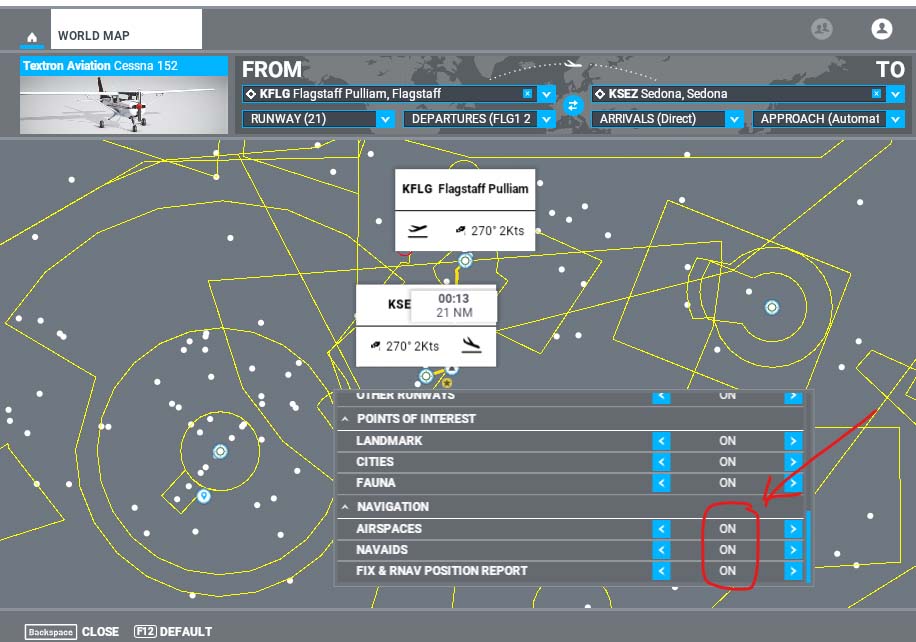
Creating Low-Altitude Airways IFR Flight Plan in MSFS World Map Just For Practice
Turning on NAVAIDS by opening Filters on World Map - Selecting on Menu
Turning on all NAVAIDS in Navigation Section of Filters Box
After the Flight Plan has been created on the World Map, you want to save it to be able to reuse it. Before you save it, make sure the Flight Plan has been adjusted to the date and time that you’re going to have to fly in tutorial #8 when you take it.
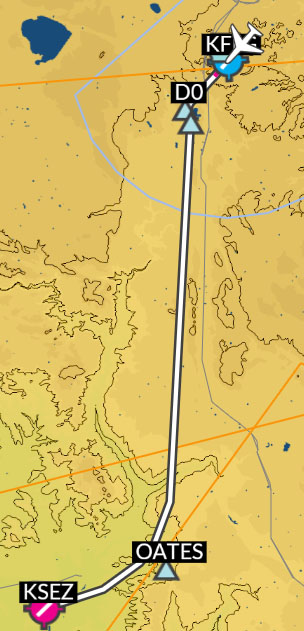
Now to practice, use the flight plan to fly. Click the FLY button in the World Map. Then READY TO FLY. If you open the VFR map, the IFR flight plan you created just to practice your approach might look something like this with Oates picked as a waypoint near Munds Park.
MSFS VFR Map Showing (IFR Low-Altitudes Airways) Flight Plan Created:
Now, from the toolbar at the top of the screen, open the Travel To applet and the NavLog applet. Your screen should look something like this (I believe I added the Oates waypoint and several others along the IH-17 highway when I was creating the IFR plan - I’ve forgotten).
MSFS IFR Flight Plan Showing Flight Segments in TRAVEL TO and Waypoints in NAVLOG
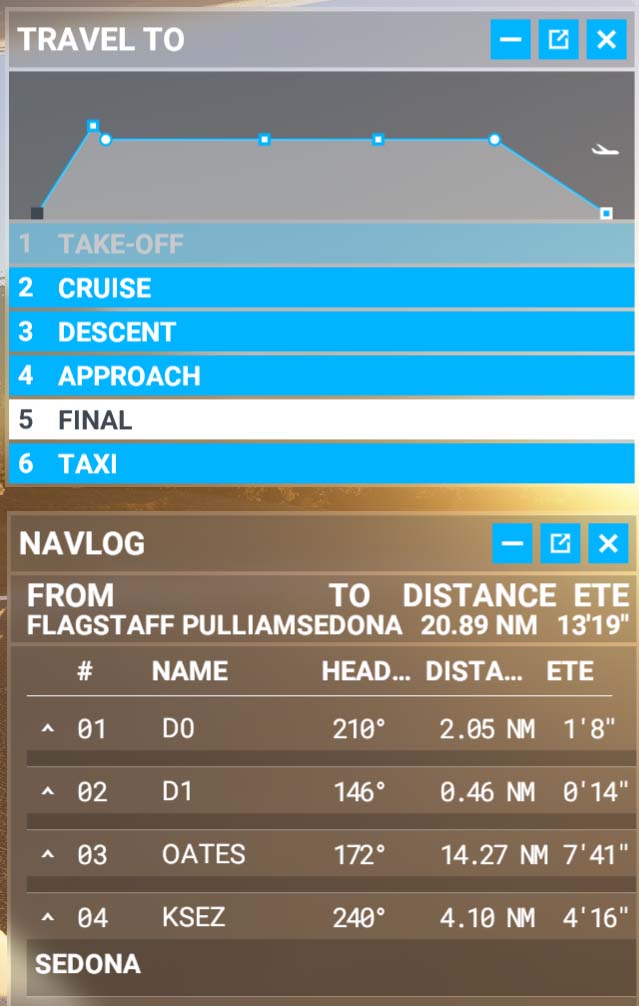
You can see that unlike Little Navmap, the Elevation Profile shown in TRAVEL TO doesn’t give you a very good idea of relative elevation changes. There’s no altitudes shown anywhere, at least in the default view.
I would like to be able to jump to DESCENT by double-clicking on that in the TRAVEL TO applet but that seems to be broken or I didn’t create the low-altitude airways IFR flight right.
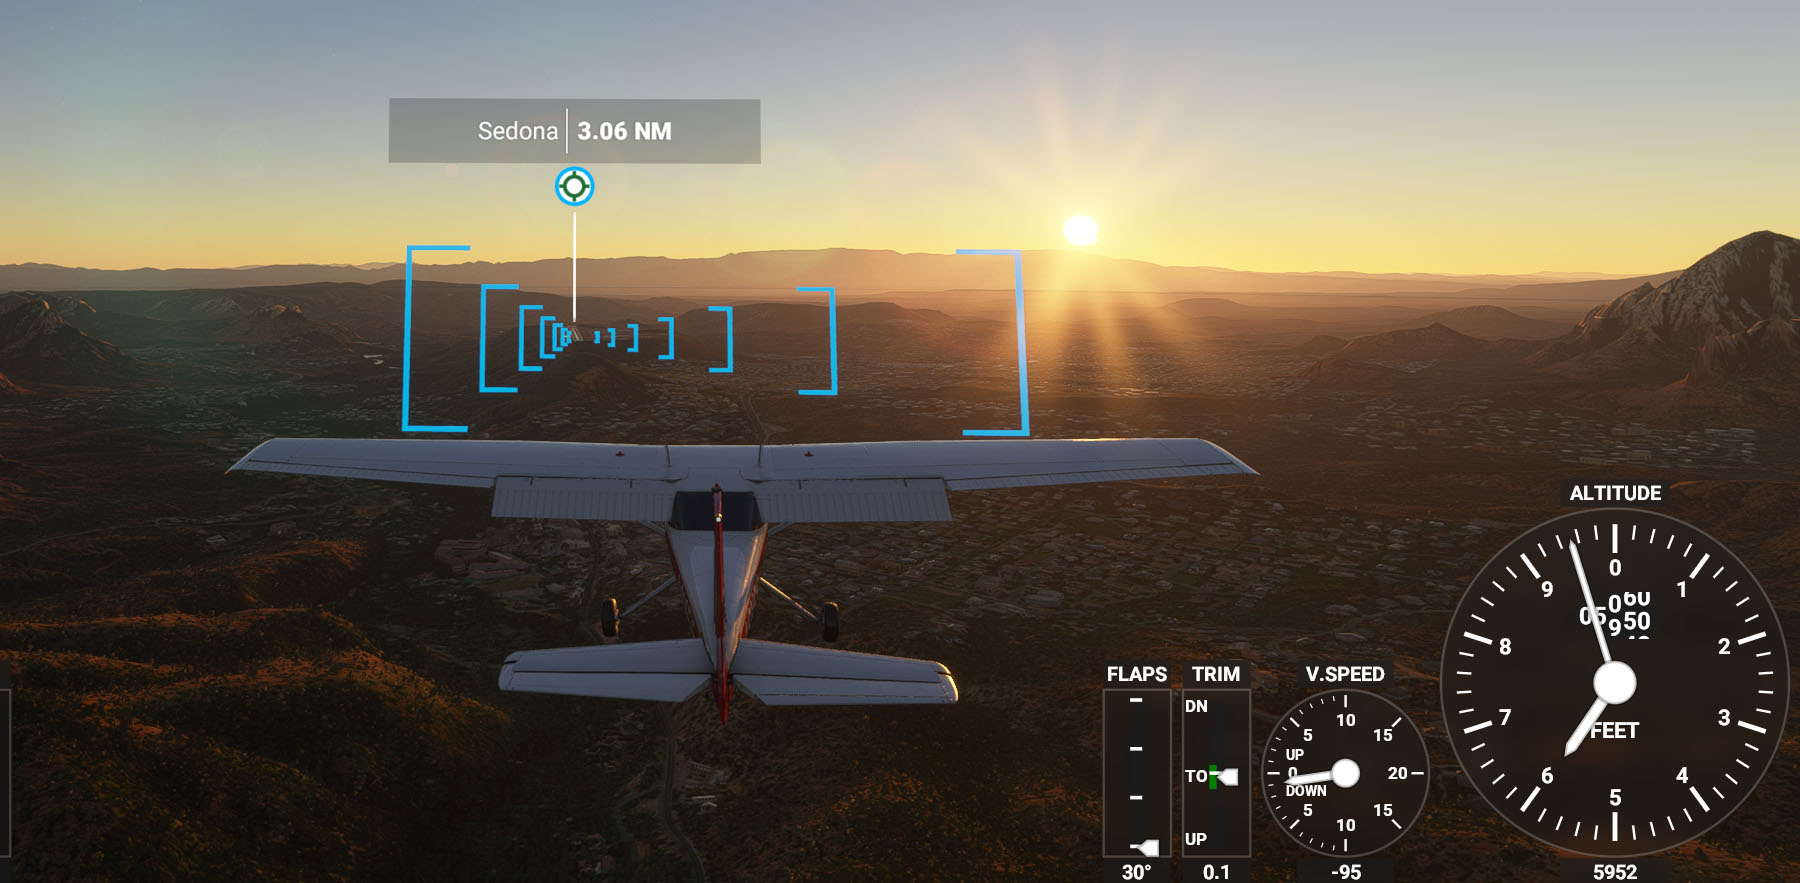
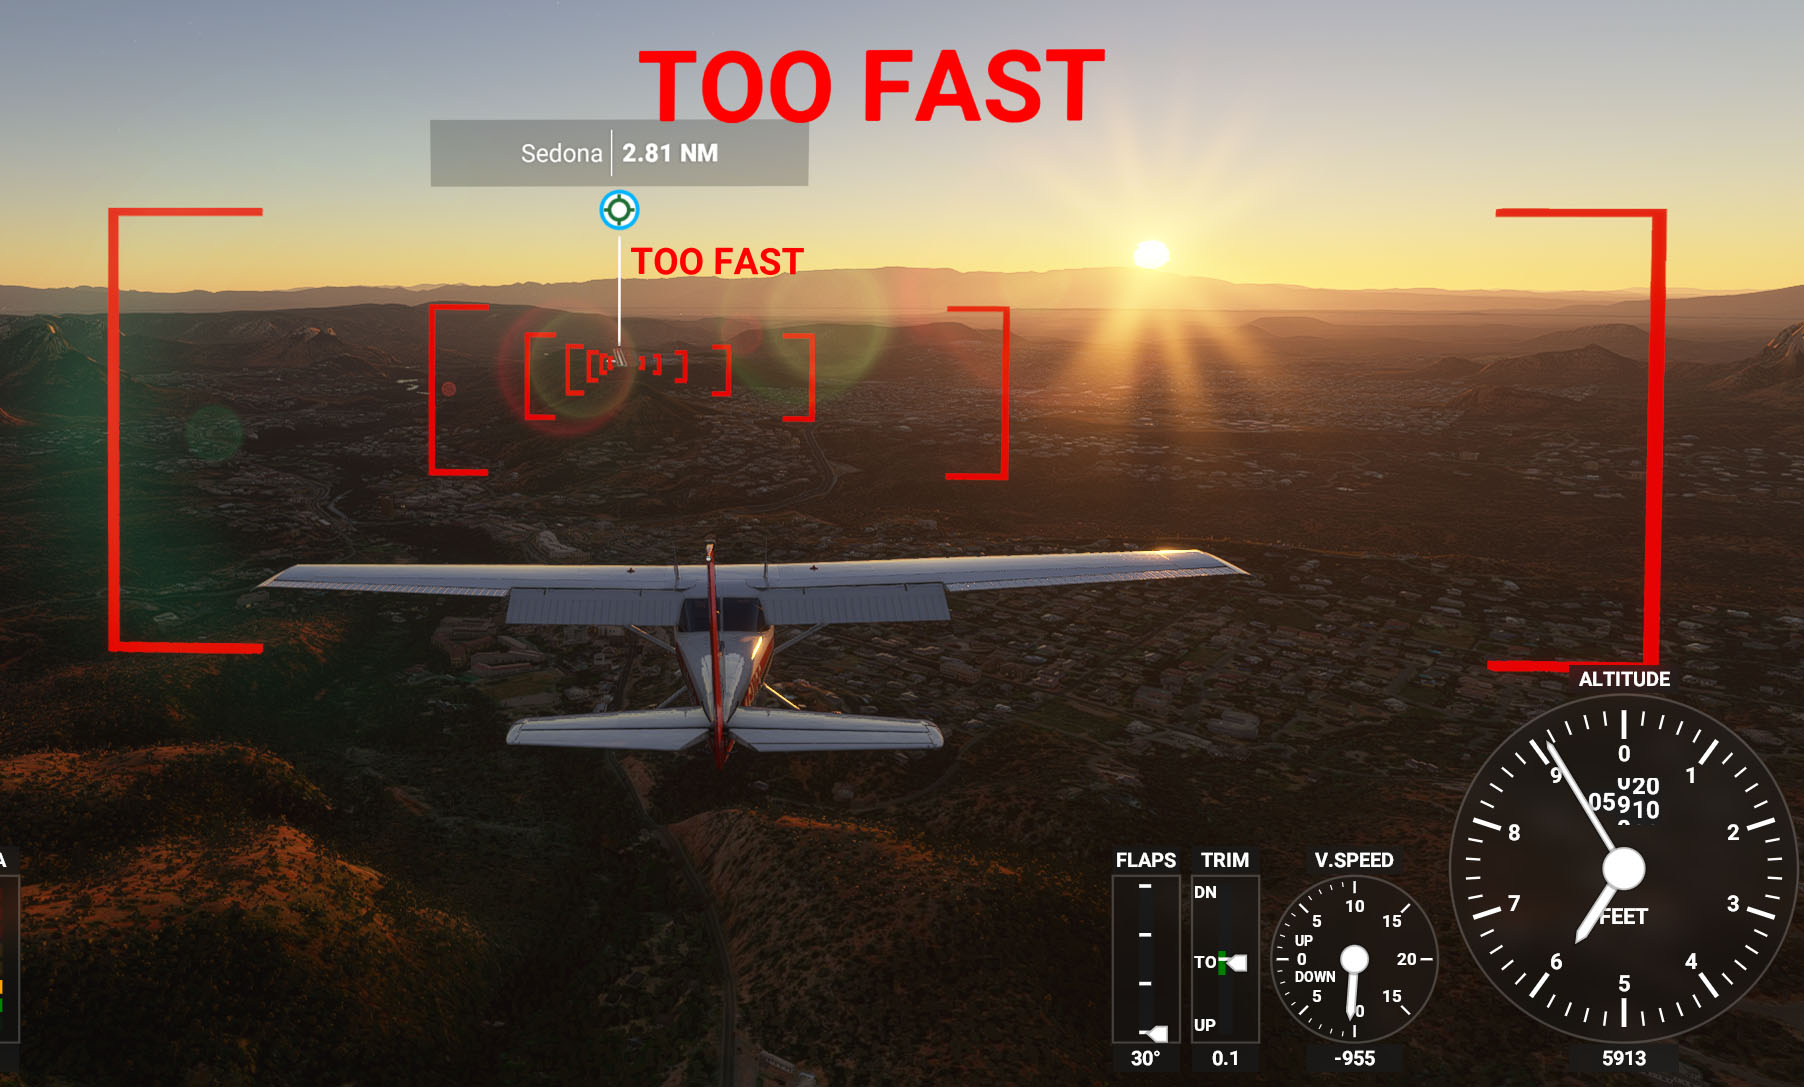
What does work-and what this post is all about, is double-clicking on FINAL. If you go to the FINAL part of the flight, click READY TO FLY, hit the END key to get the external view behind the plane, you might see something like the following.
MSFS Correct Final Approach with Guiding Virtual Navaids in Air
(airspeed and other gauges on left cut to minimize upload)
MSFS Incorrect Final Approach with Guiding VIrtual Navaids in Air Showing Error
The bonus of doing this is the brains behind the IFR Flight Plan and the TRAVEL TO puts the plane in the air with the right trim, the right airspeed, and initially, if you don’t blow it, the right rate of descent to complete the final approach. So you get to practice flying with the virtual NAVAID frames in the air maintaining these factors, learning how the landmarks should appear passing under you as you approach the airport, and practicing your landing technique.
In the end, when you go to take the tutorial #8 test, you’re going to have to fly the whole flight VFR and you won’t have any of the virtual NAVAIDS in the air on the final approach. You’ll have to set all the trim, adjust your throttle and rate of descent to control airspeed, etc. But you should be able to get plenty of practice by reloading your IFR Low-Altitude Airways .PLN file over and over again and jumping to FINAL (rather than trying the whole 21 to 24 min tutorial over and over again).
This low-altitude airways IFR flight plan trick should work for practicing landing at other airports around the world. Just make sure to set the weather and time of day so that you’re using the IFR guides to practice VFR flying in fair weather in the daytime.
This is only for free-flying when you have multi-player turned off in MSFS. In a real world airspace and altitudes are strictly controlled. So after you get your solo “I’m alone in the world” flying techniques down, you can learn the additional rules for flying safely in an orderly world, perhaps starting here: [HOW-TO] learn VFR using a flight
Suggestions for improvement and criticism are welcome. Apologies if the idea is all too hokey but it really helped me successfully land in Sedona at dusk. I completed the whole tutorial #8 on only my second try. The other important keys to completing tutorial #8 are on taking off from Flagstaff to be sure to reach the altitude required by the instructor, then adjust your attitude on attaining the required altitude, and then do a 180 and be sure to fly over the center of the Flagstaff runway as you look for IH-17 to follow to Munds Park according to your VFR flight plan.