This is the 4th and last installment of my MSFS flight planning series. If you have not read the previous parts, click here where you will read the first installment.
Arguably the most important part of the trip is the briefing of every phase of the flight. Having a established plan is very important because it eases the burden of the multiple things that happen at the same time, specially during takeoff and at the beginning of the approach and landing.
Get to know the airport by looking at the chart and find your parking space on the airport chart. It will make the navigation to the active easier.
Go through your before engine start checklist. As soon as you have power, tune in on the ATIS, in our case (KJAX) is 125.85 → this I tune in on COM2 and the standby COM2 frequency is always 121.5.
With the ATIS, take note of the letter that identifies it, the temperature and dew, the altimeter (enter into the altimeter setting - and confirm that it correlates with the airfield altitude) Take note of the active runway and dial the heading of the runway with the heading bug (you can find the heading of the runway on the airport chart).
Go through your engine start checklist. Then set up all your COMs and NAVs.
For me:
COM1 KJAX ground 121.9 / KJAX tower 118.3 – need these for taxi and take off
NAV1 SSI 109.8 Rad 28 / SAV 115.95 — SSI is my first waypoint
NAV2 SSI 109.8 Rad 15 / — This is the direction after I fly through SSI
If the airfield’s temperature is lower than 10deg C, turn on Pitot heat, specially if the dew point spread is narrow.
Request taxi clearance. Run your taxi checklist. Review your airport chart and start the taxi procedure. (Do not run any checklists WHILE you are taxing, at this point the most important thing is that you navigate the airport, check your control surfaces, brakes and the 6 pack response to motion and keep an eye on the traffic in and around the airport). Find a spot where you won’t be blasting anyone (I like to be 90deg from the active) and do your run up. Be ready to tune into tower and as soon as you do, dial the center com that you expect to get (in this case 132.775 on the COM1 standby - you need this to make the switch quickly as there will be a set of things happening very quickly. Once done, the first briefing should take place.
TAKE OFF BRIEFING and CLIMB
This is all about how you will be leaving the airport This is a critical step and the goal is that you stay clear and don’t interfere with the traffic around you. For our flight, we will be departing from runway 8 (Hdg 077). Pattern for this runway is left, so my departure briefing will be:
- Apply Full power quickly and keep my hand on the throttle
- Call out loud: speed alive, all green, Rotate (at 55 KIAS)
- Keep the nose down and Accelerate to Climb Speed 75KIAS then pull up slightly and keep hdg 077 - trim for this attitude and keep 75KIAS with pitch changes. Trim, trim, trim.
- At 1000’ turn left hdg 035 (standard pattern departure) and maintain heading for for 2 miles
- Turn Left Hdg 343 and track SSI rad 28 (This will put you on an intercept path of 45 deg)
The figure below shows my departure plan in better detail. Note that you will be scanning the inside and the outside of all your turns. I hand fly all this! it is exciting and goes by fast.

As you climb, monitor the OAT and your RPMs, as they fall - roughly above 3000’, start to lean the mixture, for now, the only objective is to keep max RPM with small changes on the mixture. Let every change sit for a good 5 seconds before you do the next one.
You will be reaching the top of your climb at roughly 9 min and you will be 11 miles or so from the KJAX at this point. Level up, let the aircraft gain speed, then bring down the power to 2500 RPM. Engage the AP on Hdg and Roll mode. Turn off landing and Taxi lights.
Lean very slowly via the EGT - Ideal settings are 50deg lean from peak. That burns about 9 gallons at my current settings.
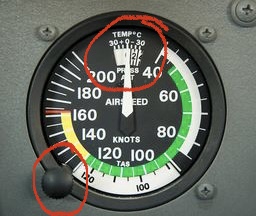
Time to do the Cruise check list at this point. Remember to check the OAT and your density altitude, dial-in the data with the speed bug (see figure). In my case the KTAS is anywhere from 114 to 116, very close to our prediction.
For the cruise, I divide the trip in segments of 15 min.
CRUISE
- Look outside for visual reference and confirm attitude
- Scan the 6 pack and navigation error
- Take a look at the engine instruments - all green
- Take a look at the OAT - Pitot heat
5, Fuel pump on - switch tank - Fuel Pump off - Look at the map and cross reference with what you see outside.
As you get to a waypoint, crosscheck the ETA and the estimated fuel with what you had in your plan.
About 60 nm from my destination I dial the landing airport ATIS/AWOS frequency on COM2 and turn on the identifier, as soon as I get the Morse code, I open the receiver and take note of the ATIS. Same data as the departing field. Now that you know where you will be landing is time to figure out the best approach.
DESCENT
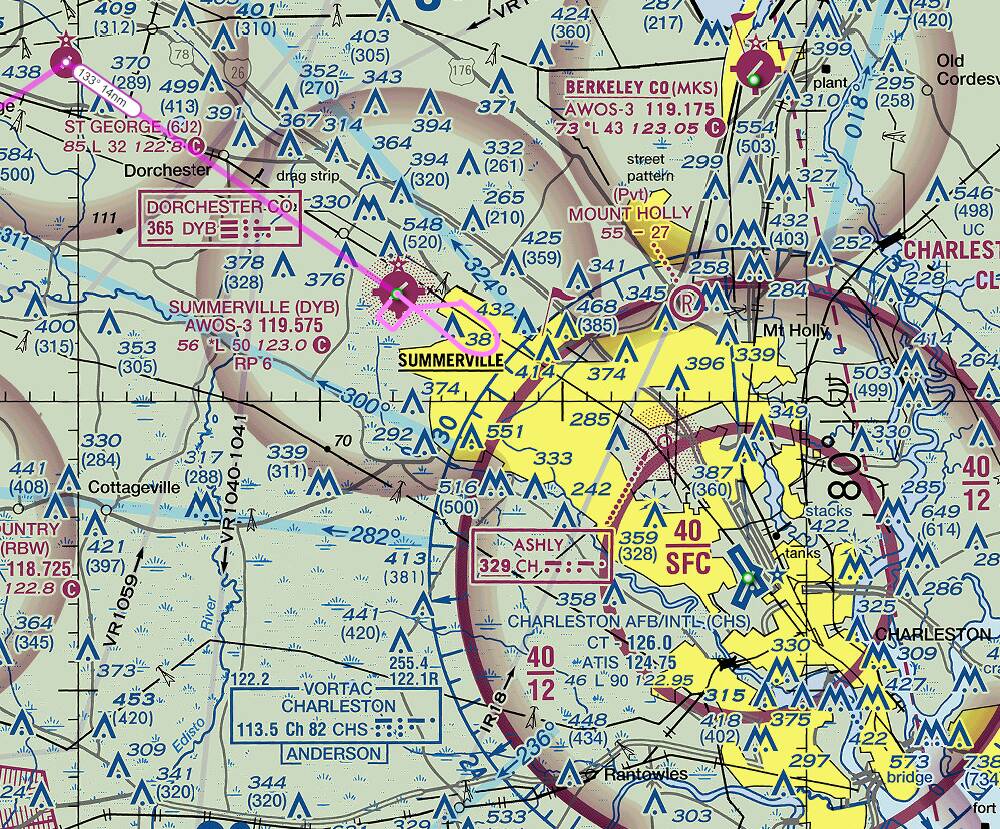
In my case we will be landing on runway 06. Landing Pattern is to the right in this runway. Because is a non controlled airport my preference is to enter into the pattern instead of a straight in approach and landing. The last thing you want is someone dropping on you on final while you are in base. In order to do that I would need to descend to 1000’ above the pattern altitude and fly over the airport, perpendicular to the landing direction and then do a tear drop approach so I can enter at 45 deg on downwind. It gives the best view of the field and the traffic in and around the pattern.
As you pass the last checkpoint before the TOD I dial the Dorchester NDB on 365 and the Charleston VOR (CHS 113.50). Disconnect AP and pull the power down and pitch the nose down, you can also let it descend on ALT + VS mode, but be careful, you could overspeed if you are not on top of the numbers, manage the throttle carefully to match the GS (you can see it on the GPS) and your descent rate. 10 miles from the airport, I call and announce my arrival and my entry into the pattern. Approach check lists and turn on landing and taxi lights at this point.
I arrive at 2000’ about 4nm from the airport, by this time I have allowed my speed to lower and be close to 100 KIAS as I am crossing on top of the airport using the NDB and the visual cues. As I pass just above the airport, I will do my final landing check lists and my last mental briefing for landing:
- Maintain 90 KIAS at 2000 and clear the pattern and fly 2 miles west on same heading (I’m using CHS for distance measuring here) - Do not get into the Charleston Class C
- Start descent to 1000’ and perform a left standard turn of 180 degrees, keep the runway in sight
- Turn left into a 45 degree on the pattern, as you turn, decrease speed to 85 KIAS and add 1 notch of flaps. Decrease airspeed to 80.
These 2 figures show my entry into the pattern, is the standard recommended entry in the US:

- finish your pattern in the same way you land every time. My final speed is 63KIAS and 30 degrees of flaps. Announce your pattern legs
- Exit the runway right towards the terminal
after exiting the active, perform the after landing checklists and taxi to the ramp.
That’s it. Compared to my ground preflight estimates, I landed 4min after my calculated arrival and saved 1 gallon of gas. My Landing weight was just 7 Lbs over the original preflight calculation. Weather was just as we predicted on the forecast. Not bad for desktop simulation!
This is the end of this Series, if you have questions, do not hesitate to put it in the comments.
More posts on these series:
- Weather forecasting Here
- Planning the VFR route Here
- Preflight Checks Here
- MSFS 2020 Flight Planning - Part 4: How everything comes together
All these are critical components of Dead Reckoning, and pilotage, so we can ditch the GPS and fly this just by looking outside and comparing the references on the map to the planned route. Its really cool and makes for a fun flight on a VFR simulation platform, just like MSFS.