Hi all, for those of us old school VR users who have stuck with the CV1 I have spent the evening finding some great settings to allow you to have a smooth and sharp VR experience with just modest hardware (lets face it, those of us still with CV1s probably aren’t packing the latest and greatest GPU/CPUs).
I am currently on an i7 6700k, 16gb ram and an RTX2070 (so pretty much the minimum spec for VR) and I was able to run with some pretty decent settings thanks to two main tricks detailed below.
–
Trick 1: Set your ASW (Asynchronus Spacewarp) to run at 30fps.
Yes it sounds gross to run VR at 30fps but nobody has the hardware to run at the 90fps native to the CV1 right now and the difference in re-projecting frames using ASW from 30fps vs 45fps is minimal and barely noticeable (in fact in my experience 30fps reprojection has been smoother!). It has been working great for those in Xplane, this is just a way to use this same trick in MSFS for now, until a plugin comes along.
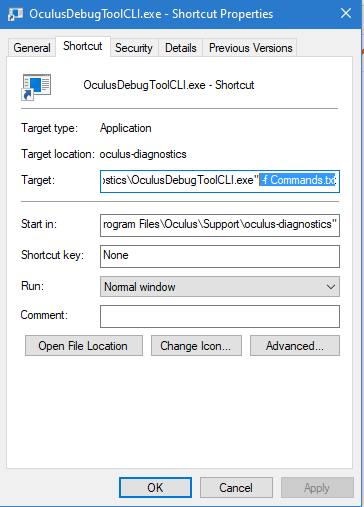
To do this open the following folder ‘C:\Program Files\Oculus\Support\oculus-diagnostics’ and run the file ‘OculusDebugToolCLI.exe’. You will see a command line interface like the following:
Enter the following command: server:asw.clock30
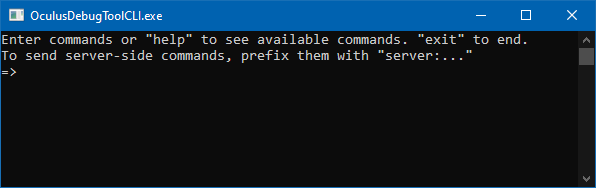
If you have done it right you will see this confirmation:

I believe you will need to do this every time you start the Oculus service, I think it can be automated via a .bat file but I am not sure how, if anyone knows how feel free to add that in a reply and I will put it here.
This will now set the sim to run at 30fps in VR mode and re-project 2 frames for every 1 rendered frame, this saves A LOT of performance and is barely noticeable from 45fps reprojection.
–
Trick 2: Set the games internal render resolution to 50% and super sample it using the Oculus tools.
Thank you to CptLucky8 for this one! It is from his excellent 2070S settings guide, I just applied it to the Oculus Rift CV1.
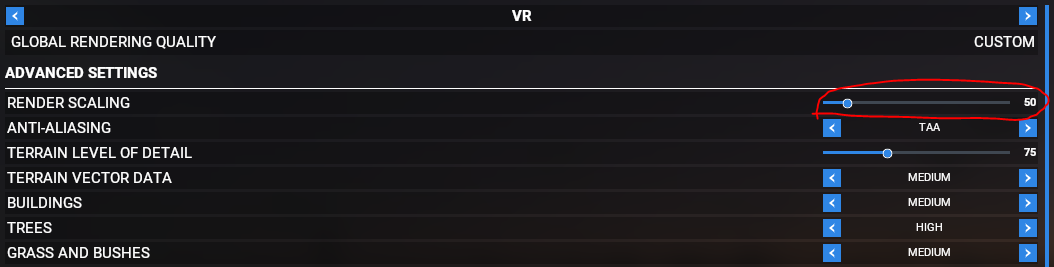
Firstly set your in game render scaling to 50%:
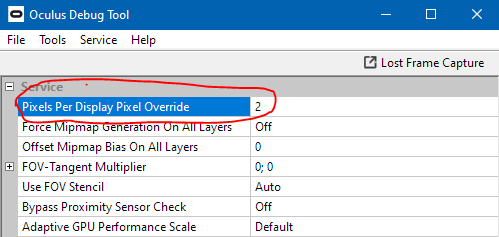
Next, from the same folder as before (‘C:\Program Files\Oculus\Support\oculus-diagnostics’) open the file ‘OculusDebugTool.exe’ (this is the GUI version of the command line interface you used in trick 1). Here you need to set the ‘Pixesl Per Display Pixel Override’ to 2, as below:
Leave everything else the same.
There is a great explanation for what this does in CptLucky8’s thread but the short version is it uses MSFS’s great TAA upscaling as well as Oculus’ tools super sampling to render at a very low resolution but to output a nice crisp much higher resolution image to the headset displays. Again, this saves A LOT of performance
From here you can run the game and test the new performance. It should give you plenty of headroom to increase other settings whilst still keeping a pleasant VR experience.
For me I got a very sharp image (able to read most of the small text on cockpit buttons etc, about as good as can be expected from a CV1) and still had about 30% GPU headroom left on the following settings:
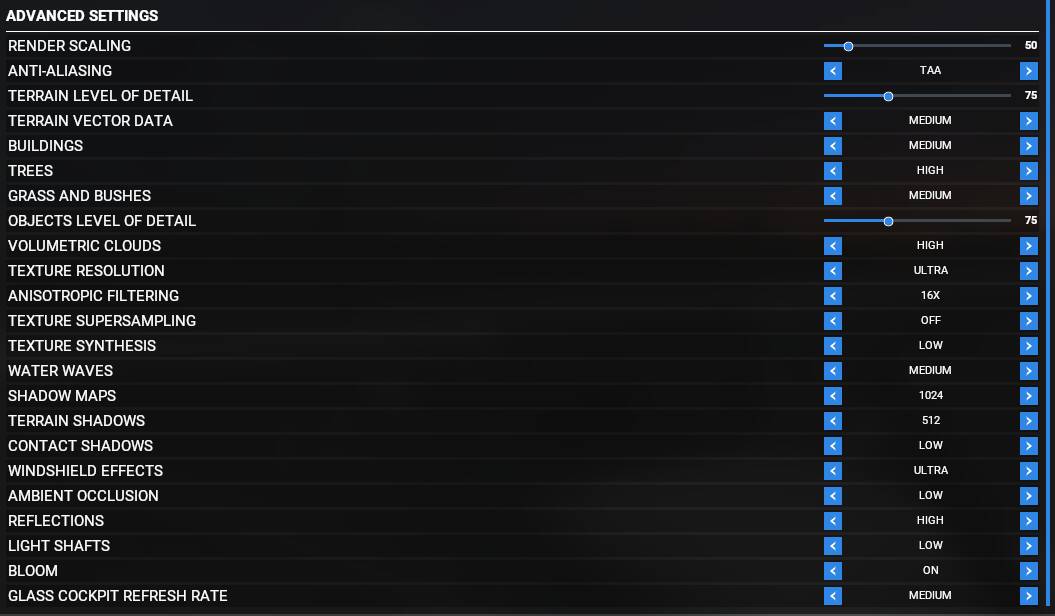
High clouds, decent shadows, ultra windshield effects (great for immersion) and even some reflections and AO, which is usually far out of reach for this hardware in VR.
Give it a try. I did a short test flight on a cloudy day in the Caribbean (no glass cockpit though, C152, my favourite!) and the GPU even had room to spare.
Let me know how you get on, but I hope my suggestions can help some fellow ‘hardware limited’ VR simmers our there too!