Quest 3 Ghosting/double image problem

I’m afraid I’m having a VR stutter/double image/ghosting problem which after experimenting as much I can, I cannot get rid of it. If anybody can come up with any suggestions or ideas I have missed I would be grateful.

System:

Quest 3
4090FE
32 gb 6000mhz ddr 5 ram
Msi B650 tomahawk wifi
Ryzen 7 7800X3D
Windows 11

My system seems to have plenty of headroom and essentially runs well with good clarity and i get well over 70 fps with most settings high or ultra but the motion is not very smooth. When i use asw/motion reprojection or limit my frame rate to 50% of the refresh rate i get a nice smooth performance/motion.

Problem:

When I do limit the refresh rate to 50% (i have used xr toolkit/occulus debug tool/riva tuner/nvidia control panel to do this ) I get a horroble double image/blurred scenery when turning/banking . Its especially obvious with any place name text which has a “double stuttering outline” when turning or
banking the aircraft. It is also evident in the cockpit but to a lesser extent but can be seen when turning my head quickly. The problem only occurs when I try to cap my frames at 50% of the frame rate and for all refresh rates of the quest 3 including 72/80/90 hz. Flying low fast and straight is fine, it only occurs when I bank the aircraft or turn my head quickly. The faster I bank/turn the worse the effect.

Things i have tried:

Used link/air link/virtual desktop (with dedicated WiFi 6 router).

All resolution settings (even the lowest possible) when set in the sim/using open xr toolkit/meta quest app or virtual desktop.

I want to use TAA but it occurs with all the other anti-aliasing settings.

It happens with xr toolkit disabled

When I lower my msfs vr settings to low end it still happens. I have tried all sorts of nvidia cp settings including default but no change. I have tried the lowest settings on virtual desktop and on the meta quest app (bit rates/resolutions) and this doesn’t make a difference.

The only thing that helps is if I use asw ( set in occulus debug tool or virtual desktop) which produces a lovely smooth image/motion and eliminates the problem completely but I do get the usual artifacts which bother me quite a bit

Sorry for the long post but if anybody can suggest anything else i can try inwould be grateful.

Cheers
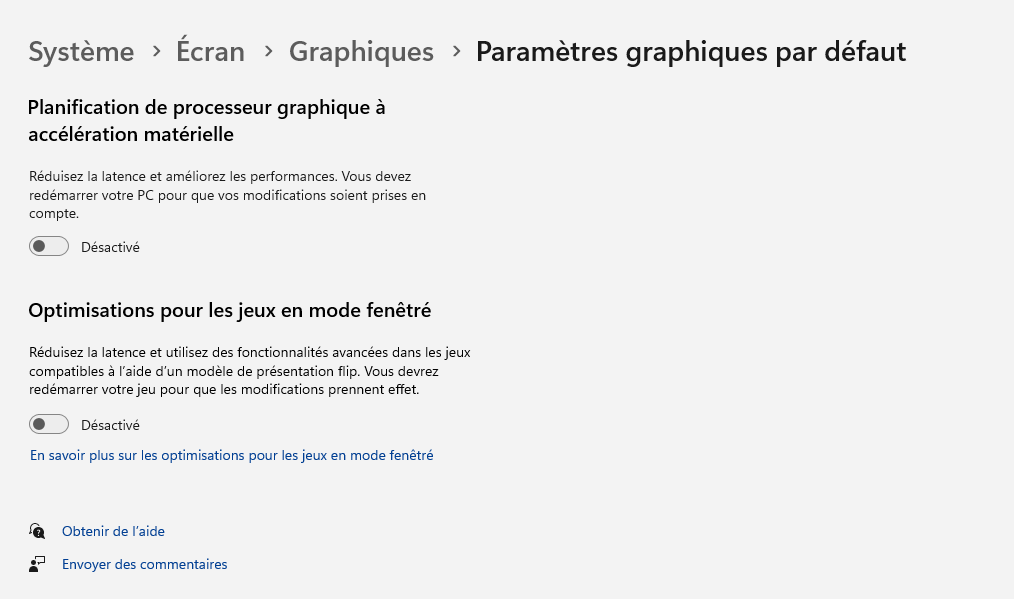
did you disable windows graphics acceleration?

Thanks for replying :+1:

Hags on/hags off makes no difference
Problem also happens in dx12 and dx11

Jist to add, Flight sim is installed on a fast spearate nvme drive m.2 drive.

I’m thinking of doing a fresh install of windows tomorrow and see what happens :thinking:

@NakdTrader I have similar PC specs and get great results with both my Q3 and QPro using Link (at 650mbps encoding bitrate) or Air Link (at 200mbps dynamic bitrate.

I find it best to use 80Hz refresh rate and the res slider full right. I then set the ODT ASW setting = forced 45fps (actually limits to 1/2 refresh rate with asw = off). I also prefer using DLSS/Balanced because it runs smoother and has less distance shimmering. I apply 1.20 to the ODT pixel density and this makes cockpit clarity pretty well as good as I can get using TAA.

All these settings are kinda tied in together (win11/nvidia/msfs) imho. I suggest you have a look at my Q3/QPro Link/Air Link settings thread and give all (not just some) of these a go. Good luck mate and cheers.

So your post is where i started as yes we do have similar systems :joy:

I copied all your settings. My preferred configuration like you, is link using 80hz and 1.2-1.3 Supersampling in ODT. TAA looks really sharp and slightly
better than DLSS for me but i do not get the smoothest motion and i think this is down to the refreshrate mismatch so i feel i need to limit it to half the headset.

Asw forced 45fps with asw on provides perfectly smooth motion but i don’t like the artifacts.

When i choose ODT ASW setting = forced 45fps with asw off, the ghosting/double image type problem starts. It doesnt matter where i put the resolution slider. I’ve tried it all the way to the left (looks terrible and I still get the problem) and all the way to the right. DLSS doesn’t make a difference either along with all the other anti-aliasing settings.

Problem is reproduced in exactly the same way using airlink and virtual desktop.

I feel that something else is amiss so i think i am going for a fresh install tomorrow.

Thanks for your reply :+1:

2 Likes

@NakdTrader Ya, sounds like you either have unnecessary processes/hacks/mods running in the background or something that is killing your performance.

I have a friend with a Q3/rtx3090 that gets the same great results with my settings using Link. With your very good PC and Q3 you should expect very good results imho. Neither of us are using OpenXR Toolkit btw.

Quick update …

I did a fresh install of windows and MSFS today and nothing else installed other than meta app and the double image problem persists when choosing ODT ASW setting = forced 45fps with asw off.

I give up :man_facepalming:

1 Like

You are trying to solve the impossible. You should google “judder” in VR for the technical stuff. The problem happens because the system cannot get the frame created in time for the headset refresh. When this happens it will send an “old” frame in place of the missing new frame. This old frame is slightly out of sync with your current position, causing things that move past you to “judder” back and forth. The only way to solve this is to hit a frame rate that matches your headset refresh. Set the headset to 72hz and your settings at a point where you can maintain 72fps, and it should vanish. Easy test: set the headset to 90hz, and lock the rate to 30fps. You should see 3 copies of each runway light as it judders past on takeoff. At 45hz you will see 2 images. But, it’s very hard to maintain 72fps in vr in this sim. So, learn to live with a little judder. Set the headset to maximum refresh 90hz, turn off any Reflex, ASW, Low Latency Mode, Turbo Mode, frame locks, frame limits, etc. and let Openxr manage the frames. If you keep your head forward between ±45degrees, you don’t see it much.

2 Likes

Sorry I cannot be of more help mate. Sounds like you need to find some local help to sort this out. Might be a hardware issue, who knows?

Not an impossible to solve problem as @OldpondGL has suggestted imho. But, possibly impossible to solve in this, or any user forum, lol!

Right. I’ve got your back here. I have the exact same spec pc and the quest 3, which I’ve tinkered with for over a year now. I know I’ve got the very best of it for our PC spec. So here goes…

  1. Use link cable, it is by far the best graphic quality.

  2. Run this on steam VR. Its a bloaty option, but essential.

  3. Change XR runtime in oculus to SteamXR run time.

  4. Set oculus res to max but go to 72hz.

  5. Download oculus tray tool. *Debug isn’t great, as it defaults back all the time.

  6. Set tray tool to the following:

  • Pixel per display (1.4)
  • ASW set to auto
  • encode resolution 4040
  • Bitrate 800
  • Set option, to mirror debug tool, this is crucial, and in debug, only6 adjust 1 setting, and that’s sharpening to “quality”. This debug setting will apply directly to tray tool, as tray tool doesn’t have the quality preset.
  1. Use an app, which i am not allowed to say on here (not essential at this stage)
  2. Buildings, trees, vector, pre cache all high.
  3. Shadows low and off.
  4. TAA mode at full res (100%), which with the 1.4 tray tool setting, will get you 3808 resolution. Leave XR tool kit for now, the resolution override isn’t great on quest 3. Steam vr leave at 100%, don’t supersample here either.

Now all this will get you the very best smoothness, and a really, REALLY nice crisp experience. You will just be making 36fps, but the ASW will boost you to 72hz. Its fabtastic.

Dont let the 36fps half refresh put you off, its very good, best ive ever had it, and ive tried EVERYTHING!

Hags off, game mode off.

VDXR is no good for our system. Its poor graphics. It nets you more fps, but never enough to get you to 72hz/fps without looking rubbish.

Your going to be amazed with this set up, please i beg you to switch to this method.

Please let me know if you have any questions, because i am more than happy to help get you stunning gameplay.

Once this is set up, all you will have to do from then on in, is slightly adjust the in game graphic settings for your aircraft of choice. The settings i have put up here, are for the A320 Neo, which is a heavy hitter on fps, so feel free to use ultra settings depending on your aircraft.

I really cannot scream enough at you to try these settings, as they are tailored specifically for the 7800x3d and 4090. All other youtube settings guides are dog ■■■■, because their systems differ. This is tailor made for our spec.

Hope this is of value.

Andy.

2 Likes

Hi Andy, I will definitely give this a try and thanks for taking the time to explain your settings in detail. I will report back in a few days as busy with work but will definitely let you know how it goes.

Just a quick question, the option to mirror the debug tool, is that found in advanced? There is an option for the debug tool saying ,“use OTT local”?

1 Like

No problem, happy to help you get the best experience.

Negative - The option is in the tray tool, and it says “mirror oculus home”. This will then translate all settings from the tray tool, to the debug tool, and vice versa.

Always here to assist getting you going. Its dead easy once you know how.

@Cornhole2840 I think it’s great to post settings but I gotta say some of yours are a bit suss imho.

For starters, ODT encoding resolution should be kept at 0 = default. Also, encoding bitrates above 700 mbps can cause audio stuttering and increases latency. Anything above 650mbps doesn’t significantly improve anything imho.

Also, I also like to use OTT to set ASW and SS settings. I’ve found it best to use OTT to sett game profiles since global settings do not always work properly.

OTT is a great free addon, and I’ve used it for +5yrs. However you must read its manual and understand what their settings actually do. Your explanation about OTT mirror is incorrect. It only mirror montor graphics, not settings.

In any case, as long as you are happy with your settings, that’s great. However, I suggest that there are others, like myself that have done much more experimentaion and understand incremental settings differences a little better.

I have an interesting observation with link cable at 90hz, 1.0 resolution, PD at 2 at ODT. Despite turning ASW off and not using any other reprojection tool, my ODT performance monitor shows that the headset is always trying to hit either 22.5, 30 or 45fps (depending on where I am during the flight). The picture remains very nice at each fps. Is there some hidden fps target algorithm working in the background to aim for 1/4, 1/3 or 1/2 despite turning ASW to off?

Ok, well, how do i respond to this one.

For a start, both myself and the op are running a completely different system spec to you, and whilst it may be around the same (ish) performance, Ours being a little faster, to say what works for your, and then to say what’s “suss” about ours is a little ridiculous, petty and rather bolshy.

I have tweaked these settings to work optimally with "the ryzen 7800x3d and 4090. I believe firmly they are near optimal for stonkingly good performance/visuals for our system.

Do you know how many god darn youtube videos i watched in the early days, which all came to naught. Non of them were near workable nor optimal for the system i was running. So to say they are suss, is an insult to my intelligence.

Encode resolution in tray tool, has much better graphics quality when combined with 1.4 super sample, tahn the other presets. It just works. Try the settings above, and see for yourself. What is academic/theory based speculation on your part, does not translate to reality in sim, (for me/on this rig) simples.

With regards to bitrate, do what works for your system, mine easily runs 800 without the least hint of interference. But again, for you, maybe not.

You say - “Anything above 650mbps doesn’t significantly improve anything imho”; - Again, this is your experience, for myself, 650 vs 850 is clearly seen as a translation of crisper graphics.

You also didn’t absorb what i posted. I clearly stated that OTT (Tray tool) is where these settings are applied. And not in debug tool. All settings i posted are made in tray tool, and only one preset is altered in debug, and thats “sharpening” to be set at - (Quality).

You may be right about the mirror aspect, but in my use across a years tweaking and faffing, this preset seems to hold all settings firm in debug. And it certainly has no other ramifications or negative affects. And for your information, i have read the docs concerning tray tool, and debug tool.

And finally, you wrote this:

“n any case, as long as you are happy with your settings, that’s great. However, I suggest that there are others, like myself that have done much more experimentaion and understand incremental settings differences a little better”.

= Condescending.

EDIT: After reading your provided link:

On your link, it advises to use "DLSS - Balanced. That together with a 1.2 super sample. - That is selling yourself short.

Ive read your link suggestions, and without trying to sound a ■■■■■■, I am not impressed.

Feedback from users isn’t exactly stella either. And again, not wanting to sound snarly, but to suggest graphics settings (so specifically) to someone running a different system, is just folly. These tweaks have to be made on the fly in sim. You also seemed to get confused at what motion repro does, and were corrected for it (perhaps a manual study is needed). Doesn’t exactly inspire and translate to the inflated sense of self assured confidence you seemed to portray, and certainly doesn’t warrant belittling my own simple but effective settings.

All the best.

2 Likes

Hi Andy,

thank you for showing us your settings.
Q3, 7800x3d/4090 here, i will give them a try.
One question: why do you prefer SteamXr Runtime over Oculus Runtime?
Thx

I guess this is the kind of response I’d expect, lol! Of course there are a zillion ways to skin the same cat. If you’ve found settings that work best for you, that’s great mate. Cheers.

Hi, no probs, happy to share what worked for my rig.

Oculus runtime has always been unstable. Steam VR is definitely a lot more stable.

Why that is, i have no idea. Other so-called experts on here may know, or may disagree, but at the end of the day, we have to try it all, experiment and adapt. Defo give steamvr priority testing, it worked way batter for my 7800x3d/4090/q3.

Let me know your findings. Cheers.

1 Like

Cornhole2840, Thanks for your settings! Do you need to have ODT with “default” settings (whatever those are) first before you set the “Mirror Oculus Home” to enabled on OTT in order to pick up Link Sharpening?

I am going to try this on a lesser hardware config (just for experimentation). I usually use VD. What you are saying with regard to “side-looking smoothness” is that SteamVR motion reprojection is superior (for your hardware) to Oculus ASW or Virtual Desktop SSW. And that Link cable @800 is a crisper image. I currently use a wifi6e VD config with “godlike” resolution so it will be interesting to compare.

I had this problem on a little laptop with an rtx 2060 and solved it by using virtual desktop instead connected by cable with the openxr option set to VDXR. There is no more back and forth effect and gained some fps and overall quality.

2 Likes