My 2 cents from a Pilot’s Perspective to achieve maximum sharpness and smoothness
enjoy
01:32 - how to understand the concept.
02:50 - Why to set your worst scenario.
03:10 - How to prove the concepts.
03:45 - Why use GPU-z.
04:25 - Enabling FPS in your sim.
04:51 - Meta quest app setup.
05:12 - FPS and Human vision.
06:01 - Variable FPS - Gsync and Freesync Technology.
07:15 - Fixed FPS - VR headsets.
07:45 - Half Refresh rate trick
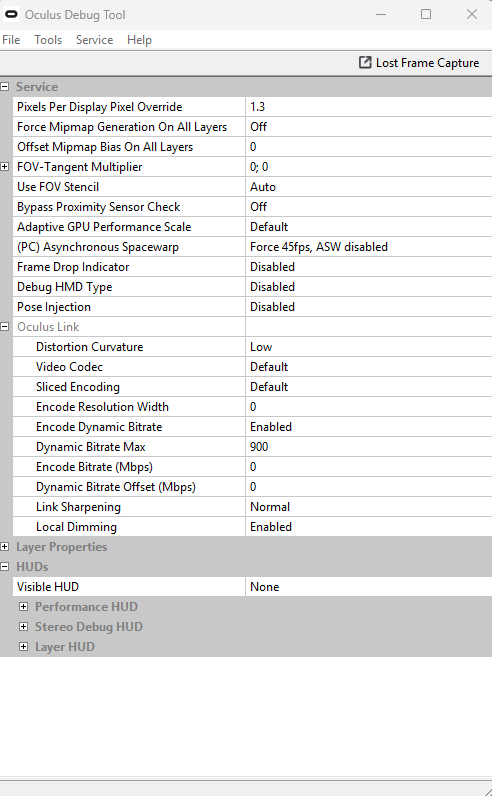
09:05 - Oculus Debug tool overview.
09:25 - Why I use Link Cable not Wi-fi.
11:10 - How I can make comparisons with image quality (Oculus Mirror).
12:10 - Asynchronous Space warp ASW explained (locking FPS).
13:47 - Why 36 fps is smoother that 50 fps in VR.
14:19 - Enabling Heads up Display to analyze the frame synchronization.
14:40 - ASW disable, full GPU usage, stutters and miss synchronization.
15:15 - ASW with 1/2 refresh - 36fps silk smooth.
15:45 - Ghosting and ASW Artifacts explained.
17:03 - Pixel override (supper sampling) explanation.
18:00 - Super sampling effects on GPU usage.
19:30 - Field of View vs sharpness.
20:55 - Comparison super sampling with FOV reduction vs 100% FOV.
22:00 - Reduce FOV for better clarity.
22:27 - GPU Load vs Headroom.
23:55 - 90hz vs 72hz in image clarity.
26:00 - Smart way to control TLOD, OLOD and Clouds in VR
27:49 - OpenXR Toolkit overview
28:31 - FOV Rendering - 3~5% more less GPU usage.
30:11 - Fixing the brightness / contrast and colors (pilot’s perspective)
31:21 - OpenXR toolkit MOD (by Ohne Speed) FOV for VD
32:01 - In game Settings FS2024
32:30 - Why TAA not DLSS or DLAA
34:30 - In game Settings FS2020
34:50 - Nvidia control panel and Nvidia APP settings
35:05 - Trick to set Debug Tool with one click and VoiceAttack
37:36 - Conclusion
38:36 - VR from a Pilot’s Perspective
39:25 - VR certified Professional simulators (Loft Dynamics)
For those who don’t have 40 minutes to watch the whole thing, is there probably a one-page summary available that anyone can read in 2 minutes?
Edit: Since I posted this, OP added a summary of the contents, which now makes it very easy for everyone to decide themselves if they want to watch. Thanks!
Some concepts (commandments)
Virtual desktop is a must
The concept is smoothness, no maximum fps.
The cost of DLSS is blurriness
Use TAA only if your system allows you get smoothness, no perfect crystal clear image.
VR is not flat screen
Smoothness, smoothness, smoothness.
The human eye is ok with 28 fps.
No such thing as commandments in VR imho. Whatever works best for you is great.
VD is a good option but certainly not a must. If you know how o properly setup things then other options like Link (my preferred option) and Air Link can be made to work very well. Like everything VR it generally comes down to personal preferences imho.
With the latest nvidia driver and dlss4 enabled, upscaling via super sampling removes 99% of cockpit blurriness, for me anyway.
The object is to get the best combination of smoothness and clarity. The VD developer has mentioned this often.
I target fixed 40fps and this looks very good. For me, anything less than 30fps looks terrible (way too much ghosting).
Users kindly share what works best for them. If you know everything and don’t want, or need, to try different suggestions, there’s no need to waste your time reading anything I guess, lol!
Funny, right? Of course I don’t know everything and I want to learn about different suggestions, it is only I prefer getting that information in a more condensed form, but writing up anything in a clear and concise way seems to be a lost skill in this age, which is understandable, it is a lot easier to make a 40 minute video, as Blaise Pascal put it in 1657: " I have only made this letter longer because I have not had the time to make it shorter."
I understand what you mean mate but a simple 1 page, 2 minute read on how to setup a Quest headset with Link (or Air Link) for the best pcvr results is pretty hard to accomplish. Esp. since you need to cover a lot of components and their related settings (eg meta-link pc app device graphics, ODT, win10/11 graphics, nvidia control panel/nvidia app/nvidia inspector).
Of course this will also depend a lot on your PC specs and msfs2020/2024 flying style. On top of these some seem to also see the need to use other mods/addons like OpenXR Toolkit and the Oculus Tray Tool (which I use to finetune game profile SS and ASW modes).
The closest I’ve been able to summarize is a post I made almost a year ago on this forum.
I followed this up with a discussion on how to use dynamic bitrates (which continues to work very well for me).
Up to you if you want to give some of these a go or not but I don’t think you’ll be able to do all this in 2 minutes, lol! Also, now that we have dlss4 this also introduces another level of settings. The most important thing is to be able to obseve and understand the overall effect of all settings.
Once the dust settles on msfs2024 I’ll probably try to update and combine my overall best settings (for me) using Link/Air Link with both my Q3 and QPro. I’ll try to make this as short and sweet as possible. Cheers.
You nailed it. Most of the youtube videos are mostly to long and some of these guys love to hear themselfs talking. And generate views. (No offence to the op, and thanks for the effort)) i learned alot with youtube but it takes a long time before i found the right one for me.
There is no holy grail for vr.
Trail and error. Sure there will be 1-5fps to gain if you go a different route but thinkering settings can ge anoying and useless with a next nvidia/msfs etc update.
After years in simracing vr i know the rabitholes you can get lost in
Thanks for your tips !!
Here I 'm working with a 5800x, 3060ti, quest3 and virtual desktop.
I 'm using my quest 3 via WiFi and I have a helmet/strap with battery. Normally I fly 1-2 hrs , no more.
Do you use your quest 3 via WiFi or cable?
Do you see any differences in fps ?
My honest opinion, I think it’s a wonderful tool for people who want to adjust VR with little effort. I know that the tool has its benefits with certain codecs in Wifi that really extract a little more quality when compared to other Wifi methods.
However, for those who use cable, I don’t see any advantage over using VD. Especially because all the resources we have in VD are also available with Oculus tools (Or even better like FOV options). Yes, many of Oculus settings have little explanation from the developer itself, which makes the majority of people to buy VD.
And once again, I don’t see anything wrong with this. If the person doesn’t want to find the sweet spot resolution for their system by doing massive tests and comparisons, they can simply click on a preset (godlike, ultra) as most gamers are already used to doing, there’s nothing wrong with that.
But its not a must, for most.
I made a point of explaining dozens of concepts and technologies, so that an advanced person and also people who are new to the VR world can understand why I am adjusting certain parameters.
I think it’s terrible to see most people saying that they use x or y values in certain parameters but have no idea what effect it has on the PC or the simulator.
I just wanted to explain and prove by showing numbers and graphs that everything has a reason and effects.
I apologize for going on too long.
I will pin a brief summary of the topics covered in the video.
I will also leave the time tags on YouTube to make things easier.
Thank you for your support, guys.
01:32 - how to understand the concept.
02:50 - Why to set your worst scenario.
03:10 - How to prove the concepts.
03:45 - Why use GPU-z.
04:25 - Enabling FPS in your sim.
04:51 - Meta quest app setup.
05:12 - FPS and Human vision.
06:01 - Variable FPS - Gsync and Freesync Technology.
07:15 - Fixed FPS - VR headsets.
07:45 - Half Refresh rate trick
09:05 - Oculus Debug tool overview.
09:25 - Why I use Link Cable not Wi-fi.
11:10 - How I can make comparisons with image quality (Oculus Mirror).
12:10 - Asynchronous Space warp ASW explained (locking FPS).
13:47 - Why 36 fps is smoother that 50 fps in VR.
14:19 - Enabling Heads up Display to analyze the frame synchronization.
14:40 - ASW disable, full GPU usage, stutters and miss synchronization.
15:15 - ASW with 1/2 refresh - 36fps silk smooth.
15:45 - Ghosting and ASW Artifacts explained.
17:03 - Pixel override (supper sampling) explanation.
18:00 - Super sampling effects on GPU usage.
19:30 - Field of View vs sharpness.
20:55 - Comparison super sampling with FOV reduction vs 100% FOV.
22:00 - Reduce FOV for better clarity.
22:27 - GPU Load vs Headroom.
23:55 - 90hz vs 72hz in image clarity.
26:00 - Smart way to control TLOD, OLOD and Clouds in VR
27:49 - OpenXR Toolkit overview
28:31 - FOV Rendering - 3~5% more less GPU usage.
30:11 - Fixing the brightness / contrast and colors (pilot’s perspective)
31:21 - OpenXR toolkit MOD (by Ohne Speed) FOV for VD
32:01 - In game Settings FS2024
32:30 - Why TAA not DLSS or DLAA
34:30 - In game Settings FS2020
34:50 - Nvidia control panel and Nvidia APP settings
35:05 - Trick to set Debug Tool with one click and VoiceAttack
37:36 - Conclusion
38:36 - VR from a Pilot’s Perspective
39:25 - VR certified Professional simulators (Loft Dynamics)
I fully agree with all that mate. As much as I can get very good results with VD I still can get better results with a Link cable. I get better distant clarity together with zero artifacts.
Also, using Link (or Air Link) allows me to control upscaling by a combination of meta-link app device graphics refresh rate (I use 80Hz) with the res slider full right, and using ODT Pixel density. This also avoids needing to use the OpenXR Toolkit, esp. if you have a strong PC (rtx4080 or better). Brightness and contrast can easily be modified back in the Quest standalone home environment. These settings seem to transfer over into PCVR very well. I use a darkish environment like Thrones to help find a good balance. For me, 85% brighness and just a tad of contrast works well. Everyone’s eyes are different so you need to find out what works best for you.
I’m also able to better control asw modes (I use forced 45fps asw disabled, which because I use 80Hz refresh = forced 40fps). You can also use keyboard commands to adjust asw modes (eg. ctrl+num2 = forced 45fps asw disabled). These keyboard commands can be done on the fly so it’s easy to monitor their effect. These commands cannot be used with VD because it doesn’t actually have the official oculus runtime, just their version of it. VD does also not allow you to use oculus as your OpenXR runtime because of this. It can only use SteamVR or VDXR (which works pretty well btw).
Other ODT settings like FOV can be used but I don’t like the visual effect of reducing it, esp. vertical FOV because it tends to limit my cockpit view. I’ve also never seen all that much improvement in performance. Dropping down to 0.70;0.70 only gives me about 5-9% improvement and looks terrible, to me anyway. Dropping it down to 0.85;0.85 looks a bit better but only improves performance by about 3-4%. Since I target 45-50fps with asw off, then force this to 40fps I don’t see any benefit adjusting FOV. Like everything VR, your results may vary.
Here’s an example of what my current ODT file I use with msfs2020 (2024 is currently uninstalled) looks like;
The beauty of this ODT file is that it can be directly used with Air Link as well. Using Air Link I can pretty well match VD. Although VD codec hevc-10bit and AV1 do produce a few less compression artifacts than Air Link’s default h.265 8-bit. However, these differences are not significant, to me anyway.
Since updating nvidia to 572.16 and enabling dlss4, there’s not as much in it compared to Link right now, lol! I still prefer Link, but Air Link is still very flyable.
Whether you like to use TAA or dlss is up to you. I prefer dlss/balance because it gives me smoother performance with better distant clarity and much less shimmering (esp. at night). Adding some super sampling (1.3x in my case) makes the cockpit clarity as good as I can get with TAA without any ghosting (that I can detect anyway).
Like you said, it’s important to understand the effects of setting changes. You can do this by monitoring things like fps and latency, and cpu/gpu usage. But at the end of the day, your eyes will be your best indicator. The goal is simply to get the best clarity and smoothest performance that you can extract from your PC, and it will also depend on your flying style.
All this still is kind of subjective and will depend a lot on your personal preferences. As long as you’re happy with your results, that’s the main thing imho. There are lots of ways to skin the same cat, lol! Cheers.
I don’t know if you watched the video, but my goal with FOV it’s not purely performance, I said that the goal is the 30% more clarity by packing a lot more pixels in the center of the image.
Ya, I did watch, and enjoy, your very nice vid all the way through mate. I do understand that reducing the FOV improves performance and of course, like you’ve said, this can be use to improve your graphics rendering, hence clarity. I don’t disagree with anything in your vid. I may do things a little different but this is more due to personal preferences. Overall, I think we’re singing from the same song sheet.
Like I’ve seen with performance differences, the reduction in FOV vs the fewer pixels displayed doesn’t seem to be a direct linear relationship. Likewise with clarity. It all sounds great on paper but like everything VR, you have to see it to believe it, and then decide what’s best for you.
Reducing the FOV to 0.70;0.70 does allow me to increase TAA res and this does help reduce shimmering. It also helps improve the cockpit clarity a bit, but while the res slider can move up ~25%, it doesn’t really look like a 25% improvement, to my eyes anyway. In any case, the reduction in FOV is unacceptable, to me anyway.
It doesn’t seem to have as much effect using dlss4. I normally use dlss/balanced and it does allow me to increase this to dlss/quality, but this doesn’t have any significant visual improvement, to my eyes. Likewise, I can increase the super sampling (upscaling) up from 1.3x to 1.5x and this does slightly improve cockpit clarity, but not all that much. Again, I find that the reduction in FOV is unacceptable so it’s kind of a moot point.
I guess if you only want to use TAA ,and don’t mind the reduction in FOV, reducing FOV via ODT is a sensible option. Like everything VR, there’s allways trade offs. Cheers.