Introduction
No matter if you are flying a Cessna 172 or a Boeing 747, the basic principles and techniques when it comes to landing are the same. In this guide I will explain everything there is to know about landing an aircraft, from basic techniques to runway markings, threshold crossing heights and the stabilized approach concept.
When it comes to myself, I have been flying professionally for a little over 13 years. I started flying business jets and small turboprops, I’ve been a classroom instructor for various ATPL(A) subjects and a flight instructor for PPL, CPL, FI, IR and NQ. The last 6 years I have been flying around as commander on various turboprops and jet aircraft, mainly Jetstream 31/32, ATR 42/72 and Embraer E-jet.
I will update this how-to over time and add more detail when I have the time. If you have any comments, tips, tricks, etc. → shoot me a DM.
Definitions
The most common definitions you might run into:
LDA
Landing Distance Available - this is the length of the runway from the (displaced) runway threshold to the runway end, available for landing and stopping.
LDR
Landing distance required - this is the distance required for the aircraft to land. The LDR is built-up of air-distance, which extends from passing the threshold at 50 ft until touchdown, and a stopping-distance, which is from touch-down until full stop. The LDR is corrected for density (non-standard pressure and temperature), wind, runway slope and surface (paved, unpaved, dry, wet, contaminated).
LRR
Landing run required - the landing run itself might be published in the Pilot Operating Handbook of some General Aviation aircraft and basically means the stopping distance. LDR - LRR = air distance.
Certified Landing Distance
The aircraft is certified for a landing distance established during aircraft testing. The certified landing distance is the distance required from crossing the threshold at 50 ft, touchdown and then come to a complete stop using maximum braking effort and no reverse thrust.
Factored & Unfactored landing distance
The landing distance found in the aircraft POH do not contain any safety margin and are commonly referred to as the gross or unfactored landing distance. For operational use a safety margin needs to be added to these distances. For example, piston or turboprop powered aircraft need to be able to land and come to a complete stop within 70% of the LDA (LDR x 1.43) while jet aircraft need to be able to stop within 60% of the LDA (LDR x 1.67). Difference correction factors exist for head / tailwind, up / down slope, wet or contaminated runways etc.
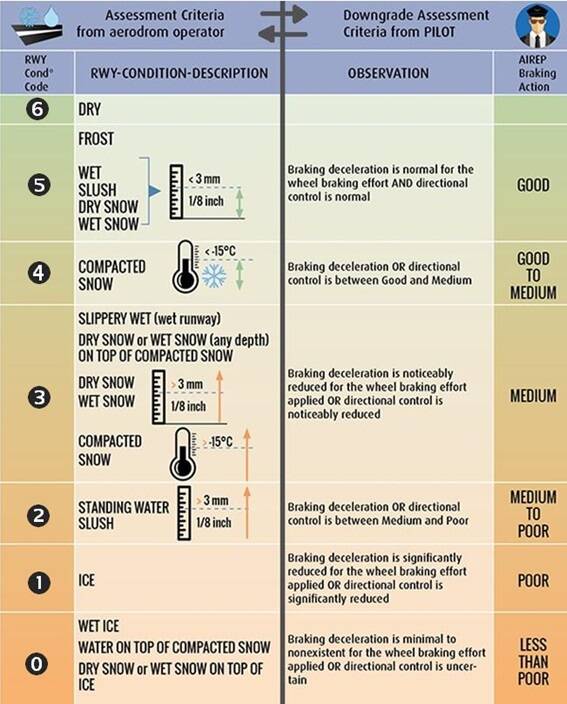
GRF
In an attempt to reduce runway excursions a new concept has emerged called the “Global Reporting Format” which introduced a standard way of reporting runway conditions using Runway Condition Code (RWYCC) from 6 to 0 (6 being clear and dry, 0 being no braking action) and an assessment element for pilots to report observed braking conditions. This can be found in the Runway Condition Assessment Matrix (RCAM) below. Part of this new concept is the Landing Distance at Time of Arrival (LDTA) as described below.
LDTA
Landing Distance at Time of Arrival - this is a new concept which came together with a standardized reporting format for runway conditions. The LDTA is calculated before top of descent with the most up to date information about landing conditions and increased by a margin of 15% (LDR x1.15), this distance is called the LDTA.
Vat
Speed at threshold, this is a term used on most GA aircraft to indicate the speed to be obtained over the threshold. The Vat should be at least stall speed in the landing condition +30% (x1.3).
Vref
Landing reference speed is the term used for speed over the threshold on most larger aircraft. The Vref is the reference speed to which corrections are added for example wind gusts, speed corrections related to certain malfunctions etc. Usually the Vref is coupled to the landing flap setting, e.g. the Vref for flaps 30 is commonly referred to as Vref 30.
Contaminated runway
A runway covered for more than 25% with water, sluch, snow, ice etc. more than 3 mm thick.
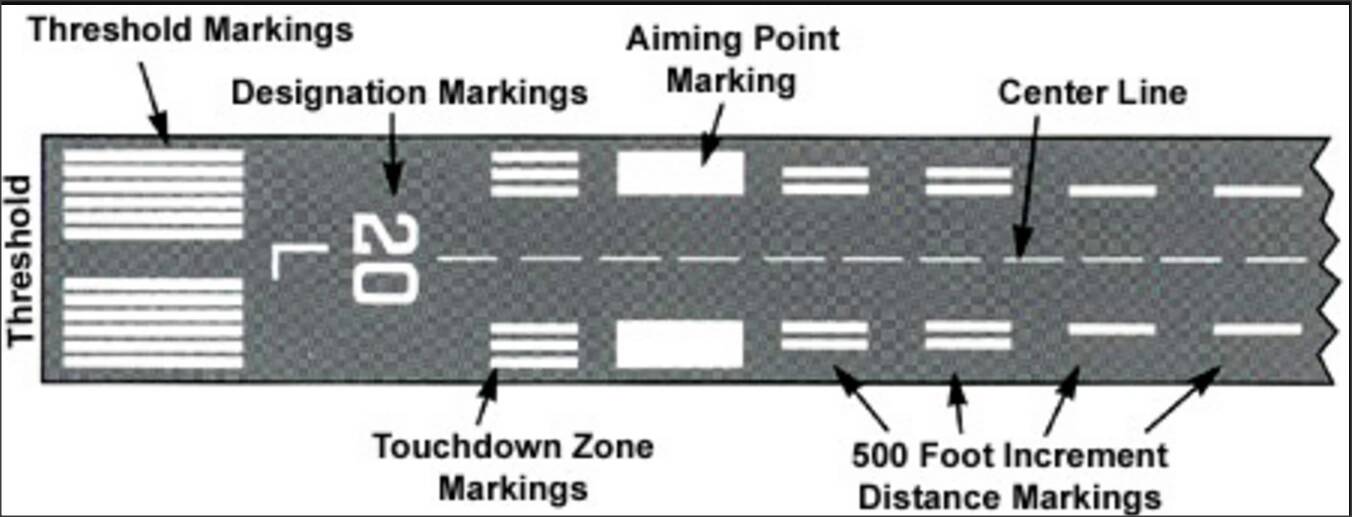
Aiming point markings
The two big white blocks abeam the PAPI or glideslope antenna, following an ILS glideslope or PAPI you will end up (usually) crossing the threshold at 50 ft on a 3 degree glidepath at those markers, this is where the flare is initiated, touchdown happens after the markers.
Touchdown zone
Is the zone indicated by pairs of lines on either side of the centerline within the touchdown needs to occur for a safe landing. Important to remember that simply touching down within “the zone” does not mean sufficient runway is remaining to safely stop the aircraft.
Techniques
There are numerous landing techniques, additionally landing techniques might be aircraft type specific. In general the following techniques can be found.
- Normal approach and landing → crossing the threshold at 50 ft on a 3 degree glidepath towards the aiming point markers, start flare, touchdown within the touchdown zone. We will primarily focus on the normal landing technique but know the following techniques do exist.
- Short-field landing → approaching the runway at minimum (safe) landing speed, aiming to start the flare before the runway threshold, touching down on the beginning of the runway “on the numbers” after a brief flare, applying maximum safe braking. Additionally it might be a good idea to keep the elevator up to transfer more weight onto the main wheels, thus increasing brake effectiveness. Raising flaps during landing roll serves the same purpose.
- Soft-field landing → landing on an unpaved or unprepared surface. For example, landing on a grass runway or making an emergency landing in a field. Approach is performed at minimum (but safe) landing speed, normal approach and flare, after touchdown the elevator is held up to “unload” the nose wheel, keeping it off the ground as long as possible and reducing weight on the nose wheel after the nosewheel touches down. This is done to prevent damage to the nose landing gear and propeller.
- Spot or precision landing → commonly used for competitions, to improve landing skill and to practice judging the distance required to flare the aircraft. This can be an important skill for a successful emergency landing off airport in a field. The target to touchdown on are usually the numbers, aiming point markings or any other marking for that matter.
- Combinations → a combined short and soft-field landing for landing on a short unpaved or unprepared surface, you can see the two techniques can be quite easily combined. A short field landing also has elements of a spot / precision landing (touchdown at the beginning of runway).
Note: in commercial aviation there is no such thing as a short field landing technique, if a normal landing can’t be performed, you simply can’t land. On GA aircraft which are not required to add margins to the landing distance required, this landing technique can be performed when runway length is known to be critical.
Stabilized Approach Concept
General - maintaining a stable speed, rate of descent and vertical / lateral flight path in landing configuration is commonly referred to as the stabilized approach concept. Any significant deviation from planned flight path, airspeed, or rate of descent should be announced. The decision to execute a go-around is no indication of poor performance!
Recommended Elements of a Stabilized Approach - All approaches should be stabilized by 1000 ft HAT (Height Above Threshold) in instrument conditions (IMC), by 500 ft HAT in visual conditions (VMC) and wings level by 300 ft HAT in case of circling or VFR traffic patterns. An approach is considered “stabilized” when all of the following criteria are met:
- The airplane is on the correct flight path.
- Only small changes in heading and pitch are required to maintain the correct flight path.
- The airplane is not more than Vref + 20 kts indicated airspeed and not less than Vref.
- The airplane is in the correct landing configuration.
- Sink rate is no greater than 1000 ft/min, if an approach requires a sink rate greater than 1000 ft/min, a special briefing should be conducted.
- Thrust setting is appropriate for the airplane configuration.
- All briefings and checklists have been completed.
- ILS approaches should be flown within one dot of the glide slope and localizer, or within the expanded localizer scale.
- During a circling or traffic pattern approach, wings should be level on final when the airplane reaches 300 ft HAT.
When the aircraft isn’t stabilized passing the 1000 ft, 500 ft and / or 300 ft “gate” or becomes unstable thereafter an immediate go-around shall be executed!
Pitch and Power
On approach to landing, two things are important: airspeed and flightpath and the scan should therefore alternate continuously between airspeed and the runway until start of flare. The technique for proper speed and flightpath control is somewhat type related, on a small single engine piston the commonly thought technique is as follows:
- Elevator controls airspeed
- Throttle controls flight path
Examples:
- On path - speed low → lower the nose regain speed → aircraft is now descending below path so increase throttle → raise the nose to maintain speed and regain glidepath.
- On path - speed high → raise the nose regain speed → aircraft is now climbing above path so reduce throttle → lower the nose to maintain speed and regain glidepath.
- Above path - on speed → reduce throttle → speed decreases so lower the nose → upon re-intercepting the glidepath, increase throttle and raise the nose the maintain speed.
- Below path - on speed → increase throttle → speed increases so raise the nose → upon re-intercepting the glidepath, decrease throttle and raise the nose the maintain speed.
This technique is a little black and white if you ask me and isn’t transferable to bigger aircraft. On jet aircraft the throttle response is much slower and the aircraft has much more inertia, you simply need to think further ahead and make corrections sooner, control of glidepath and speed is much more a combination of the black and white old fashion pitch - power approach:
- On path - speed low → lower the nose slightly to correct → simultaneously you increase throttle → raise the nose back-up to regain glidepath.
- On path - speed high → instead of raising the nose, maintain glidepath, reduce throttle and let the speed settle back.
- Above path - on speed → Simultaneously reduce throttle and lower the nose to maintain speed → upon re-intercepting the glidepath, increase throttle and raise the nose the maintain speed.
- Below path - on speed → Simultaneously increase throttle and raise the nose to maintain speed → upon re-intercepting the glidepath, reduce throttle and lower the nose the maintain speed.
- And in any appropriate combination when both speed and path need to be corrected for.
To prevent negative training for students transferring to bigger aircraft, a more modern pitch - power philosophy is adopted in which airspeed and glidepath are maintained using a combination of pitch and power rather than the old, black-and-white “pitch = speed, power = glidepath” method.
Trim
Another important subject is trim, trimming is extremely important during approach but must be done right. The elevator trim should only be used to remove stick forces and not be used for actually flying the aircraft. For example, when slightly low on approach, it might be tempting to give a little burst of nose-up trim, especially with electrical trim rocker switches on the yoke beneath your thumb. Trim should be used however to trim control forces away after a correction has been made. In the above example, the nose must be raised, simultaneously power is added to maintain speed, then the resulting forces are trimmed away. As a general rule, the aircraft needs to be retrimmed:
- After power changes
- Speed changes
- Configuration changes
Do NOT use the trim during flare to remove stick force or to initiate nose-up pitch. Some people make it a habit to trim slightly nose-up on short final and then slowly release forward pressure on the yoke during flare. This is not a recommended technique. During go-around the combined pitch-up effect when applying power and the already nose-up trim is undesirable and might cause an overshoot.
Only use trim to remove stick forces, do not use trim to steer the aircraft. Retrim after: configuration, power or speed changes.
Flying the constant (3 degree) glide path
It might be hard to judge whether you are flying a 3 degree glidepath or not, this is true even for experienced pilots as the visual perspective depends on the runway length + width combination, runway slope etc. A wide runway might give the illusion that you are low, subsequently you will fly a steeper approach and might built-up speed, a down-sloping runway might cause a similar effect, vice versa for a narrow long runway and up-slope.
There no easy answer how to follow a 3 degree glidepath, it comes partly from experience and awareness. Briefing the runway length, width and slope during approach for example prepares you what to expect. I recently flew from a 30 m wide runway to a 60 m wide runway and it can really throw you off when unprepared. Use all available references, ILS glideslope, DME or GPS distance, to crosscheck the flight path, luckily most runways are equipped with Precision Approach Path Indicator (PAPI).
Assuming we now have two white / two red on the PAPI, the trick now is to maintain this glidepath. For a standard 3 degree glidepath, using instrument references you could maintain a vertical speed equal to groundspeed x 5 (e.g. 100 kts = 500 ft/min) and then adjust to maybe 300 ft/min when becoming low or 700 ft/min when high. For beginning pilots I wouldn’t bother too much about this technique, its rather helpful when transitioning from IMC into VMC, on approach with less than ideal visibility and no clear visual references.
Outside you should be focusing on the aiming point markers (the two large blocks abeam the PAPI), you could try flying one approach only focusing on the aiming point markers and nothing else. Having autothrottle installed and operating might help with focusing solely on the runway by not having to worry about speed. You will see that you will automatically end up where you are focusing. When focusing on the markers you will quickly see if you are overshooting or undershooting i.e. when undershooting the markers move up on the windshield, when overshooting they will move down and eventually disappear under the nose.
Landing Flare
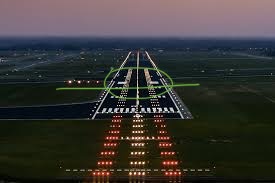
Continuing from previous subject we continue following a 3 degree path towards the aiming point markers, maintaining Vat / Vref until start of flare. Doing so we will cross the threshold at screen height (50 ft) to guard against undershoots, especially on large aircraft where the main landing gear is substantially lower than the cockpit this is important. With some practice you’ll be able to fly 2 red, 2 white all the way down to the aiming point markers. The PAPI, just like an ILS glideslope becomes more sensitive when you get closer so it becomes much harder to follow. Following the ILS glideslope or PAPI you will cross the threshold at 50 ft, over the markers you will start the flare and touchdown after, within the touchdown zone.
In the picture below you can see the aiming point markers (big white blocks) aligned with the PAPI lights. This should be the focal point until starting the flare, upon starting the flare, shift your focus to the end of the runway, this will enable you to judge your height, rate of descent and any deviations from the centerline way more accurately. When following an ILS glideslope or PAPI you will end up at the two white blocks, touchdown will happen after those two large white blocks, within the touchdown zone.
One misconception which might arise from doing these landing challenges is that the aiming point markers should be the touchdown point. This might causes people to fly a steeper approach or cross the threshold below 50 ft. The aiming point markers are just that, an aiming point and not a touchdown point. Following a 3 degree path (e.g. following ILS glideslope, or PAPI) you will end up at the aiming point markers where flare is initiated, touchdown therefore occurs after the aiming point markers, within the “touchdown zone”. Only big airliners will actually touch with the main landing gear on the markers since the cockpit is the part of the aircraft following the glidepath, therefore when the flare is started with the cockpit approaching the markers, after a short flare the main gear would touch on the markers.
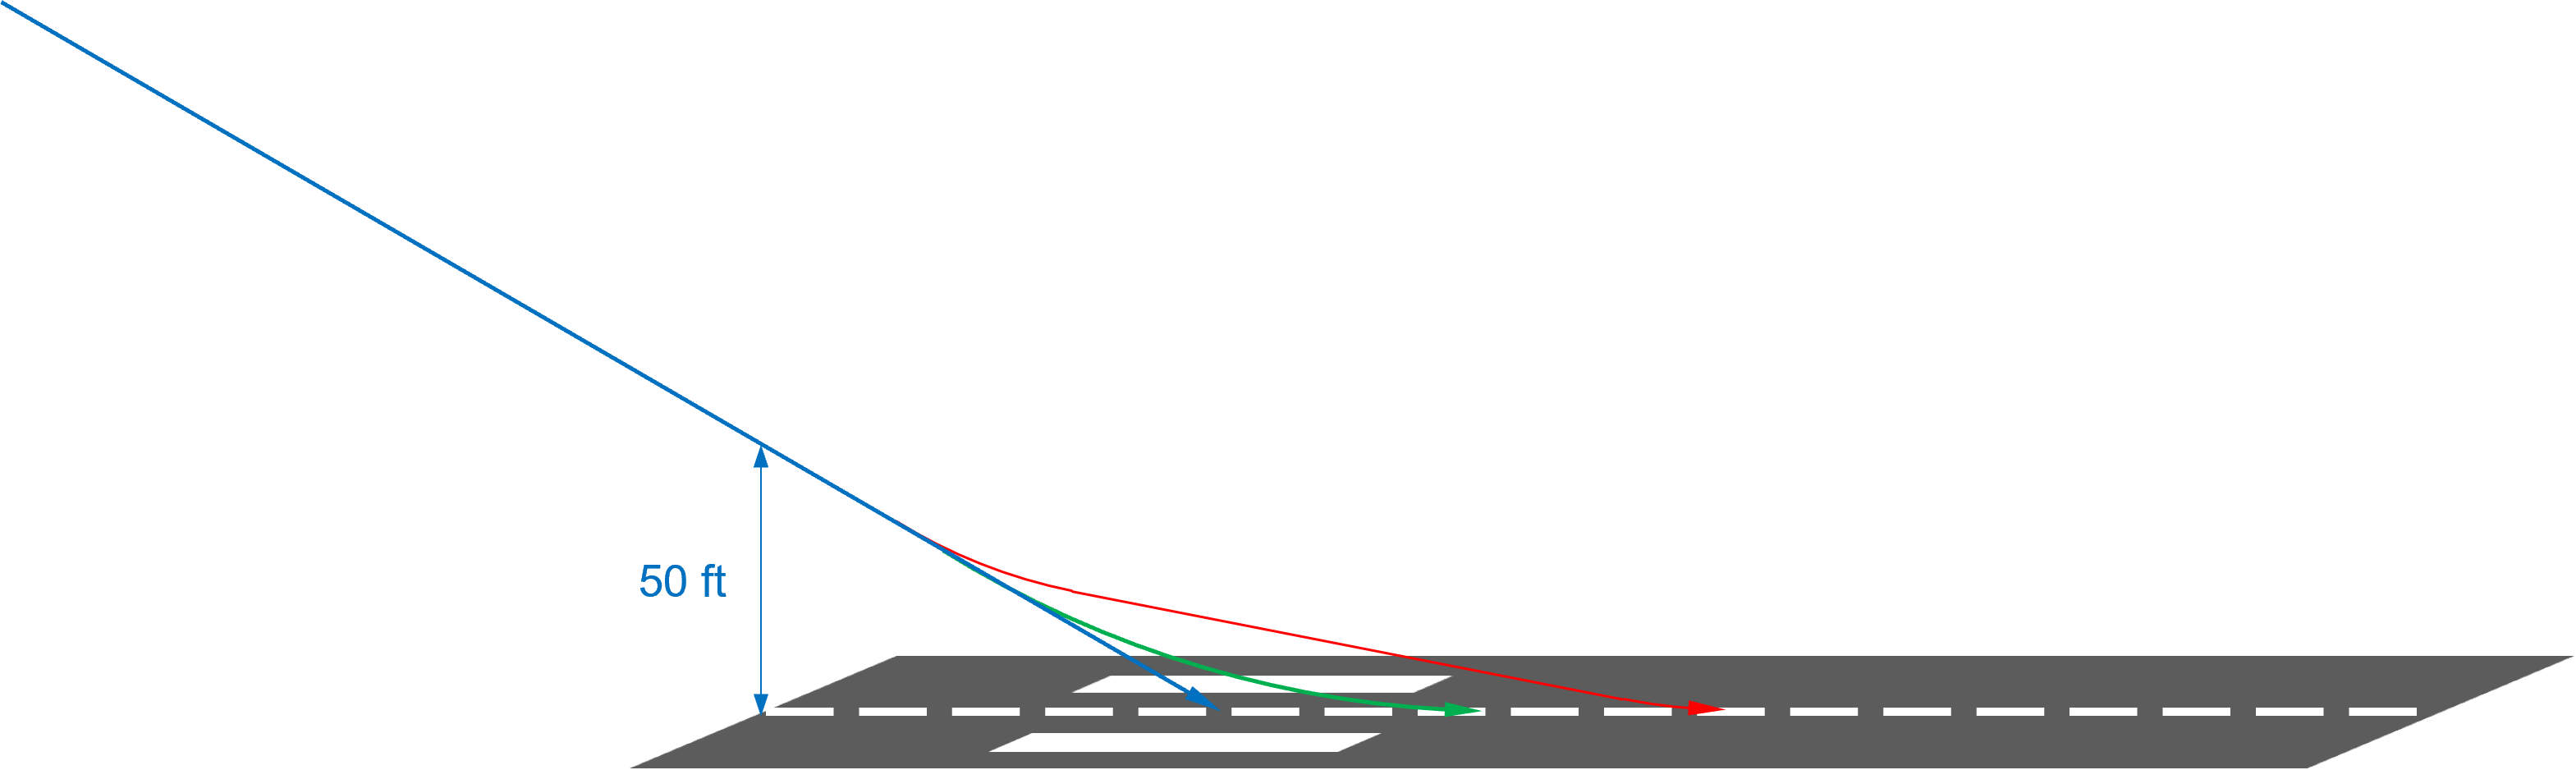
The tendency to “pre-flare” should be avoided, instead fly a constant path to the runway until starting the flare, the flare itself should be a continuous, smooth pitch-up until reaching level flight just above the runway. To illustrate what I mean with “pre-flare”, the blue line is a 3 degree path towards the aiming point markings without flare (not recommended ![]() ), the green line is a properly executed flare, starting at the correct height in a smooth “round” transition into a level flight above the runway. The red line is a early flare followed by a shallow, continued descent towards the runway and then transitioned into level flight above the runway, extending the landing distance.
), the green line is a properly executed flare, starting at the correct height in a smooth “round” transition into a level flight above the runway. The red line is a early flare followed by a shallow, continued descent towards the runway and then transitioned into level flight above the runway, extending the landing distance.
To the question, when to initiate the flare, there unfortunately isn’t an easy answer. This is depending on the aircraft type. The distance between the landing gear and the ground when following a 3 degree glide path is lower on a Boeing 747 than a Cessna 172. Additionally a Boeing 747 has a higher approach speed and more inertia which means it takes more altitude to arrest the descent. With GPWS radio altitude call-outs its a little easier on bigger aircraft and usually some reference to radio height as when to start the flare is defined in the FCOM. On smaller GA aircraft it comes more down to experience. Be aware that again, a wide or down-sloped runway may cause the illusion of being low so flare is started too early while a narrow or up-sloped runway might trigger a late flare.
Upon initiating flare, simultaneously and smoothly reduce the thrust to idle and raise the nose. Shift your focus to the end of the runway, this way it becomes easier to judge height above the runway, vertical rate, alignment of the nose with the runway centerline and drift in case of crosswind etc. Hold the aircraft off the runway until the aircraft reached the correct landing attitude. Although landing technique varies per aircraft type, generally you don’t need to hold the aircraft off the runway as long as possible (until the stick is full back into your stomach), neither is it necessary to stall the aircraft onto the runway.
The purpose of the flare maneuver is to achieve the landing attitude (landing on main landing gear before nose gear) at a safe vertical rate. Holding the aircraft off the ground any longer is usually unnecessary and only extends the landing distance. Simply hold the aircraft off the ground until the main gear will touch before the nose gear, then gently lower the aircraft onto the runway. Most airliners naturally have a nose-up attitude and the flare basically means “rounding” the flightpath to touchdown, ideally hitting 0 ft/min rate of descent at the moment of touchdown occurs, there is no level-flight-over the-runway segment.
While a soft touchdown is the primary indicator for a safe and successful landing for passengers ( ![]() ), this is absolutely not a requirement. Touchdown needs to occur at a safe vertical rate. A soft touchdown is not a requirement and should not be the aim. It is far more important to touchdown safely within the touchdown zone than extending the flare in the attempt to make a soft touchdown. Also, don’t keep power applied during flare to achieve a smooth touchdown as this will extend the flare.
), this is absolutely not a requirement. Touchdown needs to occur at a safe vertical rate. A soft touchdown is not a requirement and should not be the aim. It is far more important to touchdown safely within the touchdown zone than extending the flare in the attempt to make a soft touchdown. Also, don’t keep power applied during flare to achieve a smooth touchdown as this will extend the flare.
Remember: Its nice if a soft touchdown occurs, but it is by no means a requirement for a safe landing and should not be the aim. It is far more important to land safely within the touchdown zone, at a safe vertical rate with plenty of distance to stop instead of extending the flare in an attempt to achieve smooth touchdown.
Landing rollout
After the main gear touches down, “de-rotate” and softly lower the nose gear onto the runway. Then maintain runway centerline and keep ailerons into the wind. Unless performing a soft or short field approach, do NOT hold the nose gear of the ground, aerodynamic braking isn’t an efficient way to slow down and it will reduce nosewheel steering effectiveness. Use deceleration devices according to conditions and slow down to vacate the runway at taxi speed. When the aircraft is installed with reversers, activate the reversers as soon as touchdown occurs, unless necessary to safely stop the aircraft, cancel reverse thrust timely to prevent Foreign Object Damager (FOD).
Crosswind landings
Work in Progress
Landing Performance
Work in Progress
Runway excursion prevention
Although this video isn’t updated with the new GRF and LDTA concept, it still is a good video! I will try to update this section with some more details when I have the time!

Key-points for a successful approach and landing
A summary of the key-elements for a successful approach and landing:
Approach:
- Stabilized approach (only small correction in flight path required)
- Correct approach speed (1.3 x stallspeed + wind correction)
- Flaps in landing configuration and all checklists and briefings completed.
- Aiming point should be aiming point markings (“blocks”).
- Keep scanning: airspeed → runway → airspeed → runway etc.
Landing:
- Crossing threshold at 50 ft “screenheight” at Vat (minimum 1.3 x stallspeed)
- Continue 3 degree glidepath to aiming point markers.
- Upon starting the flare, shift focus towards the end of the runway.
- Start flare at the height corresponding to the aircraft type and prevailing conditions.
- Power idle, aircraft flight path is “rounded” into level flight just above the runway.
- Back-pressure is increased and aircraft kept off the ground until reaching “landing attitude”.
- Touchdown is achieved at a safe vertical rate.
Rollout:
- Nosewheel is lower gently onto the runway.
- Use of deceleration devices, brakes, spoilers, thrust reversers.
- Directional control maintained with rudder, ailerons into the wind.
- Aircraft vacates the runway at taxi speed.
Myths and common mistakes
There are a lot of myths and flawed techniques circulating on the forums but also in real life, below I will mention some of those:
- Remembering the nose-attitude on approach and distance (usually in fingers) between the engine cowling and the aiming point → the nose attitude on approach is depending aircraft configuration, weight, speed, and head / tailwind component. A technique that always works, no matter the conditions is focusing on the aiming point to determined if it you are flying straight towards it (stationary in the windshield), overshooting (moving down, eventually disappearing below the nose) or undershooting (moving up).
- During flare hold the aircraft off the runway for as long as possible (stick full back) or stall the aircraft onto the runway → while true for some aircraft types (tail draggers) this has absolutely no use on most aircraft. It extends the landing distance and limits the distance available to safely stop the aircraft. The aircraft should be held off the ground until enough energy is bled off and reaching “landing attitude”, this means touchdown occurs on the main landing gear before the nose-gear. When there is a strong crosswind it might even be dangerous to run out of energy above the runway.
- After touchdown, keep the stick back and hold the nose landing gear off the ground → ONLY do this if the runway surface is in bad condition or on unpaved runways, this will prevent damage to the nose landing gear and / or propeller. Keep in mind that this limits / eliminates nosewheel steering effectiveness. During a short field landing this is also a proper technique to help transfer weight onto the main gear and increase braking effectiveness, in this case the nosewheel steering will likely remain effective to some degree as using the wheel brakes cause a nose down pitching moment. Only in these conditions hold the nosewheel off. Be aware that aerodynamic braking is inefficient and not a proper technique.
- Aiming point markers is where the touchdown should occur → Aiming point markings are just that, an aiming point, not a touchdown point. A normal approach and landing is flown using a 3 degree glidepath towards the aiming point markings, crossing the threshold at 50 ft, flare is then initiated over the markers and touchdown occurs behind the markers within the touchdown zone. Only big airliners with the cockpit far in front of the main gear will likely touchdown on the markers. In such a case, flare is started with the cockpit approaching the markers, the flare is usually brief and only used to reduced vertical rate after which the aircraft is immediately lowered onto the runway. In case of short-field or spot / precision landing you could decide to touch anywhere else on the runway but this isn’t standard.
- Flare is initiated … m from the intended touchdown point → The point where flare is initiated can not be defined as a horizontal distance from the touchdown point as it is depending on many conditions, for example wind. Starting flare at the same distance from touchdown with no wind versus a 30 kt headwind will result in an undershoot.
- Cutting the power before start of flare → I am not aware of any aircraft which needs the power to be cut before start of the flare, usually the aircraft is flown at a speed equal to Vs + 30%, further deceleration before start of flare is neither necessary nor safe. Maintain speed until start of flare, then simultaneously reduce power to idle and raise the nose.
- A soft landing is a safe landing → A soft touchdown is absolutely not a requirement for a safe landing, the touchdown needs to occur at a safe vertical rate obviously. Aiming for a soft touchdown might cause extending the flare or landing with power on resulting in long landing. It is far more important to aim for a safe touchdown within the touchdown zone. On wet or contaminated runway a firm, positive touchdown is even recommended.
- When being too high on approach, you could perform a side-slip → For some aircraft where visibility over the nose is limited, side-slipping or performing s-turns might be necessary to see the runway. It is however not a commonly used technique and doesn’t fit with the stabilized approach concept. Side-slipping on approach is also not without hazard, when bleeding off too much speed you might drop a wing and enter a spin. On top of all that, airspeed indication becomes unreliable when slipping. Safest option would be to perform a go-around and simply try again.