NOTE: I wanted to make this a guide and applied to do so but haven’t ever heard back. So, as I see this as a pressing issue for many, I’m posting it here.
Key Concepts
- Assigning an input (be it keyboard key(s), controller buttons, or controller axis) to a pre-existing command, and making it “stick”, is what this is all about.
- The game has a long, long list of commands. To see all possible commands, go to Options/Controls/Keyboard/Default and set the filter to ALL. Then expand each group of commands in turn. As you will quickly notice, you will rarely if ever have a need for the vast bulk of these commands or can’t use them until the relevant DLC (gliders, helicopters, live weapons, etc.) comes along. So, the primary goal is to pick out only the commands you will actually use and assign a keyboard key, a combination of keyboard keys, or a controller button to (“controller” here means joystick, yoke, HOTAS, throttle, button panel, mouse, Xbox gamepad, whatever). This is best done by making a custom keyboard profile (see below).
- Any dedicated flightsim controller worth buying comes with its own software to program commands into it. Using this software is FAR, FAR, better than not. If you don’t use this software, usually 66% to 90% of the controller’s base functionality will not be available. MSFS does not recognize modes, does not allow reconfiguring hats from 4-way to 8-way, etc, and basically treats every $300 dedicated flightsim gizmo as an Xbox controller with more buttons. So if you own such a thing, BY ALL MEANS download its software and learn to use it. Otherwise, you’re throwing money away.
- The basic convention of dedicated flightsim controller software is to turn the HOTAS, stick, yoke, button panel, or whatever into another keyboard. That is, you assign keyboard press(es) to each button on your controller and it’s the same as if you’d typed those commands in on the keyboard. This is why it’s imperative that you either learn the rather convoluted MSFS default keyboard commands (see above) or create your own custom keyboard profile with your own set of key bindings that’s more understandable to you. Either way, as long as you know what key(s) activates which command, you can program your controller buttons and hats to send that to the game.
- MSFS has default profiles for a wide range of dedicated flightsim controllers (plus keyboard and mouse). Most of these seemingly cannot actually be edited (as in, they might appear to accept changes, but they don’t save). You can’t even adjust axis sensitivity without creating a custom in-game profile. So, if you want to configure your controls to your taste vs. Asobo’s, you must create your own in-game profiles for most of your controllers. The only default in-game profile I haven’t seen a reason to change so far is the mouse.
- Note that in-game controller profiles are separate and distinct from any profiles created by your controller’s own software, and they do not conflict. IOW, you will need both to get the most out of your expensive dedicated flightsim controllers.
Main Controls Screen
The new Options//Controls menu looks like this:

At the top, just below the title line, is a row showing all the controllers you currently have plugged in and the game has detected. Note the scroll arrows on the ends of the row. If you have more controllers than will show up at once, use these arrows to find the ones you can’t see. In my case, my stick/throttle HOTAS is off the right margin.
Within the row of controller names, the selected controller will be highlighted and will show the in-game profile that it is currently using (in this case, the default keyboard profile). If you’ve created your own profile(s), the scroll arrows at the sides of the profile name will be active, allowing you to page through your profiles to select the one you want to use. This selection is saved automatically so next time you start the game, it will be using the profile you had selected last time. NOTE: these are the IN-GAME profiles, separate and distinct from any profiles you create outside the game with the controller’s own software.
The rest of the screen is divided into 3 columns. At the top of the left column is the sensitivity button which brings up a screen where you can adjust the sensitivity and deadzones of your axes. More on this later.
The rest of the left column is controls for searching for both commands and assigned inputs. For example, suppose you try to assign the key X to “Increase flaps” and get the message that X is already being used by some other command. You can “Select an Input”, enter X, and see what that other command is. There’s also a “Filter” selection that will display all commands, commands with keys/buttons already assigned, and “essential” commands (this latter I find pretty useless). Finally, at the bottom is a button to expand or contract the groups of commands in the central column.
The wide central column shows the commands available for the selected controller. These commands are grouped and subgrouped. For instance, the Power Management group contains subgroups for throttle, mixture, and prop, each of which has a number of related commands in it. Also note that each command can be given 2 different keys/buttons for the selected controller.
The right column is just a picture of the selected controller, to give a visual verification you’re editing the profile for the correct controller.
So, in general, the way you use this screen is as follows:
- Select the desired controller in the top row.
- Select the desired profile for the selected controller.
- Find the command you want to assign a key/button to in the central area, either by scrolling through them manually or by using the various search options in the left column.
- Enter the key/button you want to use for that command (more on this later).
- Hit the “Apply and Save” link at the bottom of the screen.
- Repeat for another controller or go back to flying.
NOTE: This whole process can be done in-flight. Hit ESC, then go to Options/Controls. Make your changes, Apply and Save, then Go Back and finally Resume.
In-Game Profiles, Their Importance, and How To Create Them
The 1st time the game detects a new controller, it will give it a profile called “Default” (at least if recognizes the controller to begin with). So, the 1st time you run the game, ALL your controllers will be using the “Default” profile. This means the key bindings (in the keyboard profile) and button assignments (for your flight controller) will be what Asobo thought was best. You probably won’t agree so will want to change things. For this, you will need to create your own, new profiles.
NOTE: It seems like changes made to the default profiles don’t survive shutting down and restarting the game. This is probably due to the automatic file verification that happens as part of “Checking for Updates” on launch. I’m guessing the default profiles are on the list of files this checks and if they’re different from the original version, they get replaced. I don’t know, but that seems to match the reported symptoms. While this will likely get patched at some point, I think it’s better practice just to make your own profiles anyway.
There are 2 ways to create a custom profile: forced and voluntarily. “Forced” happens when you’re using the default profile and change the sensitivity settings. The game won’t let you make this change to the default profile, so creates a new profile and prompts you to give it a name.
“Voluntary” is what you should be doing anyway IMHO rather than mucking about with the default profiles. To create a new profile, do the following:
- Select the controller you want to make the new profile for
- Go down to the bottom margin of the screen (need to be in full screen mode, it doesn’t seem to show in windowed mode–use ALT-ENT to toggle between full screen and windowed) and click the “PRESET MANAGER” link (see pic above in the “Main Screen” section).
- The “Preset Manager” is a row of icons with mouse-over tool tips, but they’re pretty easy to figure out graphically. You want to click on the gaint “+” sign.
- You will then be asked to name your new creation. Give it something descriptive so, if you end up making several profiles for the same controller, you can remember which does what.

I STRONGLY recommend creating your own keyboard profile to make key bindings you’re already habituated to from other games. Not only does this make entering keyboard commands easier (as you don’t have to memorize anything new), but odds are your controller-software profiles from other games will now work in MSFS, at least for the most part, so no need to make new ones from scratch. You will also almost certainly want to adjust flight controller sensitivity so will be forced into making new profiles for them for this reason even if you don’t want to change any of the button assignments.
And if you use your flight controller’s own software to make profiles outside the game, you will CERTAINLY want to make new in-game profiles for your flight controllers that have ONLY the axes assigned, none of the buttons.
Editing Your Custom In-Game Keyboard Profile
The keyboard profile is the “One Profile to Rule Them All” because it defines all the key bindings. The default MSFS keyboard profile is not at all similar to any other game I’ve played and has a lot of good keys tied up with commands you’ll likely never use. Thus, it’s best to start from scratch IMHO. Which is what happens when you create a new keyboard profile as described above–it will be a totally blank slate and you’ll have to enter EVERYTHING you want into it.
NOTE: I recommend using SOME of the bindings in the default keyboard profile just so the game functions properly. This means you should look at the default keyboard profile and write down the keys used for the following commands (at a minimum, depending on taste).
- EVERYTHING in the “Menu” group. Otherwise, you won’t be able to navigate around the game’s menus very well.
- The Camera\Instrument views CTRL-1 through CTRL-9. These are essential even with TIR, at least on my small 1080 monitor. YMMV.
Otherwise, everything else is up for grabs. Set things up to be what you’re used to from other games.
NOTE: Think about the Drone Camera, too. This is great for getting nifty screenshots and pretending you’re walking around on the ground. Some folks use an Xbox gamepad for this but I find it easier to use the keyboard.
Anyway, whatever you do, the process of assigning keyboard keys to commands is as follows:
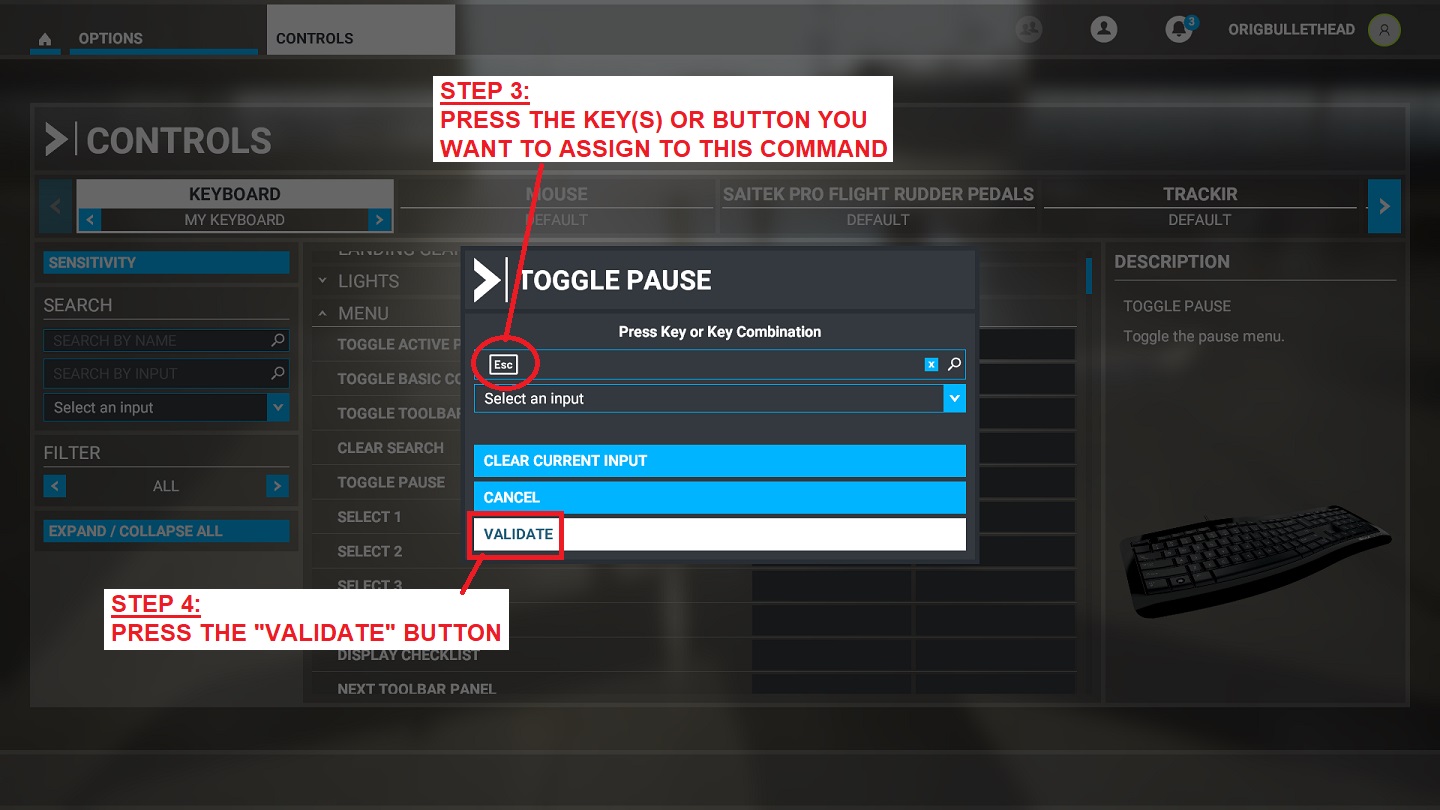
- Find the command you want to give a keypress to. In this case, I’m replicating the default “Menu” commands in my custom keyboard profile, so am going to put ESC in the 1st box of the “Toggle Pause” command.
- Click on the 1st box of the command.
- This will cause a box to pop up. The top line of this box has gray-out text saying “Search by Input”. Click on this line.
- With the “Search by Input” line selected, simply hit the key(s) you want to assign to this command. IOW, if you want CTRL+KP8 for this, hold CTRL and press KP8. Or just press a single key.
- One the key(s) appear in the top line, press the “VALIDATE” button at the bottom of the box. This saves your new input TEMPORARILY.
- To PERMANENTLY save your changes, you must hit the “Apply and Save” link in the bottom margin of the screen, which not only saves your custom profile but also makes it active in your current or next flight, as applicable.


NOTE: The above process is the same if you want to use “joystick buttons” (Button 1, 2, etc.) for your flight controllers. The “joystick buttons” are essentially just additional keyboard “letters” as far as the game is concerned, but as the keyboard can’t create them you can only do this when editing the flight controller’s profile. However, I STRONGLY recommend NEVER using “joystick button” inputs for anything unless you don’t even have a keyboard, only a gamepad. Instead, create a custom keyboard profile to set your desired key bindings, then use that to make a proper flight controller profile outside the game using its own software.
Creating an In-Game Flight Controller (Axis) Profile
Having established your preferred keybindings in your custom in-game keyboard profile, it’s time to work on your main flight controllers (stick/throttle/yoke/whatever). The main difference here are the axes, which really work pretty much the same as key presses. If you use the “joystick buttons” instead of your controller’s own software, then set your buttons up EXACTLY the same as you did defining keyboard presses. OTOH, if you DO use your controller’s own software, DO NOT set up any buttons in the in-game profile. ONLY set up the axes. You’ll define all the buttons and hats outside the game, based on your custom keyboard profile.
Either way, to define an axis in your custom in-game controller profile, do the following:
- Select the controller on the main screen.
- Make sure your custom in-game profile is selected for that controller
- Find the appropriate axis (elevator, aileron, rudder, toe brake, elevator trim, mixture, prop pitch, whatever) as with defining key bindings
- Click the box where the input will go, as with defining keybindings.
- Click on the top line with the gray text that says “Search by Input”
- Wiggle the appropriate part of your controller that you want to map to this in-game axis. IOW, if mapping elevator pitch, move the thing on the controller you want to use for elevator pitch. Direction of movement really doesn’t matter.
- Hit the “VALIDATE” button, and then “Apply and Save” as with defining key bindings.

NOTE: Some axes have different axis command options so be sure to pick the appropriate one for what you’re doing. For example:
- The engine controls (throttle, mixture, and prop pitch) have 5 choices each: A single command to affect all engines at once, plus individual commands for each engine separately. The latter allows those with multi-handled throttle quadrants to get full control. If you only have a single throttle lever (like I do), use only the axis that affects all engines (it won’t say “engine 2” or whatever), then use the mouse in virtual cockpit mode to move the handle(s) for an individual engine as needed.
- Some axes have a choice between being 0-100% or +/-100%. The former is best for throttle, prop, and mixture, the latter best is for flight controls. Elevator trim is an example of where you have both options (most axes do not). So for elevator trim, be sure to go with the +/-100% axis.

NOTE: After you’ve assigned a flight control movement to an in-game axis, moving that part of your controller will make a bar move back and forth below the command’s line on the main Controls page, and you can see if it’s going in what you think is the right direction. If not, you can check the “Reverse Axis” box. In my experience, the axes for elevator, aileron, rudder, throttle, and toe brakes default to the correct direction. However, I had to reverse elevator trim, mixture, and prop pitch. YMMV.
Adjusting Axis Sensitivity and Dead Zones
Control axis sensitivity and dead zone can be adjusted by:
- Selecting a controller with defined axes (will not work for the keyboard, for example)
- Pushing the “SENSITIVITY” button at the top of the left column of controls on the main Options/Controls screen (see pic above in the “Main Controls Screen” section).
Before doing this, however, it’s important to understand what “Sensitivity” means. In a nutshell, it’s like this:
- 0% controller deflection always equals 0% control surface (or brake pad) deflection.
- 100% controller deflection always equals 100% control surface deflection.
- Sensitivity setting therefore only affects the relative motion of the control surface to the controller at different points in the controller’s travel. They always start and end in the same places.
- Dead zones define an area of controller movement that does not move the control surface at all. However, once the controller deflects beyond the dead zone, the control surface does NOT start moving from zero deflection. Instead, it instantly jumps to the position it would occupy at that point on the graph for that amount of controller deflection (based on sensitivity setting).
From the foregoing, you should now understand these things:
- 0% sensitivity is always (except for dead zones) a 1:1 correspondence between the % of controller deflection and the % of control surface deflection. This is the most realistic option for airplanes controlled directly by pushrods and cables. If the plane is fly-by-wire or has something in the system that alters control movement based on speed, altitude, FMC settings, and whatnot, all bets are off as to how realistic this is. However, it’s the easiest setting to get comfortable with so I recommend it.
- Positive sensitivity causes more control surface movement for a given amount of controller deflection in the early part of controller movement, so the control surface is “ahead” of the controller itself. This reverses in the latter part of controller movement, so the controller “catches up” with the control surface and they both arrive at 100% deflection together. This can result in a twitchy plane. Thus, I don’t recommend ever using positive sensitivity unless you have a disability that limits the range of motion of your hands/arms to the point that you can’t move the controller its full extent. I used to have a friend with serious ALS who needed to do this.
- Negative sensitivity has the opposite effect. In the 1st part of controller movement, you get less control surface movement so the controller “gets ahead” of the control surface to begin with. But after a point, you get more control surface deflection for a given amount of controller movement to let the control surface “catch up”. This can cause over-control at larger stick deflections, which you’re more prone to do given the lack of authority in the early phases of controller movement. But folks using a yoke (which pretty much guarantees over-control anyway due to poor ergonomics) might find this helpful, at least in non-aerobatic flight regimes.
- Large dead zones make for a twitchy plane because they eliminate the ability to make fine adjustments. IOW, with 0% sensitivity and 5% deadzone, the minimum control surface movement is ± 5% with nothing in between.
So, my recommendations are as follows:
- For ALL axes, put sensitivity at 0%. Unless you have a disability, then go as far positive as you need to. Or unless you use a yoke, in which case a bit of negative might do you good (and consider buying a HOTAS).
- For elevator, aileron, rudder, and toe brakes, have no more than a 1% dead zone (unless you have negative sensitivity, in which case you can go a bit bigger).
- For all other axes (throttle, mixture, prop pitch, trim, etc.), have a 0% dead zone.

And that’s all I have. I hope you found this useful.