The post is in the process of filling! Be patient!
Hi there.
Much to my regret, I did not manage to create a video tutorial due to a catastrophic lack of knowledge of the English language, so I will try to describe it in text using Google translate.
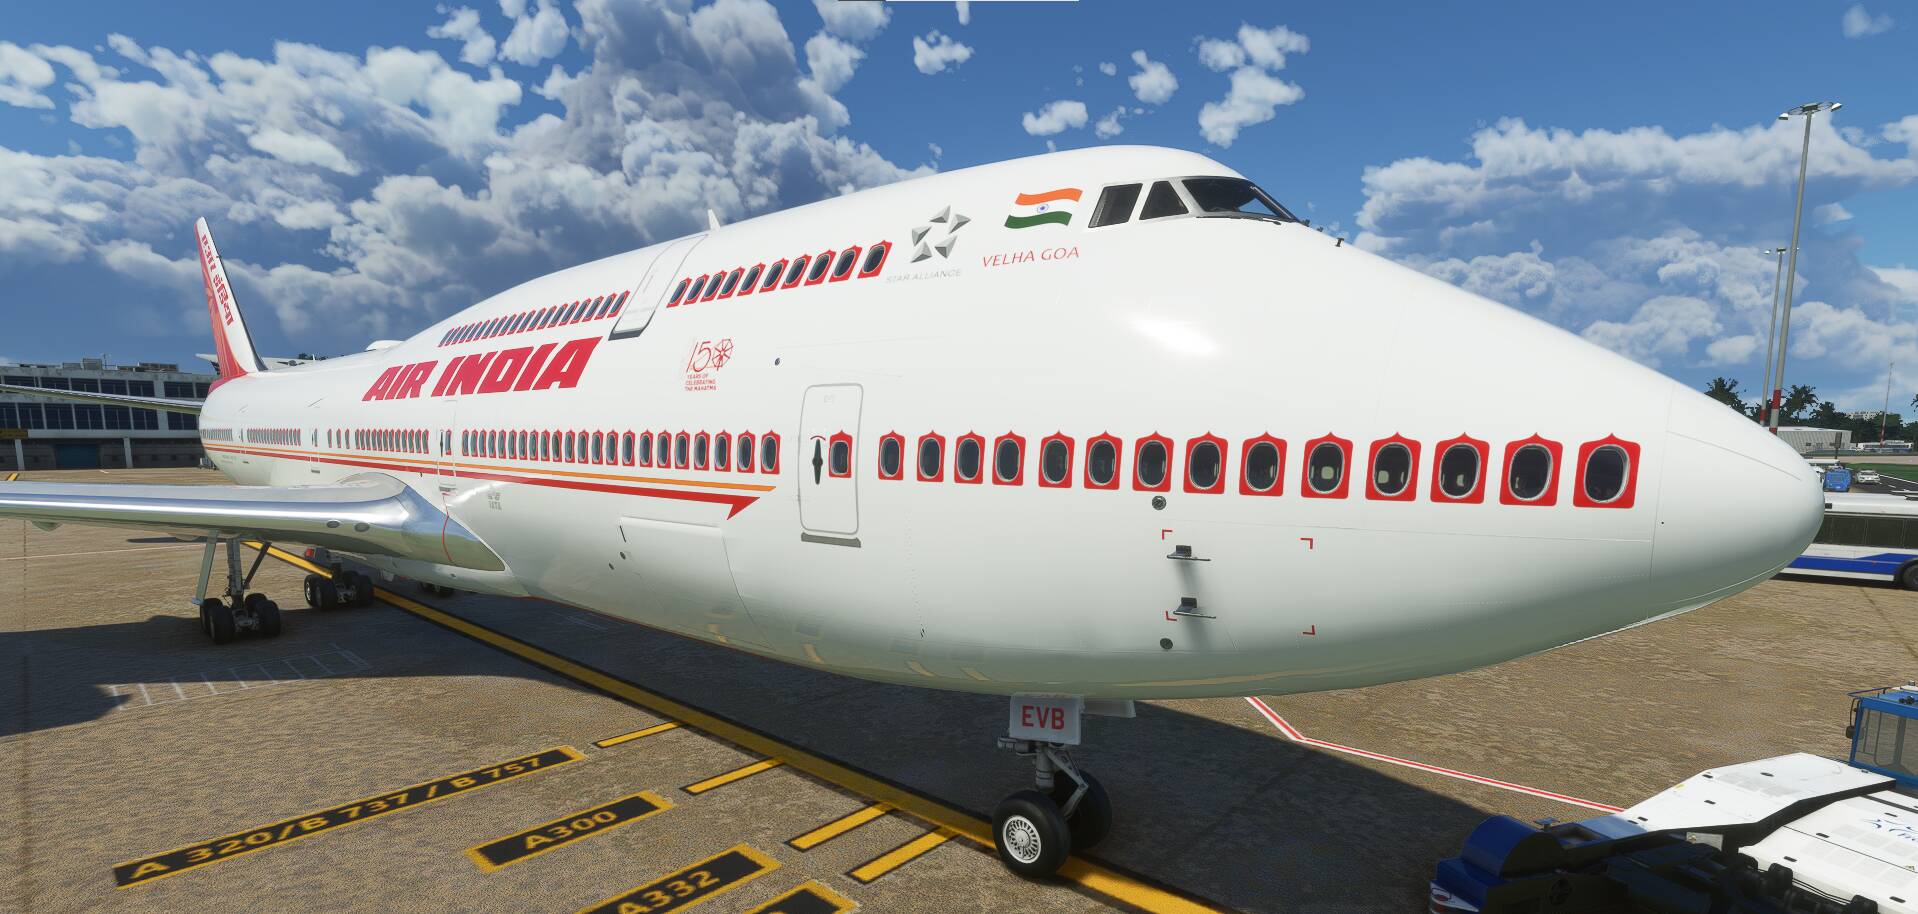
This method was tested by me on liveries for Boeing 747-8i where the problem of mirror textures is especially acute. But it will also work for absolutely any aircraft.
The advantage of this method is that you no longer need to make super huge textures and deal with incorrect UV mapping, you just paint what you need on top of the plane. Large objects are like polygons, small objects are like small plates where you then put the texture.
The disadvantage of this method is that due to the binding to the main aircraft model, you will definitely have to update the livery every time, slipping the updated model (if the developer updates it) into the files for the final assembly.
So. Let’s started.
What we need to create:
- Blender. I am using the latest available version (2.92)
- Plugin GitHub - flybywiresim/msfs2blender2msfs: Fork of the official Blender glTF 2.0 importer and exporter designed for MSFS 2020 This plugin is used to import and export everything, other plugins do not give the desired result. I draw your attention to the fact that the plugin itself is not yet completed and not ready (do not fill up the developers with bug reports), therefore, errors may occur when importing a model or exporting it. But nevertheless, he does everything that we need, and we will fix the rest by hand.
- Photoshop, Paint.NET, Gimp any graphics editor for creating textures. We’ll need at least one additional texture with decals and color for our liveries.
- VisualStudio Code, Notepad ++, Notepad - or in general any text editor. We will have to modify the GLTF files. By their structure, they are a regular JSON file. And it is desirable to have an editor with a validator and ease of editing.
- NodeJS - the merging script is written in nodeJS. Perhaps later I will post the python version, but for now we will be content with what we have.
- A script in nodeJS written by the FBW team for merging models. https://github.com/flybywiresim/a32nx/blob/master/src/model/build.js
- The most important companions of any work. Patience and Mindfulness.
So. First you need to configure blender + GLTF addon.
After installing the blender - copy the io_scene_gltf2_msfs from the GIT to your addons folder.
Go to settings and fill in these fields:
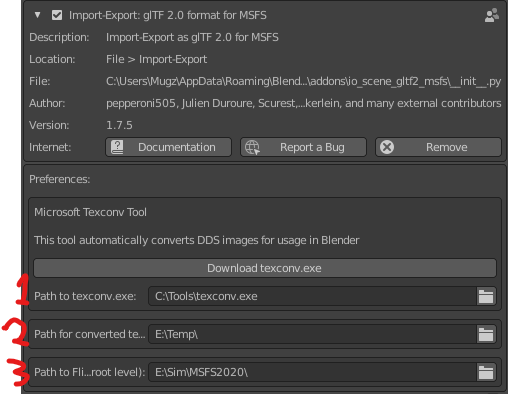
- Press download texconv.exe and then point to downloaded file. (This small tool need to convert DDS textures to PNG, because Blender cant work with DDS textures)
- Path for converted texture files. You can delete them sometimes. It’s just for working.
- Path for MSFS2020 root folder, where is Community and Official folder.
So. First step is done.
Now we can import model to blender (i preferred to start from LOD00 model).

Press import and wait few minutes while model is imported.
ALARM! ATTENTION!: Sometimes the process may fail and you will see a partially imported model. For example, there will be only one wing or part of the fuselage. In this case, disable (temporarily remove) IndianFoxTechno / Carenado aircraft from the Community folder. I don’t know why this is happening, but when I import a model, I always remove the planes (all for insurance) from the Community folder.

If everything went well, you will see something like this. This is your plane with all objects. And we will need to delete some of the objects (we will not work with them and they will interfere more than help). For example Icing objects, collisions, external connections, objects inside the cabin or cockpit, import artifacts.

Finally, your imported plane should look something like this. (I left the standard decals, because in principle we can use them too, because they are already indented from the main object)
So. After import and a little cleaning, let’s get to work (don’t forget to save your blender file).
There are several methods for painting decals.
- You can just copy existing polygons
- You can cut the required shape in the object
- You can just start painting over the surface (turn on snap to face and go). I’ll show you two of them. Simple and a little more complicated.
First, let’s define where we will draw the decal. For example, I want to write AIR INDIA on the fuselage between the windows.
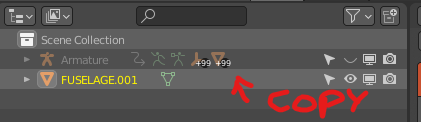
To do this, select the fuselage in the objects. You can do this by clicking to the desired object on the plane or select it in the outliner (for convenience, enable alphabetical sorting). Having selected the object, be sure to duplicate it (Shift + D, Esc) and drag it out of the parent (right click on the scene, Object Context Menu → Parent → Clear and Keep Transformation)

After that, our object will move to the upper level from the objects of the plane.
We can hide everything except the selected object with Shift + H.

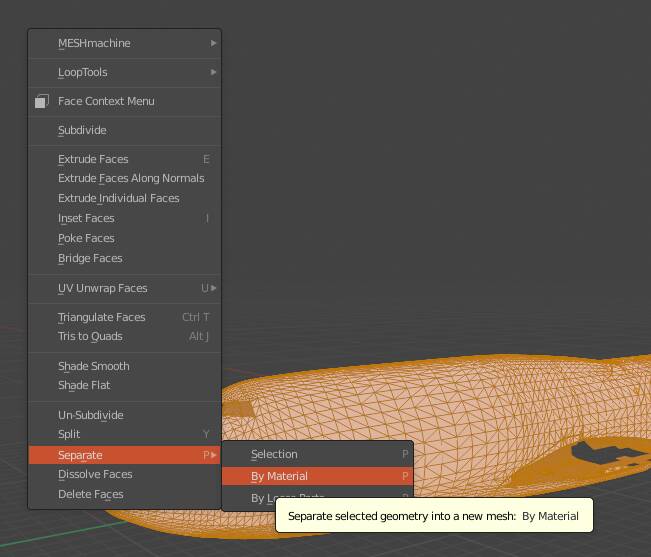
So. We have an object with which we will work. I want to draw your attention to the fact that often several materials are assigned to one object. Therefore, it is advisable to separate objects by materials. You can do it like this. Edit Mode (TAB) → Right Click → Separate → By Materials. This will allow us to work more accurately with face without overlapping faces with other material.
So. The first method is to copy the faces from the main object to the new one (decal). To do this, select the object and switch to edit mode (TAB).
Select FACE SELECT mode and disable X-RAY (if enabled). We don’t need faces on the reverse side yet.

Now let’s mark the faces that we think we need. Or in other words, the place where we want to place the text or texture.
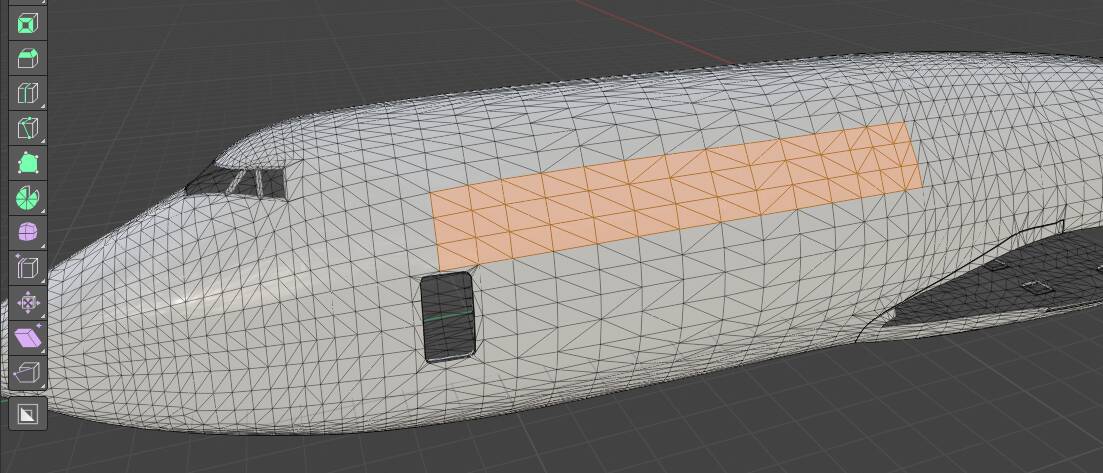
You can also shift-click on the eye to see the entire plane with selected faces. This will allow you to more accurately understand whether you are going the right way.

If you decide that everything is correct and chose what you need, duplicate the selected faces (Shift + D) and move them slightly along the X axis (Select the axis with the calculation of movement perpendicular to the faces. X-left / right, Y-forward / back, Z-up / down) at a distance of about 0.005m to 0.03m (in some cases, a larger distance is required to cover additional protruding objects.
You can also duplicate faces first (Shift + D, ESC). Then put the value in the window that appears.
Be sure to then click the right mouse button and select Separate → Selection. This will separate our decal from the main object.

Voila. We have the first decal ready. We can exit edit mode (TAB) and rename the object (and preferably the mesh).

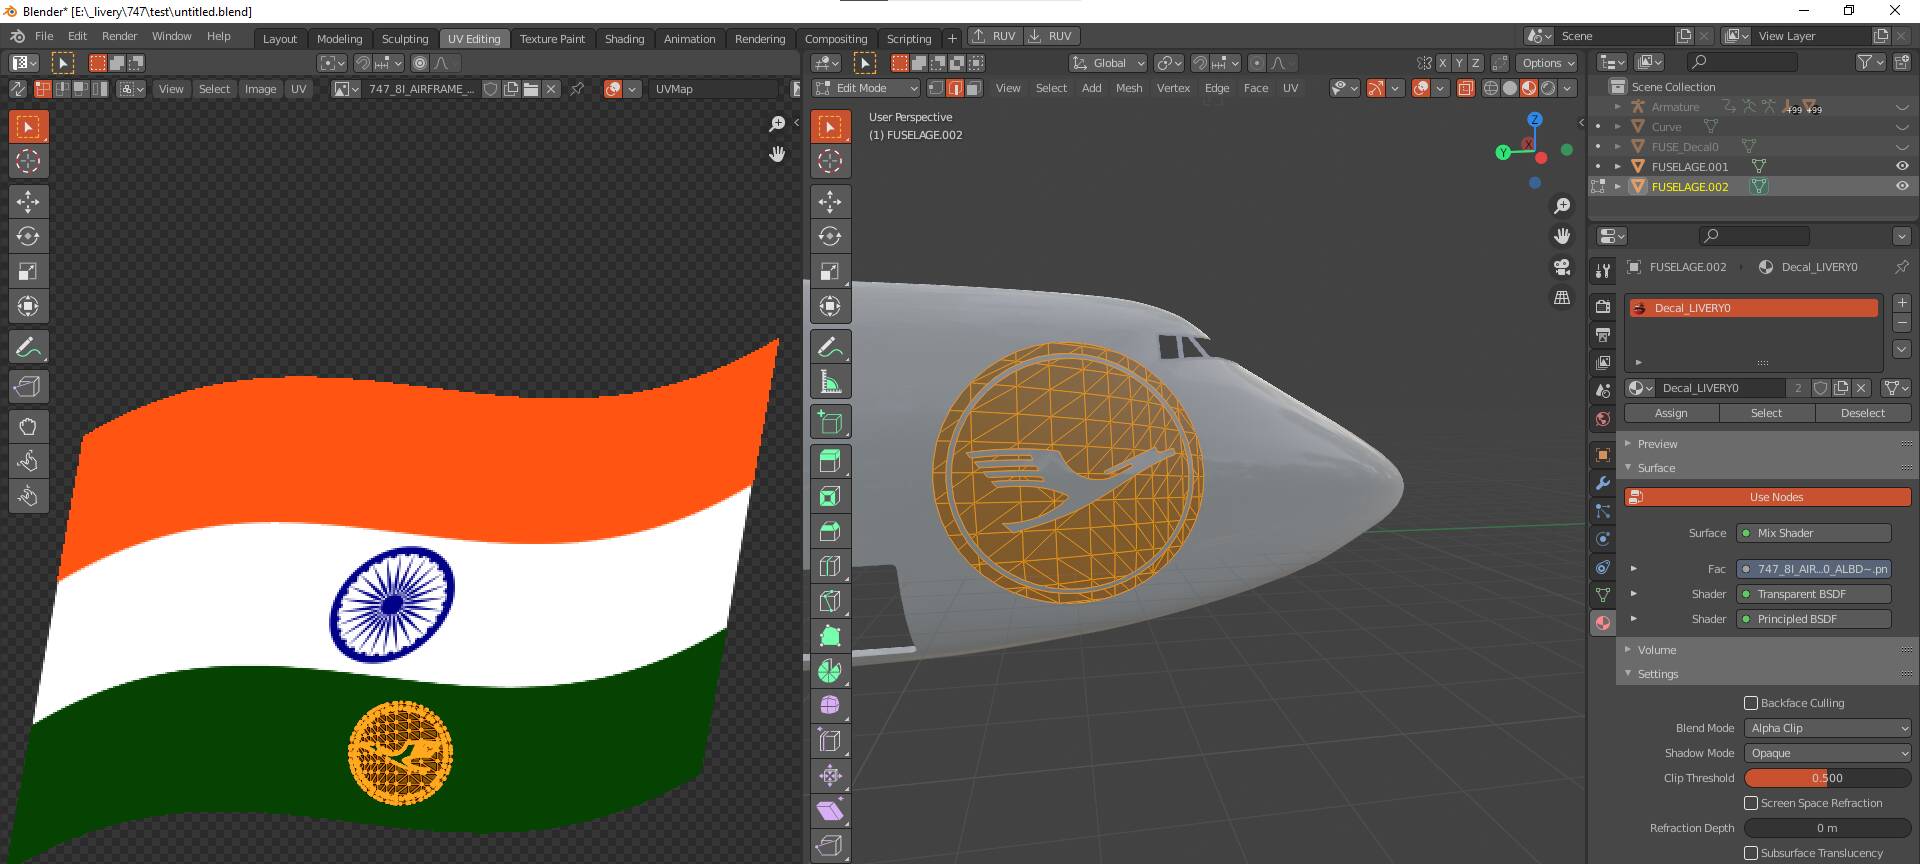
Now we need to create and assign a new material for our decal (others will use this material too). In general, there may be several materials, but this will complicate further work with them. I recommend using no more than three, and they should refer to one of your textures. If you are using one material, then you cannot place another object with the same material on top of the first. Therefore, materials can be split and display priorities controlled. We’ll talk about this later. In the meantime, we will limit ourselves to one, since We have one decal so far and is not overlapped by another decal.
First, let’s remove the material from our decal in the properties.

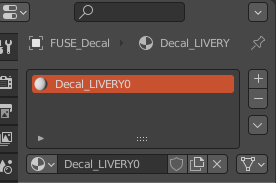
Then press the new button and name the material Decal_LIVERY0
For further work, I recommend switching to the Shading tab (it is more convenient to configure the material parameters there).
It is necessary to add to the material:
- Texture → Image Texture
- Shader → Transparent BSDF
- Shader → Mix Shader
The last two are needed for the transparent texture to display the transparency correctly.
Then we connect everything as in the picture. The rest of the parameters do not need to be changed. The end result will be corrected by hand. Also load the texture of the decals.
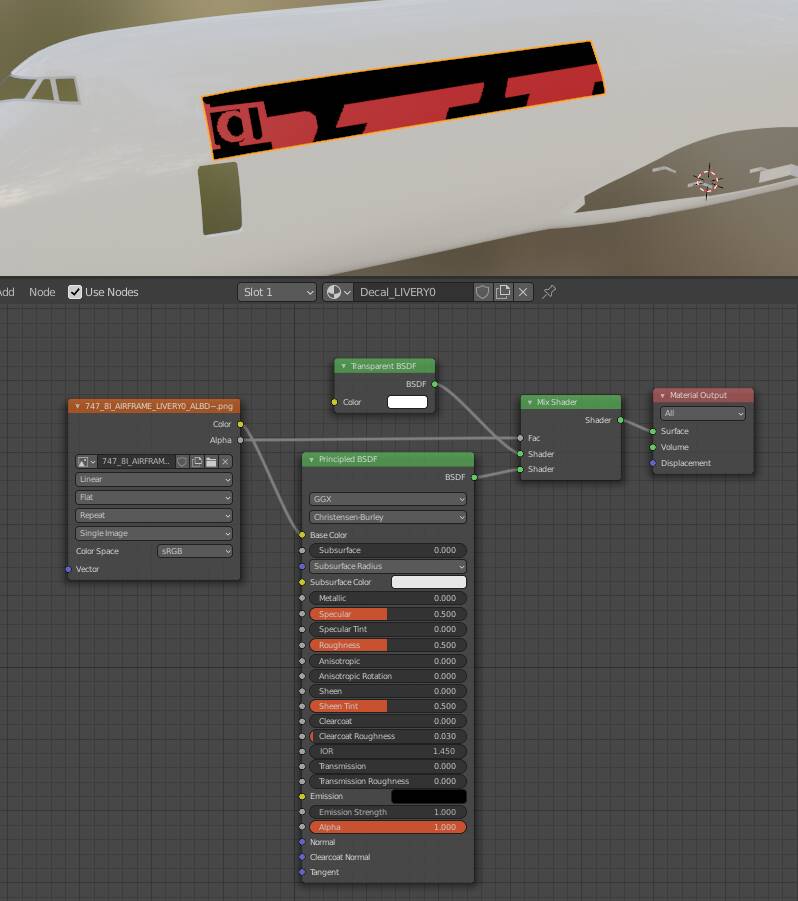
You may notice that transparency is still displayed in black. To fix this, change the material display setting from Opaque to Alpha Blend or Alpha Clip (choose which one is more convenient for you)

Now on the Layout tab you will have the transparency displayed correctly, but the texture itself will be “noisy”. To see the decal correctly and without noise (we don’t need noise, because we need to know exactly when the decal is covered by the main object, and to fix it), we need to switch to orthographic mode. In the future, all work must be carried out in this mode. It is important!

This is the texture file for example.
https://pasteboard.co/K1Ax1xm.png
The next step is to adjust the UV for our decal and position the texture as we want. Switch to UV Editing mode. We select all (A → Select All Toggle) or selected faces, if we already have a lot of them. Then select UV → Unwrap → Smart UV project in the left window (in some cases you can experiment with Cube Projection or just Unwrap. Use at your discretion or Google Youtube for UV wrapping. You should get something like this.

Next, in the left window, select everything (A) and place it on the texture as we need it. Using rotation (R), translation (G), scale (S). See the result on the right, with Material Preview turned on.
If the image is mirrored, then right-click in the UV window and Mirror X (or Y).

This completes our first decal. We can turn on all objects and see the result (we haven’t forgotten about Orthographic mode, right?)

In a similar scenario, we make decals on the other side, on the bow, under the fuselage, etc.
An important limitation, I haven’t found a way to do the wing decals yet because of the WING FLEX. There is a group of vertices and I could not get attached to it. Perhaps someone will find a way to implement this and complete the manual. I would be very grateful!
We will look at the places with animation further. For now, we are working with static objects. Mandatory requirement. If you have finished working with the decal (it is in its place) - apply all the changes to it. Ctrl-A → Apply All. Otherwise, merging models may result in unpredictable results. Example:

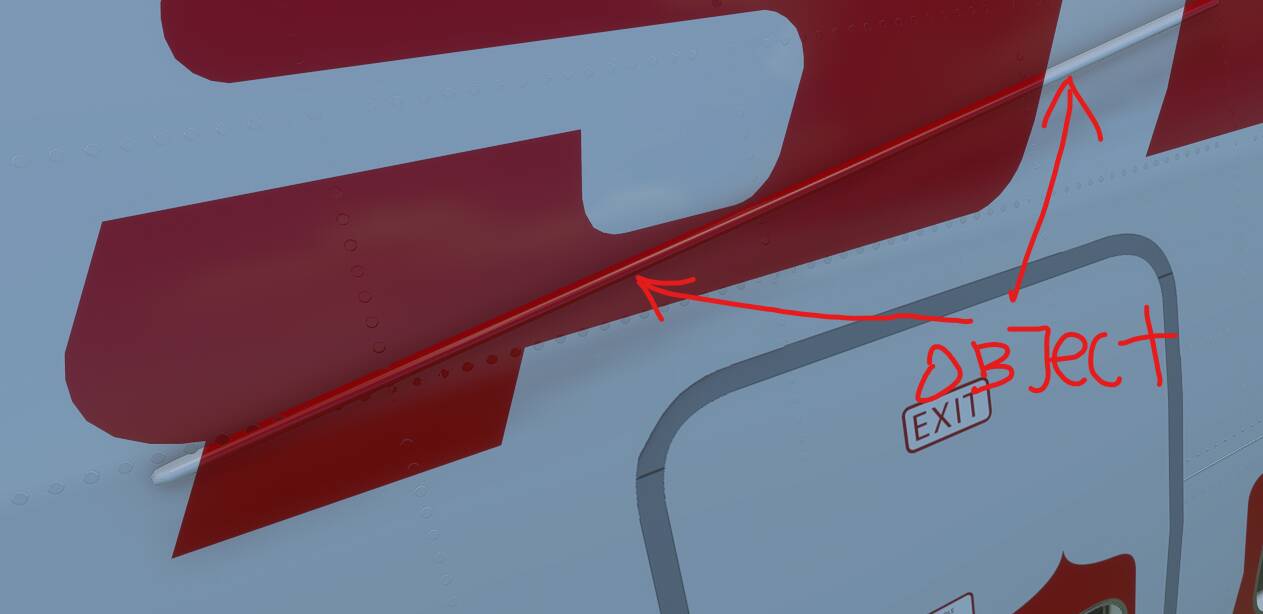
Now let’s add decals in the second way, namely by cutting them out of the main object. To do this, we need a drawing of what we cut out in SVG format, or you can draw it directly in a blender. For example, I am using the lufthansa logo which I already have in SVG format.
For now, turn off everything that we don’t need at this stage, including the first decal, and leave only the main object.
Do File-> Import-> Scalable Vector Graphics and select our file. After import, select it in the outliner and move it above the main object.
- Convert to MESH (Right Click-> Convert to Mesh)
- Let’s merge into one object (CTRL + J)
- Let’s pull it out of the imported collection (just by moving the object in the outliner)
- Delete the imported collection (so as not to interfere)
- Let’s set the origin. (Right Click → Set Origin → Origin to geometry)
- Let’s rotate the object the way we need it. We use a snap to one axis and rotate with the pressed CTRL. This will allow us to rotate strictly 5 degrees.
- Move the object to the approximate place where it will be unfolded.
- IMPORTANT! We need to select our object, go into edit mode (TAB), select all faces (A) and press (X). Select Limited Disolve from the menu that appears. Select the value at your discretion. I start at 1 degree. This will reduce the number of unnecessary points, edges, faces.

After these steps, you need to switch to a view along a specific axis (once again, let me remind you about the ORTOGGRAPHICS mode). This is important because the cut will be done at the angle you are looking at. This can be used to cut various patterns. But at this stage we need to cut out the Lufthansa logo line on the right side of our aircraft. Therefore, we press on the desired axis and the result should be something like this (we previously moved the logo as we need it and away from the plane. In Orthographic mode, the distance does not matter)

And now the fun begins. It may not work the first time, but we always have a great and powerful and incomparable combination CTRL + Z !!!
- First you need to select the imported logo (what we will cut)
- Then, holding down the SHIFT key, we select the main object (from where we will cut). The first object will be with a blue stroke, the main one with a yellow one.
- Switch to edit mode (TAB)
- Remove selection. Just click on an empty space.
- Go to the MESH menu → KNIFE PROJECT (option Cut Through will cut in another side also. Turn it off, if you not need mirrored cut in another side)

- Immediately after that, we can rotate the camera to make sure that the cut is correct, where it is necessary and what it needs.
- If everything is ok, right-click and Separate → Selection
- Voila! We have a new decal in the form of a new object!
- Exit the editing mode. (TAB)
- Select only the new object and switch back to edit mode (TAB)
- We carefully examine the object and all the connection lines at all angles with passion (other objects can be hidden so as not to interfere)
- If we find flaws, we fix them with our hands by moving the vertices with a snap to the vertices, edges, faces.
- If it did not work out, we repeat the process from item 1
In the final version, we should get a decal cut from the main object with all the accompanying details.

There is little left to do. Assign our material and UV mapping. Because the object does not contain any details, we can not bother with the sweep and just reduce it to a color square on our texture.
For example, I just made UV → Unwrap → Cube Projection and placed everything on the green part of the Indian flag.
The final touch for this decal is to move it away from the main object by the desired distance (0.005m → 0.03m).
By the way, after cutting, we have a hole in the working object, so do not hesitate to duplicate objects for work if you plan to cut something else there.

Well. In general, these are the basic and simplest techniques for cutting out decals from an airplane and repainting them for our needs.
Most importantly, don’t forget:
- Always save your work (on some steps in another file)
- Combine all decals into one object (CTRL + J)
- Apply changes CTRL + A → Apply All
- If you finish working with object - triangulate them in edit mode (select all → CTRL+T). You may need to make minor edits after triangulation. See next item.
- Carefully inspect everything and check for inaccuracies and jambs / artifacts.
Now for decals on top of other decals. You can, for example, make a decal in the form of a texture with an image, and overlay the cut text on it. For this, there is no need to cut another decal into the decals. Simply place the second decal on top of the first one. But! It is important here that the material is different (just with a different name, although with all the same properties and the same texture). In the future, we will be able to control the order in which the material is drawn.
Later I will tell you what to do with the animated part. Doors, Rudder, landing gear doors. We will forget about the wings for now, because my lack of experience in blender and understanding of how the game works with objects prevents me from implementing this. Until.
To work with animated objects, we will use the same techniques as before, but with some differences. The 747 already has pre-made decals on all animated surfaces. We’ll just use them (cut out of them) and assign our material to the finished decal. But the stages here are somewhat different.
Animation in blender is built on the type of non-linear animation, somewhere just keyframes per node. Somewhere skeletal animation.
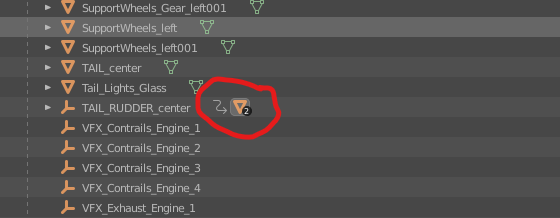
First of all, we need to find the object and its animation in the outliner. I’ll show you two examples. On the rudder and on the rear landing gear door.
Rudder.
- Select any rudder element in the main window
- Find the node where it is located in the outliner (don’t forget about sorting by letter)
- Usually the object is located in some parent, and we can identify it in the outliner as follows.
- Press SHIFT + H in the main window (hide all objects)
- But we need a parent (it contains the animation), so we shift the eye on the parent to show all objects in it, including the parent.
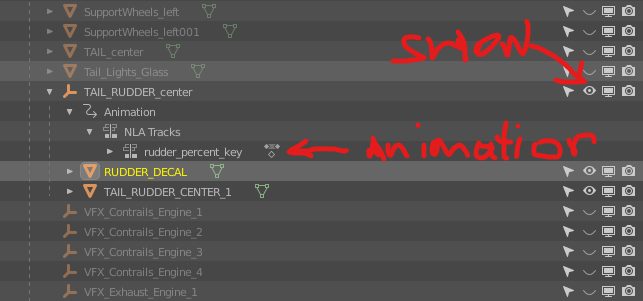
- The next step is to switch to the animation tab and select the Nonlinear Animation display mode (HINT: You can create a pop-up window, we will need it to work also in the Dope Sheet mode)

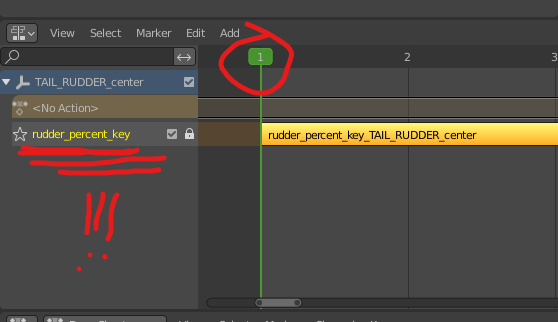
So. This is where the tricky part begins. We need to identify the length of the animation, write down the name of the NLA track (we will use it in the future). Below are screenshots showing the track name (double-clicking will enter edit mode and copy the name that you paste into the notepad). As well as the initial keyframe and the final keyframe. We will need these values.

After we have written out the values, we return to the Layout tab. Where we select the object necessary for baking the animation. In the case of a rudder, I recommend using RUDDER_DECAL because in the future we can cut additional decals from it (if we want) or use it for our own UV mapping. If there is no decal on the rudder (for example), then you can use the Rudder object itself, but you have to tinker with it to make it a decal.
Let’s continue.
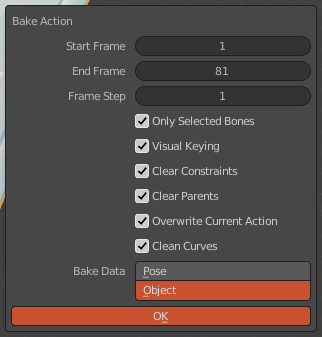
Chose RUDDER_DECAL.
- Menu Object → Animation → Bake Action
- We set the values from the previous steps. Start Frame - 1, End Frame - 81
- Set the rest of the fields by analogy.
- Press OK
Now we have a baked object with animation as a separate object (you can and should rename it).
Be sure not to forget about SEPARATE → BY MATERIAL as many objects contain multiple materials and most likely additional meshes that we don’t need. We need a solid rudder object.
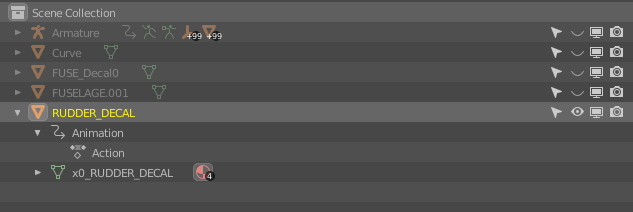


Divided, deleted everything unnecessary, left everything necessary. We rejoice for five minutes.
So. We have the object with animation ready. But not really. We will finish the animation later, but for now we will examine the clipping in the animated object. For example, a part of the logo, or a small decal with a registration number, is better cut to size than stretched over the entire size.
Example:
Part of Lufthansa rudder

Nosewheel Gear Door Registration number

We work in the same way as with statics. But! First, you need to position the objects correctly. For most animated objects, frame zero is the default state and we can work with them right away. But, for example, the rudder on frame zero is rotated to the left. To align it, you need to rewind 41 frames. On this frame, it is centered and stands exactly on all axes. In general, you yourself can experiment and look at the animation and the position of the objects (you will need it later to check the final result and that everything is correct with us)
Use the mouse wheel while holding down the ALT key to scroll the animation.
Cut out the object for all points except point 7. We do not need to create a new object. Instead, we’ll just delete the excess. At that moment, when you have cut out the surface and checked that everything is correct, without removing the selection, press the (A) key and select Invert Selection. You need to get out all the faces except the newly cut ones. After that, delete them. You should have only the cut surface of the rudder (see examples). Next, assign the material + UV mapping.
Important! For objects with animation, never apply CTRL + A → Apply All. This will break the animation. We leave it as it is. And let’s not combine them with static decals. They will be exported as separate nodes.
After that, turn on the display of all objects to check that everything is fine with us and everything works well. Let’s rotate the animation, rotate the camera. Let’s make sure that nothing disappears from the field of view and that it looks good.
I will now give an example of baking the rear wheel doors. Because there is a bone animation. To do this, we need to select a door. I emphasize again. So far, this applies only to the doors of the rear landing wheels. Most likely we will not cut out any of them. But suddenly there will be a livery with a colored bottom and you have to make decals for them. Well, if you want to make a really high-quality livery at the highest level. =) Otherwise, you can skip this point and just paint over the part of the fuselage responsible for these doors.
In fact, this is a very dreary process, since we have 12 doors (8 with bone animation) for a 747 Boeing. So I think it will be acceptable if you forget about these details and just paint over them.
“Anyway, no one will stare under the bottom of the plane” © Asobo Studios

So. Choosing a door. Press SHIFT + H to hide everything else. We turn on the display of everything from the parent in the outliner. Go to the animation tab and see. That there is NO animation.
[o.O] (WUT?!)
Yes. That’s all right. In order to display the animation, we need to turn on the upper parent Armature (only it and without Shift) and then we will see the entire bone animation.
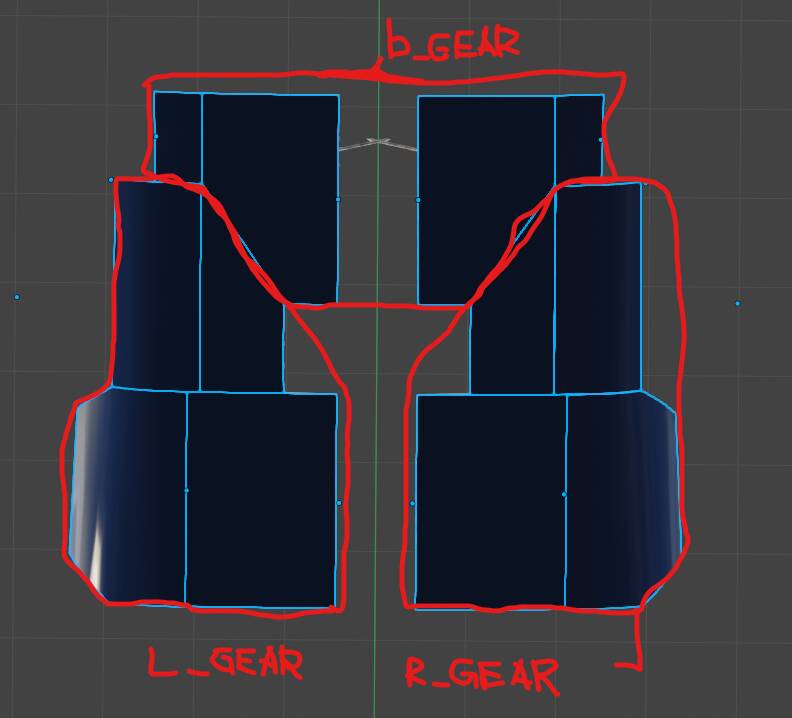
We are actually interested in b_gear (rear gear), r_gear (right gear), l_gear (left gear).
The animation for all is the same in length and equal to 1-621. And we will need to bake animation for all doors with these parameters.

To simplify the process, here is a picture of the animation bindings to the doors. We will need this later, because the name of the NLA tracks must be the same for the door group.
Then everything is simple. select the desired door decal. Object menu → Animations → Bake Action. Enter the parameters and click ok.
And so 12 times !!!
Well, for today I will finish the first part. I will give you time to comprehend and try to implement everything written. If you have any misunderstandings in the process, if possible, I am ready to help in my discord server. This is not the end, and in the coming days I will add the rest. How to correct the animation, how to prepare for export, the export itself, editing the exported files, merging models and, as a bonus, I’ll try to tell you how to optimize decals for different lodes.
Until then, if you like what I do. You can buy me coffee or buy me beer. Your choice = D