Hey VR pilots,
I’m writing this guide after almost two months of tweaking, testing and applying various setup schemes.
First of all, I would like to send out big thanks to @CptLucky8, @TheOriginalBabu and @TheFoyalais here in the forums as well as Steve Walton aka “VR Flight Sim Guy” and Jose Rick Rentas aka “theVRpilot” on Youtube. You guys are great guides and helped me (and likely many others) in getting FS rolling well in VR.
BUT WHY YET ANOTHER VR SETTINGS GUIDE?
- My approach is partially quite different to the most common guides.
- I’m blown away how sharp, detailed and smooth FS finally runs on my PC. I’m finally not changing any settings anymore for more than a week, because I just know THIS IS IT.
- I want to share this great FS in VR experience - seriously hoping to lift as many of you there as possible!
IN A NUTSHELL FOR PROs : WHAT IS DIFFERENT TO OTHER GUIDES HERE???
- Renderscale of 60% in game. Yes, you read right - and it’s still sharp and clear, but only with the super-sampling applied as per below!
- Clarity and great image sharpness achieved by a double super-sampling combo:
- Oculus PC app: Render resolution 3920x1984 (reads as 1.1x at 80hz)
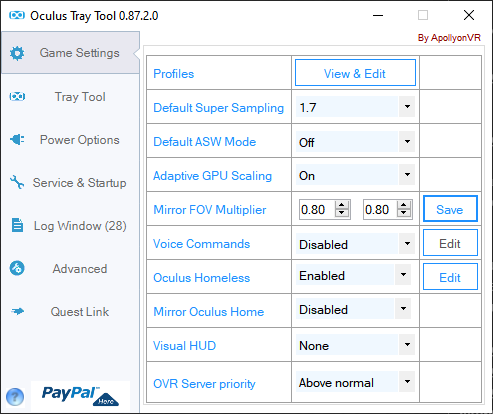
- Oculus Tray Tool: Default Super Sampling at 1.7
EDIT March 26th: after all recenet Oculus, Flight Sim and Nvidia updates, I can crank up the super-sampling to 1.9 in the Spitfire / C152 / Bush Plane type of aircraft, it’s running smooth and the clarity is just WOW! For broad stability across many systems, I recommend SS of 1.7 as a “safe harbor” now.
THE ABOVE 3 SETTINGS ARE THE CORE.
- After many tests and big hopes, I finally dropped Oculus ASW image-reprojection. It has great potential, but at this stage doesn’t run sustainable and clean enough (judder/jelly artifacts & stutters)
- Oculus Tray Tool: Mirror FOV Multiplier at 0.75 and 0.90 (big fps boost by an almost “invisible” FOV reduction) - please remember to reset and click on SAVE every time when restarting VR, even if the figures are saved, the actual setting in the runtime isn’t always persistent!
EDIT: A special chapter on the FOV (Field Of View) Settings
The right FOV-settings are very individual, depending on the face shape / forehead / how deep the eyes sit in the skull, IPD (Inter-Pupilar Distance), glasses yes/no, etc. Therefore I recommend testing the FOV reduction individually as per your vision and preference. The goal is to reduce the FOV as much as possible as it really helps on FPS performance. At the same time, we don’t want to introduce visible, straight horizontal and vertical borders to your vision as it’s very annoying to feel like looking through a square window or a cheap VR cardboard. The edges of your vision should remain round in order not to bother your brain.
This personal testing is best done in the Oculus home, looking straight forward. Please apply the above settings and roll your cursor above the Save button, but don’t press. Put on your headset, look straight and then press “Save”.
-
Horizontal FOV: If you notice straight vertical display borders at the right and left edges of your vision, you have to increase the first value, let’s say from 0.75 to 0.80. Check again. If you don’t see any borders even at 0.75, try reducing further down for as long as you notice the borders. Save the lowest-possible setting where the borders are still not noticeable.
-
Vertical FOV: same as above, just with regards to the second value and the boarders on top and bottom of the screen. Try reducing further as much as possible, but still without the visible “square” and save.
-
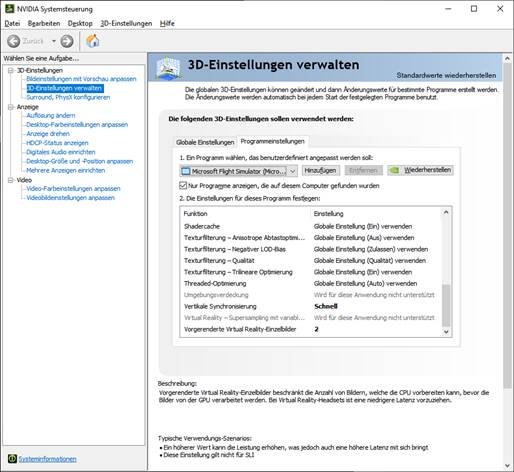
Nvidia Control Panel: ALL DEFAULT SETTINGS except for Vsync=Fast and VR pre-rendered frames=2!!! AGAIN: no “high performance” power plan, no “high performance” setting for texture filtering - just keep it at “quality”, no “low latency mode” etc. etc. - it’s all causing micros-stutters because of over-tweak - keep it simple and balanced to get it smooth, trust me - just the 2 settings as per screenshot below.
-
CPU Power Plan: go for “Balanced”, “AMD Ryzen Balanced” or similar. Don’t go for “highest performance”, QuickCPU, ProcessLasso’s “BitSum Highest Performance” etc. etc. - UNLESS YOU ENJOY MICRO-STUTTERS. Tweaking your PC to its limits makes it stumble! These stutters are very short, but they’re noticeable and there in almost every second - killing the immersion!
WHAT CAN I EXPECT BY APPLYING THESE SETTINGS?
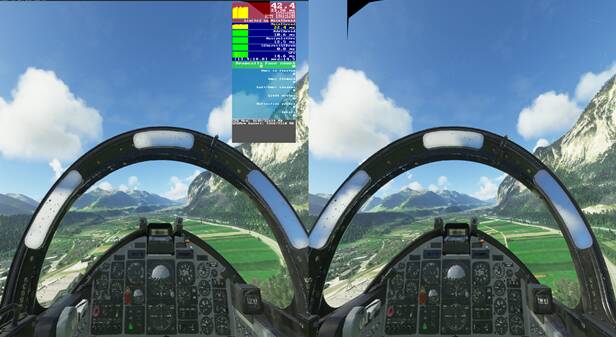
- A sharp and detailed picture, especially on all textures, clear cockpit instruments (even small EFIS fonts) and landscape.
- SMOOOOTHNESS! (As long as your PC dates not too many years back from mine): FS runs stable around 40-45 fps for me, thereby finally having enough headroom and the clarity and smoothness feel awesome.
- Disclaimer: of course things can get a bit slower in super-dense environments (e.g. NYC, the updated London, Tokyo etc.) or in heavy conditions like a storm and/or heavy air traffic or busy airports. But in an average flight, scouting in VFR or cruising in IFR, no matter where on earth - you should be able to fully enjoy the beauty of this breath-taking sim.
Once more on the core rendering settings being the “magic” of this guide: please try exactly this combination before tweaking on:
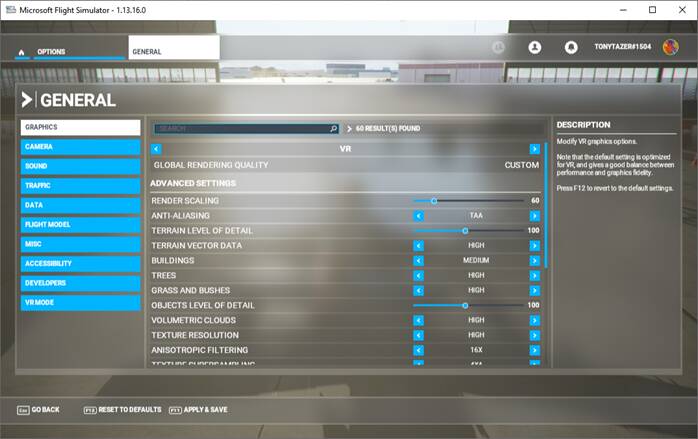
1. 60% renderscale in game, AND
2. Render resolution 3920x1984 in Oculus PC app, AND
3. Default Super Sampling at 1.7 in Oculus Tray Tool
Another Oculus “feature” and hint: you have to ensure Super Sampling in Oculus is really running at 1.7, not just showing as such in OTT as this setting also isn’t persistent. You have to (re)set it after having started Link and while in “Oculus Home” in VR. If you still use the standard Oculus home environment like me, you can easily check if it’s applied by looking in VR on the trees outside, right-hand. The distanced leaves should become very crisp and clear.
I have also tested many similar, close combinations like 70% renderscale and 1.5 ss, but they’re not as smooth and the image is not as “crisp”. There is a really special image crispiness that “clicks ON” when applying the above combination.
WHAT’S THE PRICE FOR THAT SMOOTHNESS? ANY TRADE-OFFS??
I acknowledge being blessed by a fresh and fairly strong PC, which is likely not the case for many. However, with me running now with 40-45fps, there is still plenty of headroom for other systems before you drop below the critical mark of 30fps - I hope at least! And when it comes to 3xxx users like me and others here and in FB-groups, many are still struggling a lot with poor performance - despite good hardware and because of a wrong configuration. I hope here to help this audience too.
And the trade-off?
Well, reducing render-scale in FS to 60% sounds harsh. However, the only really noticeable down-side are outlines/ contours of objects getting a bit of a “chiseled” look. One user called this precisely a “more pronounced aliasing”. You can mostly notice it on “wiry” structures like bridges, fences, antennas and also at the outlines of trees and buildings. Everything else is perfectly sharpened by the double super-sampling. Landscape textures, building textures, taxi signs, cockpit instruments - all really sharp! Believe me, it is a great deal for the overall quality and smoothness you get!
MY SPECS
- Ryzen 9 3900x
- ASUS TUF RTX 3080
- 32 GB DDR4 RAM @3200Mhz
- ASUS ROG STRIX B550-F Gaming
- 2TB M2 SSD
- Quest 2 64GB + Elite Strap + VR Cover face cover and Elite strap back foam pad (I highly recommend the last one for long-wear comfort)
- Logitech X56 HOTAS
- Nvidia driver: 461.92
- Oculus PC driver v26
- Latest Windows build, all updates, mainboard hardware drivers all updated
I am aware that my system is ranking in the higher 20% of PCs, but due to my headroom (40-45fps) I think satisfying results can also be achieved on many 2xxx cards or other strong veterans like a 1080Ti and also many other CPUs - some “older” Intels may go very well tool!
THE MOST IMPORTANT ASPECT TO MAKE THIS WORK
Please don’t pick and apply some settings and disregard others, thinking they might be irrelevant or you don’t trust they help. If you want to give my solution a serious try, please apply ALL settings from my screenshots as I’m totally sure that my results are achieved by this carefully configured combination. If you’re not satisfied afterwards it’s all back to your preferences, but please give this one a diligent try.
((e.g. I experienced that only slight deviation in the 3-factor render/super-sampling combo changes the image quality and/or performance drastically. Same when changing little settings like Nvidia’s texture filtering from default “quality” to “high performance” - just to complain minutes later about Asobo programming jittery and unclean textures… ;-))
OTHER CRUCIAL THINGS TO CONSIDER
- Please trust me on all “turbos”, been through all of that: All these GPU & CPU apps, over-tweaks and other snake-oils mostly don’t help at all, but often cause bad impacts to quality and overall smoothness. You perform maybe 1-3 fps better when tested in a long-term benchmark, but the trade-off is your PC constantly stumbling over its own pace or in other words: micro-stutter.
- Oculus Tray Tool (OTT) settings are fragile and the Quest 2 tends to revert back to defaults after sleep and/or Link restart. You have to manually re-apply them in OTT after each VR restart.
- Changing Super-sampling to 1.7 or the FOV values only works when in “Oculus Home” - not while in VR mode in FS. Don’t trust your main OTT settings like “ASW=off”. Even if the app shows “off” at start, ASW is in fact most-likely running on “Auto”. You have to select the drop-down and re-confirm the setting each time for it to take effect.
- Please close all browser windows, unnecessary apps and tray applications.
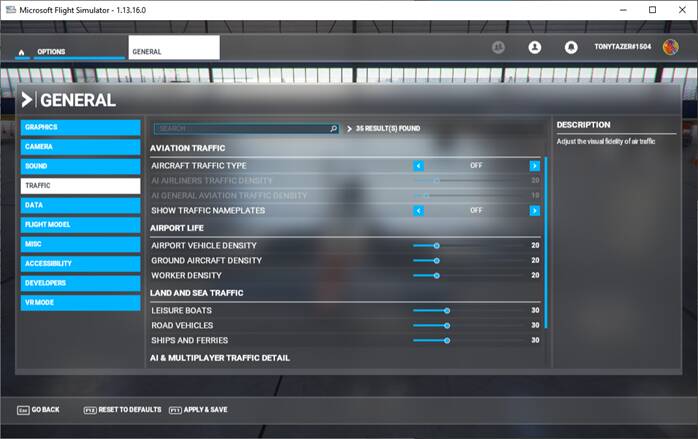
- Air traffic and online players are an awesome experience, but can also heavily impact performance / stutter. If I want a perfectly smooth flight I mostly go for the compromise and switch it off, especially if flying in very busy areas like Chicago. I know this may not be an option for many of you though…
- be mindful of real-time virus protection, it can impact performance. I use Malwarebytes and it’s not affecting FS performance, but Windows Defender and other tools may.
THE START PROCEDURE
Go in this order:
- Q2 can stay permanently connected with USB link cable, otherwise connect.
- start Windows
- start Oculus Tray Tool (OTT)
- put on headset
- confirm to activate link in your headset
- in OTT, “re-confirm”=reset manually all settings on the main tab, also click on the save button besides the FOV values again
- put off your Q2
- start FS
- once arrived in FS main menu, press CTRL+TAB to launch VR mode
- put on the headeset
- confirm/reset your headset position with SPACE
- you’re all set in VR. Get ready for takeoff!

WHAT IF IT STILL RUNS SLOW?
- In game: reduce graphics settings to medium/low. Primarily clouds, reflections, contact shadows, trees, cockpit refresh rate
- In OTT: Reduce super-sampling from 1.7 to 1.6 or 1.5 (remember you have to switch VR off and on in FS to take effect) - worst-case to 1.4
-
- VIRTUAL DESKTOP (VD) is also a great alternative to Oculus Link if you just can’t get it smooth. Link issues are often “linked” to USB 3.0 issues (cable/port/mainboard etc.). VD delivers also great quality and I plan to publish a separate guide for VD as I also have it running well, but let’s first see how this one goes…
- Check out this fantastic game settings guide which describes all features and their impact on performance in great detail:
FS2020 Graphics Settings and Performance Guide (SU12 Update) (7/26/2023)
WHAT IF IT RUNS SO SMOOTH THAT YOU FEEL YOU CAN AFFORD MORE??
With the latest FS and Oculus updates, FS seems running way more stable and clean. This is not just my personal experience, many VR pilots reporting better overall performance. So, if you feel you still have some spare FPS headroom (especially on a 3090 or similar) my recommendation for best-looking higher settings are:
- Before cranking anything else up: try increasing the Super-Sampling in OTT / ODT from 1.7 to 1.9. It works for me in certain planes like the awesome Spitfire and the image clarity looks just amazing!
- Try carefully increasing in-game Render Scale:
- 60% is still my recommended setting as it’s fail-safe in any conditions and across a wide spectrum of PCs
- 70% reduces the visible aliasing of edges, however funny-enough I find this setting overall a bit more blurry compared to the “crisp” 60%. I know it sounds crazy, but have a look yourself. And it runs noticeable slower than 60%
- 80% I’m happy for every pilot who can afford this setting, Great looks in the distance, no aliased edges.
- 100% welcome to FS visual heaven. And yet it still works for me sometimes, e.g. on a bush trip in the middle of nowhere, flying a simple bush plane. But it’s rather limited to work in simple conditions only…
- Clouds set to ULTRA look fantastic, but can get very fps-hungry, especially in heavy weather
- Reflections set to ULTRA look fantastic on water with just a fairly small fps-tradeoff
- Windshield set to ULTRA introduces nice inside-reflections on windows, but comes with a certain FPS-trade-off
COME ON - NOW ON WITH THE SLIDE SHOW!!!
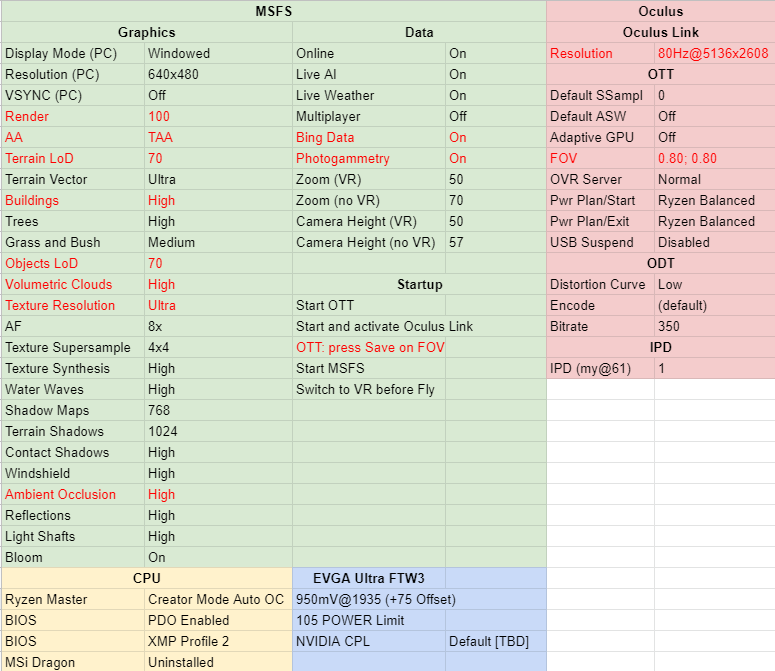
Here you go. Please try to reproduce this setup fully. I cannot guarantee it will all work as good on your setup, because PCs (and VR on top) are pretty complex and often quite fragile systems.
However, I’m very hopeful this works great for you guys, crossing fingers and will try my very best to reply to your questions, comments and findings.
Should WE find further tweaks really helping, I will of course include them in this guide. I’m just not that much into placebos and for now, I’m 100% happy with the results… ![]()
(sorry for screenshots partially in German, I hope you’ll figure it out!)
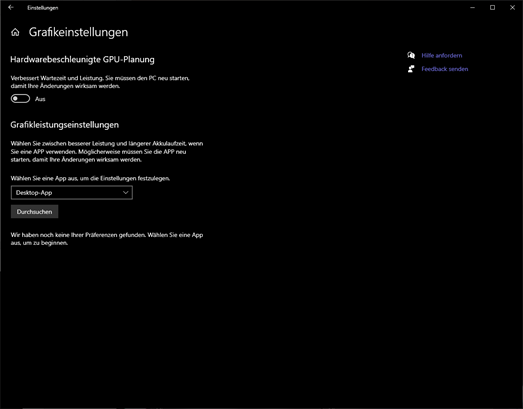
Nvidia Control Panel: ALL DEFAULT except for just 2 settings:
- Vsync=fast
- VR pre-rendered frames=2
Gamemode=ON (not that relevant tbh)
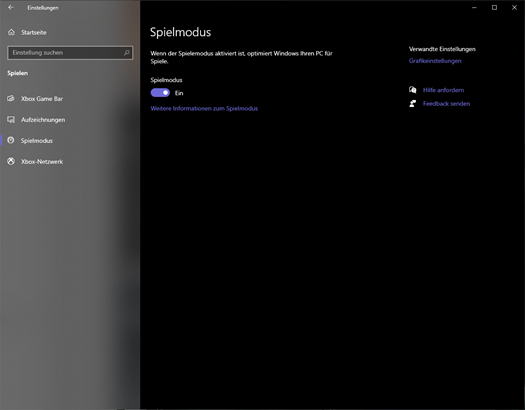
Rather switch HAGS off - it caused micro-stutters for me
IMPORTANT: Oculus PC app, Quest 2 config, just like this:
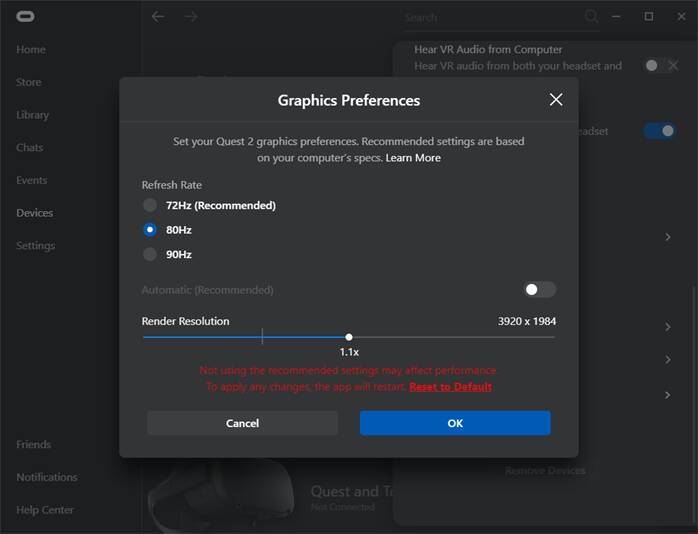
VERY IMPORTANT (you have to re-select all settings in Oculus Home to re-enable them on every VR restart):
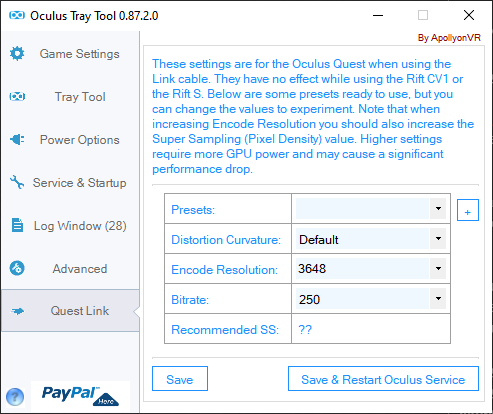
Important Update on the Bitrate Settings:
- For fast GPUs AND genuine / high-quality link cable & USB SS10 port with bandwidth >2MBps: set Bitrate to 500 AND in the Oculus Debug Tool set Dynamic Bitrate to OFF (awesome, flawless picture quality, looks like zero compression!!!)
- For moderate GPUs and not the fastest link cables: set Bitrate to 250
- For AIRLINK: you MUST set Bitrate to 0 for the sim to run in VR!
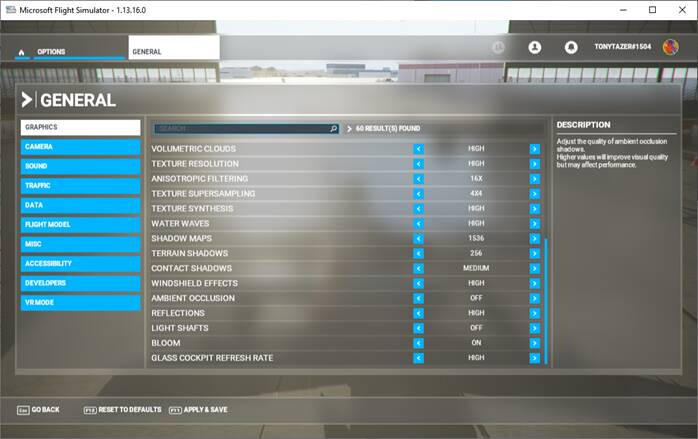
In-game settings: really thoroughly tested and carefully selected. My favorites are how contact shadows look on trees and grass, how dense trees, grass and waves look when set to “high”, I like crisp shadows. You may need to go much lower with shadow maps on older GPUs though.
Reducing the glass cockpit refresh rate to MEDIUM or LOW gives you some additional fps-boost, but I agree to multiple reports saying overall fps-smoothness suffers a bit by doing so. The sim feels a bit like “un-synced” then with tiny stutters… I therefore stick to “HIGH” for now.